Step into a world where the focus is keenly set on What To Do If Your Phone Won T Turn On. Within the confines of this article, a tapestry of references to What To Do If Your Phone Won T Turn On awaits your exploration. If your pursuit involves unraveling the depths of What To Do If Your Phone Won T Turn On, you've arrived at the perfect destination.
Our narrative unfolds with a wealth of insights surrounding What To Do If Your Phone Won T Turn On. This is not just a standard article; it's a curated journey into the facets and intricacies of What To Do If Your Phone Won T Turn On. Whether you're thirsting for comprehensive knowledge or just a glimpse into the universe of What To Do If Your Phone Won T Turn On, this promises to be an enriching experience.
The spotlight is firmly on What To Do If Your Phone Won T Turn On, and as you navigate through the text on these digital pages, you'll discover an extensive array of information centered around What To Do If Your Phone Won T Turn On. This is more than mere information; it's an invitation to immerse yourself in the enthralling world of What To Do If Your Phone Won T Turn On.
So, if you're eager to satisfy your curiosity about What To Do If Your Phone Won T Turn On, your journey commences here. Let's embark together on a captivating odyssey through the myriad dimensions of What To Do If Your Phone Won T Turn On.
Showing posts sorted by relevance for query What To Do If Your Phone Won T Turn On. Sort by dateShow all posts
Showing posts sorted by relevance for query What To Do If Your Phone Won T Turn On. Sort by dateShow all posts
Phone Won't Charge? Try This Easy DIY Toothpick Trick First
Phone Won't Charge? Try This Easy DIY Toothpick Trick First
You've plugged your iPhone or Android phone into its charger and... nothing's happened. From broken or rusted charging ports to damaged power cables, there are plenty of reasons your phone might not charge and not all of them can be easily fixed at home. A common reason for faulty charging is simply that your charging port, whether that's Lightning on the iPhone 13 or USB-C on phones like the Google Pixel 6 Pro is clogged with months' worth of pocket fluff and the cable can't quite fit in anymore.
Thankfully, this is one of the simplest and cheapest solutions to a charging problem. Here's how to fix it.
Why is my charging port blocked?
There are no covers on your phone's charging port, meaning they're exposed to every bit of dust, dirt and debris they encounter. Every time you slide your phone into your pocket your phone will be susceptible to pocket fluff and if, like me, you've got pockets filled with detritus from accidentally washing your jeans with old receipts in the pockets then that's asking for trouble. And that's to say nothing of the biscuit crumbs I have in there. Do not ask me why I have biscuit crumbs in my pockets.
Day by day, this won't be a problem but those tiny bits of dust and fluff will build up over the months or years you have your phone, compacting together each time you plug in your charging cable until it forms a solid barrier that stops your charger from going all the way in and allowing it to connect and charge.
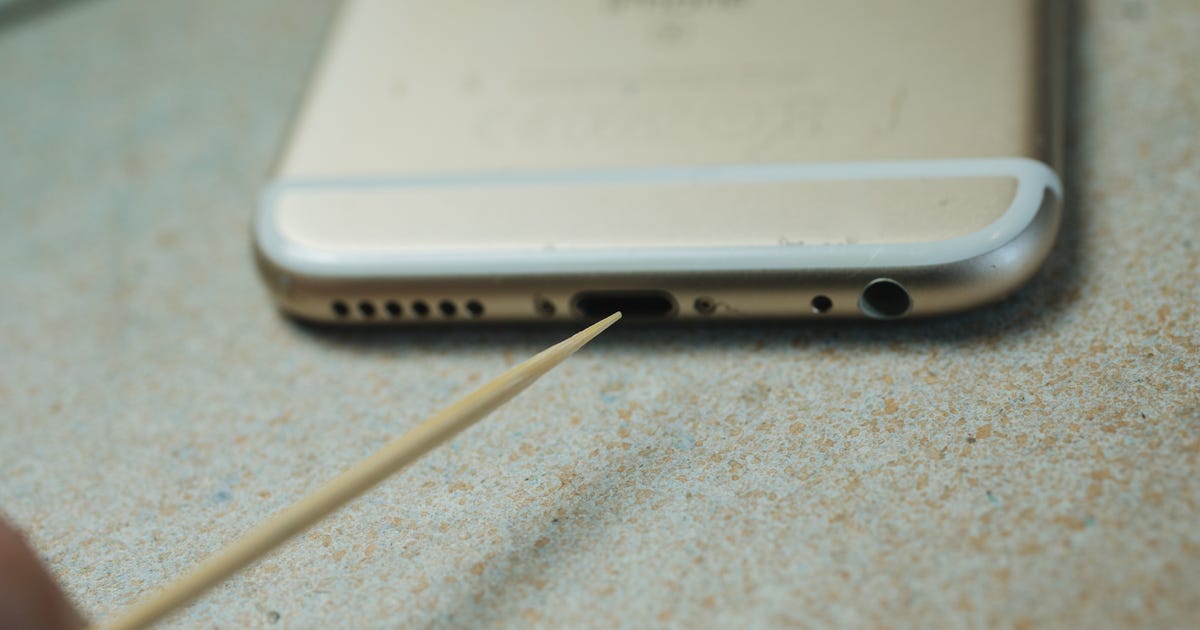
A wooden cocktail stick is a great tool for the job as the wood won't damage the internal parts.
Andrew Hoyle/CNET
If you've had your phone for more than six months and you're gradually finding the charger becoming less and less stable (particularly if you have to wiggle it around to get it to begin charging) then it's highly likely that dirt in your port is the culprit.
How to clean out your phone's charging port
It's a simple task to unclog your phone's port. You'll need a cocktail stick, toothpick or other thin item that you can poke in to the port to scrape out the grime. Wood or plastic is better as it's less likely to scrape against anything inside and potentially cause harm. I've done this using a metal SIM removal tool and while it worked well, it's not the safest option for your phone.
Insert your tool of choice into the charging port until it won't go further and gently start scraping away. With an iPhone's Lightning port you can scrape back and forth, but with USB-C you'll need to scrape around the charging connector, which sits in the middle of the port.
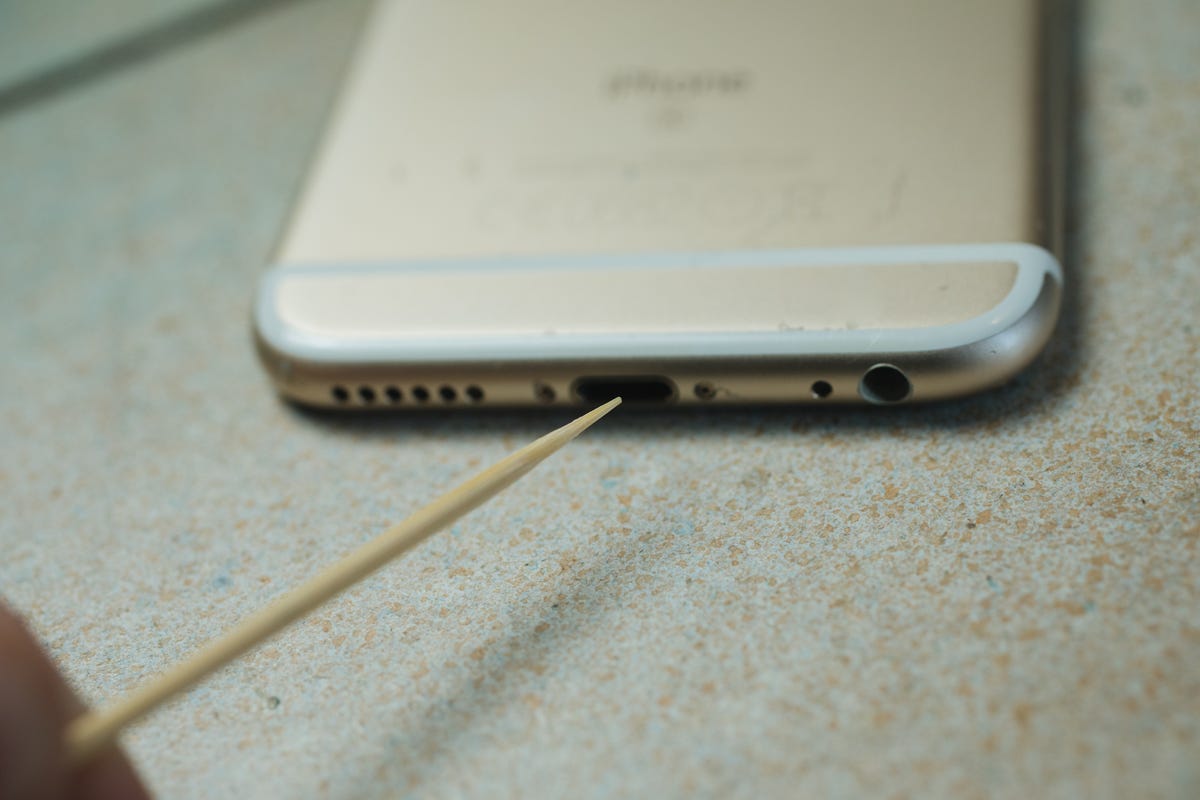
Get it in there.
Andrew Hoyle/CNET
Eventually you'll start to work the compacted debris loose and you'll be able to encourage the dislodged material out of the port. It's a satisfying process and you might be surprised at how much stuff actually comes out. Gently work on the sides of the port too, but be mindful not to scrape hard against any of the metal charging connectors.
Eventually you'll have pretty much all of it out. It's difficult to check for sure if you've gotten rid of it all as it's tricky to see inside the port, even if you have a good light to hand. But once you've got a good amount of nonsense out, you can try your charging cable again.
The satisfying removal of nonsense from your phone's charging port.
Andrew Hoyle/CNET
Hopefully it'll plug in more securely now and begin charging. If not, carry on trying to extract more dirt and then test the charger again. If that still doesn't solve the issue it's time to consider other solutions like a new cable or charger.
What is digital detox what is digital detoxification from traditional to digital how to take digitals here s how america uses its land here s how to cook the best shrimp ever here s how to make the best ham of your life here studio
Here's How a Digital Detox Will Benefit Your Mental Health
Here's How a Digital Detox Will Benefit Your Mental Health
We go about our day-to-day lives attached to our phones. They wake us up in the morning, and we check our emails and social media as soon as we open our eyes. We spend a big chunk of the day glued to a screen, be it a computer, laptop or phone. In fact, nearly half of smartphone users in the US say they can't imagine life without their phones.
According to a February 2021 survey, 46% of respondents said they spend an average of 5 to 6 hours a day on their phones for non-work-related use. Another study conducted by the US Bureau of Labor Statistics revealed that, on average, Americans spend around 3 hours a day watching TV.
It's safe to say that we've become heavily dependent on our phones for pretty much everything. But, how is the use of technology affecting our mental health? And what can we do to offset that dependency?
Many have turned to digital detoxes as a way to disconnect from technology. Research links digital detoxes to the improvement of depression symptoms, among other mental health benefits. Ready to try a digital detox? Here's what you need to know.
Morsa Images/Getty
What is a digital detox?
A digital detox is when you completely abstain or intentionally reduce your time using electronic devices like smartphones, computers, TVs and tablets. The idea of a digital detox is to disconnect from the online world to focus more on the present moment without distractions. The most common things people avoid during a digital detox include:
Emails
Text messages
Video games
Watching TV
Smartphones, tablets, laptops and computers
What is a social media detox?
Like a digital detox, a social media detox is when someone refrains from engaging with or using social media for a period of time or indefinitely to improve their mental health and well-being. It's one of the most popular forms of digital detox.
A quantitative study conducted on college students who underwent social media detoxes that lasted from one to seven days found that most students reported positive changes in mood, better productivity, improved sleep and reduced anxiety.
Another study published in the Journal of Social and Clinical Psychology found that limiting social media to 30 minutes a day can significantly improve one's overall well-being.
How social media affects mental health
There's no denying we benefit a lot from social media. Platforms like Facebook, Instagram, Twitter and TikTok keep us connected to friends and family while also serving as an outlet to find inspiring people. However, the constant comparison, fear of missing out and highly curated content we're exposed to on social media can come with some drawbacks.
A 2020 systematic review linked social media to detrimental effects on the mental health of its users. The same study found that those people's levels of anxiety and depression are affected by social media envy -- being envious of someone else's life as perceived on social media.
"Time spent scrolling through social media has the potential to promote unreasonable expectations as we see influencers posting an often filtered and edited version of their seemingly perfect lives. This can trigger feelings that others are having more fun or living better lives than you are, potentially causing a negative impact on your mental health. The increasing popularity of photo filters has also been linked to poor self-esteem and self-image as we manipulate our photos to change our reality online," says Myra Altman, who holds a PhD and is VP of Clinical Care at Modern Health.
Georgijevic/Getty
Benefits of a digital detox
There may be personal reasons to consider a digital detox. It could be that you feel like technology is a distraction, or you just need some time away from the stressors of the online world. Whatever the reason may be, you are sure to see many benefits from taking a break from technology.
Here are some of the most common benefits of a digital detox.
Reduced anxiety and depression
According to a recent study published in the journal Cyberpsychology, Behavior and Social Networking, a social media break of just a week can reduce anxiety and depression. The same study found causal evidence that even short breaks from social media can positively impact a person's overall well-being, life satisfaction and emotions.
Enhanced focus and increased productivity
This one should come as no surprise. When we are free from distractions, we allow ourselves to be more present. Mindless scrolling on social media, checking notifications on your phone and feeling the urge to reply immediately to emails are time consumers. When we set aside distractions, we allow more time to focus on our responsibilities.
Improved sleep
Disconnecting from electronic devices a few hours before going to sleep can significantly improve our quality of sleep. One study found that people who used social media before bed were more likely to have anxiety, insomnia and short sleep duration on weeknights.
Avoiding screen time before bed also reduces our exposure to blue light, which has been associated with disrupted sleep.
Meaningful connections in real life
Think about the last time you were anywhere alone at the doctor's office, standing in line at the grocery store or waiting for your friend at a table in a restaurant. How much of that time was spent glued to your phone? The answer is probably a lot.
A small 2019 study found that smartphones alter the fabric of social interactions. In the experiment, a group of strangers was put in a waiting room with or without their phones. The study found that those who had their phones present were less likely to smile at someone compared to those without a phone.
Setting your phone aside can help you stay engaged with those around you.
Luis Alvarez/Getty
More time for things that bring you joy
Have you ever thought about how many times a day you pick up your phone to check your emails, respond to messages and check social media? According to a survey conducted by Asurion, a global tech care company, respondents checked their phones on average 96 times a day. To put that in perspective, that's once every 10 minutes.
"One reason to consider a social media detox is to regain authority in your life and time. Many people find themselves scrolling for hours a day and then feel unproductive, leading to anxiety and depression. A detox can help put a pause on social media consumption and allow you to regain interest in other hobbies that bring happiness. The detox can also allow you the time you need to be with those you love in real life," says Raghu Kiran Appasani, MD Psychiatry and Founder and CEO of The MINDS Foundation.
Signs that you might need a break from technology
If you made your way to this page, chances are you are already considering a digital detox -- which is a sign itself that you might need a break from your electronic devices. The best way to know you need a digital detox is to check in with yourself and see how interacting with social media and technology makes you feel.
If you feel any of the following when engaging with the online world, it's time to say goodbye (for now) to technology:
Anxiety, stress or depression after checking social media
Social withdrawal
Urge to check your phone every few minutes
Trouble concentrating and staying focused on the task at hand
Imposter syndrome or feeling insecure about where you are in life
Disrupted sleep
Feeling obligated to respond immediately to emails and text messages
How to do a digital detox
If you're ready for a digital detox challenge but aren't sure where to start, we got you. It's important to remember why you're detoxing from your digital devices in the first place. The goal is to create boundaries that ensure you're using technology in a way that benefits and works for you. Ultimately, you want to feel good about the time you are dedicating online.
Set realistic goals
A digital detox can be anything you want it to be. It can be refraining from using any type of technology, disconnecting from social media or just limiting daily screen time. The most important thing to keep in mind is that whatever you want to achieve has to be realistic. For example, if your work requires you to be in front of a computer all day, it may not be wise to set a goal that won't allow you access to your computer. Instead, you can opt to set screen time limits on your free time.
Create healthy boundaries and limits
Sometimes disconnecting completely from electronic devices isn't possible, but setting boundaries is a great way to limit how much time we spend on electronic devices.
Here are some ideas of other times you can create limits for:
When working out: If you want to get the most out of your workout, try to avoid any distractions. If you like to listen to music while doing so, you can download your music beforehand and set your phone to airplane mode so that you don't get any notifications.
Before going to sleep: Smartphones were designed to keep us alert and productive, so the last thing we want is to bombard our brains with more information. Sleep experts recommend cutting off screen time 30 minutes to 1 hour before bed.
When waking up: You never know what you will encounter when you look at your phone. Seeing bad news as soon as you wake up can trigger your stress response and leave you feeling anxious all day. Allow yourself some time to wake up without outside distractions and enjoy the present moment.
While enjoying a meal: If you're scrolling through your phone while you eat, you may not be aware of how much you are eating and miss your body's cue that it is full. Instead, you can practice mindful eating and savor every moment of your meal.
When spending time with the people you love: It's good to keep your phone away or silent when socializing and spending time with people. When you limit your distractions, you can have deeper and more meaningful conversations.
Occupy yourself with things that nourish your mind and body
You've decided to do a digital detox, you put away your phone, now what? It's easy to give in to checking your phone if you are bored, so you'll want to fill in this extra time with things that make you feel good.
If you are having a hard time figuring out what to do with your extra time, here are some ideas.
Pick up a new hobby, something you've always wanted to try.
Go for a walk or a hike
Call a family member you haven't talked to in a while
Go for coffee with a friend
Read a new book (or reread your favorite one)
Journal about how you're feeling right now
Volunteer at a local charity that is doing important work
Learn to cook a new recipe
Sign up for an exercise class like kick-boxing, yoga or pilates
Meditate or practice mindful breathing
Klaus Vedfelt/Getty
Reward yourself for following through
It's easier to stay motivated when looking forward to something, so take this opportunity to celebrate your wins by rewarding yourself. It doesn't have to be something grand (though it can be if you want); it can be as simple as cooking your favorite meal or taking yourself out to the movies. Whatever you decide your reward should be, make sure it's something that excites you.
Tips for your digital detox
Some people will find it fairly easy to disconnect from digital devices, while others may find it more challenging. Luckily, there are some things you can do before you go off the grid to ensure that you have a successful digital detox.
If you're doing a social media detox, delete the apps from your phone and sign out from your account on your computer, laptop or tablet.
Let your friends and family know about your detox and the best ways for them to contact you and provide support.
Schedule activities to keep you busy beforehand.
Track your progress. You can write down how you're feeling each day, seeing tangible progress may keep you motivated.
Mute or turn off notifications on your phone and computer
Designate tech-free zones in your house, like your bedroom or dining room.
Remember why you started. If you feel the need to check your phone throughout your detox, think of how you felt before starting and why you decided to take a break.
Be patient with yourself
Deciding to disconnect from the digital world can make you feel anxious or even scared of missing out on important things, and it's okay to feel that way. As the days go by, you'll start to feel better about yourself and have a deeper understanding of your relationship with technology. Take the time to enjoy being present and do things that bring you happiness.
The information contained in this article is for educational and informational purposes only and is not intended as health or medical advice. Always consult a physician or other qualified health provider regarding any questions you may have about a medical condition or health objectives.
The sandman netflix show the sandman netflix release the sandman movie netflix the sandman his sea stories hit the sandman sandman history is the sandman a hit the sandman imdb the sandman season 2
'The Sandman' Hits Netflix Today: 9 TV Tips to Get the Best Watching Experience
'The Sandman' Hits Netflix Today: 9 TV Tips to Get the Best Watching Experience
What's happening
Picture settings on your new TV might not be ideal right out of the box.
Why it matters
Getting the best image possible out of your TV will make all your shows and movies pop.
What's next
We break down all the settings you'll need to adjust to get the best picture quality.
Netflix's adaptation of Neil Gaiman's The Sandman comes out today. But before you get too cozy on the couch watching the king of dreams, there are a few TV picture settings you'll want to change to get the best possible viewing experience.
Believe it or not, your TV doesn't always come looking its best right out of the box. It may be surprising, but the default settings that your TV uses before you make any changes don't always deliver optimal performance. If you want the best out of your TV, especially as you prepare to watch this fantasy series based on the popular DC comic, you'll likely need to make a few adjustments to your picture settings.
That's exactly what we do here at CNET as part of our TV review process. We immediately dig into the menus to adjust the picture settings to make sure the televisions we're testing have optimal picture quality.
Fortunately, you don't have to be an expert to get your TV looking great. Every TV has numerous adjustment options, including different picture modes and controls for brightness, backlight, sharpness, smoothing and more, that you can change to improve the TV shows, movies and video games you watch every day.
We've broken down all the settings you might need to tweak to get the best picture out of your TV. Just keep in mind that picture setting names can vary from one manufacturer to another. A setting that one TV company calls "brightness," for example, could control something totally different on another television. We tackle a lot of the variations below, but we can't account for every TV maker, especially when it comes to older models.
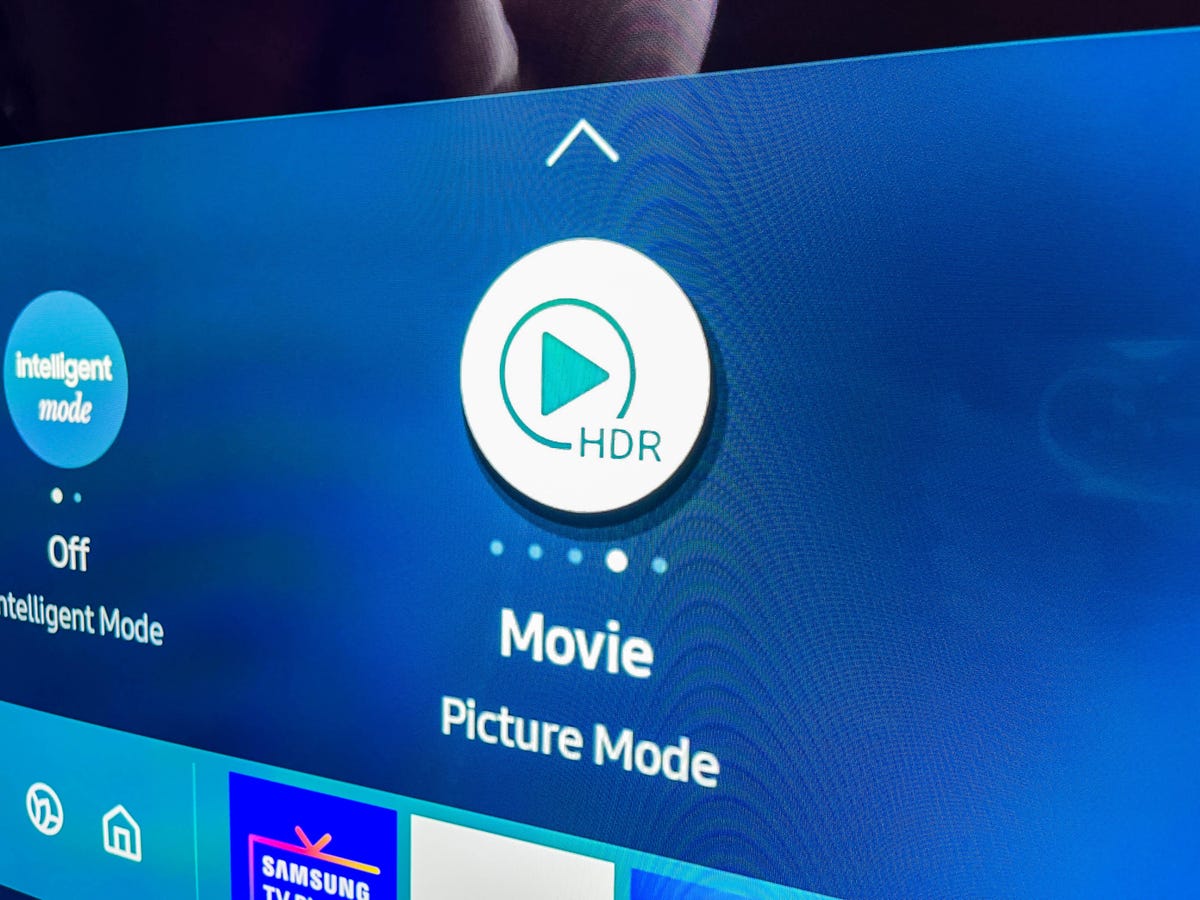
Start with the right picture mode
Your TV's picture mode has the largest effect on overall picture quality. This one setting controls multiple other settings to change the overall "look" of your TV. If you've never changed this setting it's probably still the default mode, typically labeled Standard, Vivid, Dynamic, Bright or something similar. The TV is usually at its least accurate in this mode, with typically blown-out colors and image "enhancing" features that might catch the eye on a shelf in a store, but at home might make the TV look worse than it could.
The easiest way to get accurate color? Put your TV in Movie or Cinema mode.
Sarah Tew/CNET
A place to start is switching to the mode called Cinema, Movie, Calibrated or Filmmaker. These will dial back some of the picture's more garish aspects. At first, the TV might even look soft or too warm ("reddish"). We'll discuss below why that is, but for now trust that you're actually seeing more fine detail, and the image is more lifelike.
Read more: What's the Best Picture Mode?
Let's move on to some specific controls.
Backlight or OLED light
Controls the light intensity of the entire display
Too high and it can cause headaches or eye strain, waste energy and, in some cases, cause premature wear on the TV
Too low and the image is too dim and difficult to see
Nearly all TVs will have some control that adjusts the overall light output of the TV. It's usually labeled as the backlight control, or OLED light, or something similar. On newer Sony TVs this setting is labeled Brightness, and on Roku TVs there are five settings (Brightest to Darkest) in addition to a backlight control. Whatever the label, this setting is the actual brightness, which is generally separate from the control labeled "Brightness" (see below).
You should adjust this setting based on room lighting and personal preference. Brighter rooms and daylight viewing will call for a higher setting, while home theater or nighttime viewing often looks better at a lower setting. On an LCD TV, a bright backlight can wash out the image somewhat and reduce contrast and pop, especially on models that lack full array local dimming.
The brighter the TV is, the more energy it will consume, if you're concerned about how much electricity you use. Higher brightness also makes OLED TVs somewhat more susceptible to image retention and burn-in -- although that's unlikely with typical viewing habits, even at maximum brightness.
Read more: OLED Screen Burn-In: What You Need to Know in 2022
Contrast
On the left, what the image of some friendly beachside 'roos should look like. On the right, when the contrast control is set too high. Notice the lack of detail in the sand and how the clouds are blown out.
Geoffrey Morrison/CNET
Controls the white or bright parts of an image
Too high will erase detail from clouds, snow and other bright objects
Too low will look dim and flat
The contrast control adjusts how bright the bright parts of the image are. There is an upper limit, however. If you set the control too high, it "clips" the whites, making near-white details totally white. This effectively erases any detail in bright objects like clouds without making the image actually brighter.
To set contrast by eye, you'll need something with a lot of bright areas of the image. Baseball works pretty well for this -- a fly ball, pop fly, home runs, something with shots of the sky -- or skiing (depending on season, clearly) or something with clouds. What you're looking for is a bright image, but still with highlight detail. In other words, the bright areas of the image still have detail, and aren't just awash in white.
Once you've found something you think will work, turn the contrast control up until you start losing detail. Clouds will cease being clouds, snow will just be glare. Now turn the control back down till you see detail again. Somewhere in this range will be ideal. Since all content is a little different you might need to tweak it a bit as you watch other shows/movies.
Don't want to mess with all that? Just leave it at the default for the Movie or Cinema setting.
Brightness or black level
On the left, what the teahouse should look like. On the right, when the brightness control is set too low. Notice how the shadows disappear completely.
Geoffrey Morrison/CNET
Controls the black or dark parts of an image
Too high will look flat and washed out
Too low will erase detail in shadows and dark areas of the image
On most TVs, the brightness control doesn't actually control the TV's "brightness." Instead, it adjusts how dark the darkest parts of the image are. Like with contrast, there's a fine line between too high and too low. In this case, too high and the image will appear washed out. Too low and all shadows will disappear into black. (On newer Sony TVs, this control is labeled Black Level.)
A closeup from the image above. Notice how you can't see anything in the shadows in the image on the right.
Geoffrey Morrison/CNET
To set brightness, you're looking for the opposite type of content from contrast. Dark movies, like Aliens or The Dark Knight, are perfect for this. Some famously dark TV episodes might be too dark to use for this.
Turn the Brightness control down until everything disappears into blackness (or something close). From there, turn it back up so you can see detail in everything, but the image doesn't look washed out. Another test for this is a darker scene with someone with long hair. The underside of their hair (I don't know what people with hair call it) away from the light can be a good place to spot shadow detail -- also dark coats at night. Again, you might need to try a few different shows or movies to get it right.
Sharpness
On the left, the original image of the walls of Tallinn. On the right, what it could look like if you set the sharpness control too high.
Geoffrey Morrison/CNET
Controls artificial edge enhancement, not image sharpness
Too high erases image detail, adds a halo to fine lines
Depending on the TV, set to 0 there's no effect, or a slight softening
Believe it or not, the sharpness control doesn't really improve sharpness. In a way it improves apparent sharpness, but at the expense of actual fine detail and usually with additional noise. On nearly all TVs the sharpness control adds "edge enhancement," artificially accentuating any edges the TV finds in the image. The problem is, doing this hides the actual detail in the image, so the result looks more artificial with less actual detail.
A close-up of the example above. Note the extra noise and artificial "halo" around the spires on the right.
Geoffrey Morrison/CNET
So it may seem counterintuitive, but you should turn the sharpness control down, way down. Some TVs look best with the control at 0. Others look best within the first 10% or so of this control's range. If you're used to how your TV looks with the sharpness control way up, as it typically is in the Dynamic or Vivid modes, it might appear soft at first when you turn it down. Find some high-quality 4K content and you might be surprised how detailed it now looks. You should be able to find the sweet spot on your TV looking closely for textures in clothing, wrinkles in faces, hair and beards, that kind of thing.
Read more: Why You Need to Turn Down Your TV's Sharpness Control
Color and tint
Controls color saturation and red-green shift
A holdover from the analog TV days
Generally will be correct, or close enough, out of the box
Generally, the color and tint controls will be reasonably close to correct out of the box, especially in Cinema or Movie mode. You can experiment with their effects, but it's rare they're off by more than one or two steps in either direction.
At the top, the color temperature is set too low, or warm. At the bottom, it's set too high, or cool.
Geoffrey Morrison/CNET
Color temperature or white balance
Controls how warm or cool the image looks
Too high and the image will be too blue
Too low and the image will be too red
Color temperature is a difficult one. Your brain gets used to the color temp of your TV, so if you change it, it's going to seem "wrong." In fact, this is probably the first thing you'll notice if you switch to the Cinema or Movie mode. It's going to look too warm or "reddish." On most TVs, this is actually the most accurate and lifelike. Your TV has been lying to you for years!
Switch to your TV's warm color temperature mode and watch it for a few days. If it still seems off to you, try the standard mode. I promise the cool mode will look far too blue once you get used to warm.
Check out my article on color temp and why it matters for more info.
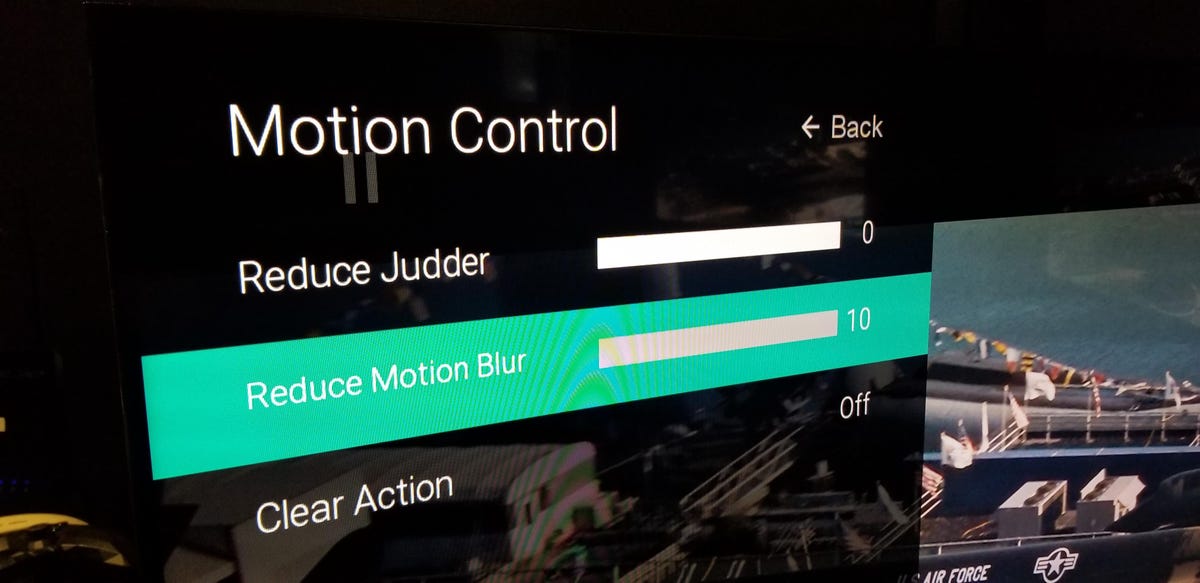
Motion interpolation or smoothing (the soap opera effect)
David Katzmaier/CNET
Controls how "smooth" motion is by artificially creating new frames of video
Too high, or even enabled at all, it can be annoying to some
Too low and the TV might appear soft with motion, such as sports
As TV settings go, motion interpolation is a rather controversial topic. Many people, including film purists and pretty much everyone who works in Hollywood, hate it. It makes movies look like a cheap soap opera or a video you'd shoot on your phone. If you've ever looked at a new TV and just felt something was off, or the image just didn't look real, it's probably this. Some people like it, but a lot of people don't. Your new TV almost certainly has this feature turned on in non-Cinema or Movie modes. Turning it off might change how you feel about your purchase.
Read more: Tom Cruise Wants You to Turn Off Soap Opera Effect. Here's How
Game mode
Reduces input lag, or how long it takes for your input to register onscreen
Usually disables features that might make the image better
Useful for any game that requires timing or aiming, especially online multiplayer
Input lag is how long it takes for you to press a button on a game controller and then to have an onscreen effect in the game. For many people this delay, measured in milliseconds, isn't noticeable. For others, especially with certain types of games, it can make a massive difference. From jumping puzzles to pixel-perfect aim in a first-person shooter, getting the timing right in many games is crucial.
Minimizing input lag, usually via a feature called game mode, can make a significant difference. If you've bought a new TV and suddenly your scores and rankings have dropped, this might be why. It's not something you want to leave enabled all the time, since it usually disables processing features that can improve the TV's picture quality.
Some TVs and consoles now support switching to this mode automatically.
Further steps
As mentioned above, the next step to fine-tuning your TV to perfection is getting a setup disc. The Spears & Munsil disc is a great option because it gets you right to the patterns without any extraneous fluff. If you just want someone else to do it, ideally with specialized test equipment, see if there are any TV calibrators in your area.
Lastly, make sure any sources you have, like a streaming stick or a cable or satellite box, are set to your TV's resolution (4K for 4K TVs, etc). Generally speaking they should do this automatically, but it's worth digging into the settings to be sure. Your 4K TV won't look its best without 4K content. You might need to pay for a higher tier to get that, depending on the service.
Lastly, HDMI. Chances are whatever HDMI cables you have are fine. If you try to send 4K from a media streamer and it doesn't work, it's possible your HDMI cables can't handle the additional resolution. But new HDMI cables are cheap. If your TV is getting the resolution you want from your sources, new HDMI cables won't make the image look or sound better, so you can save your money.
For more, check out CNET's lists of the best 55-inch, 65-inch and 75-inch TVs you can buy. You can also take a look at the best 4K TVs available.
As well as covering TV and other display tech, Geoff does photo tours of cool museums and locations around the world, including nuclear submarines, massive aircraft carriers, medieval castles, airplane graveyards and more.
You can follow his exploits on Instagram and YouTube, and on his travel blog, BaldNomad. He also wrote a bestselling sci-fi novel about city-size submarines, along with a sequel.
The sandman his sea stories the sandman historia the sandman histoire the sandman his farm stories hit the sandman sandman songs 1960 hits sandman history the sandman netflix the sandman cast the sandman tv series the sandman imdb the sandman season 2 the sandman hotel the sandman netflix cast
'The Sandman' Hits Netflix Today: 9 TV Tips to Get the Best Watching Experience
'The Sandman' Hits Netflix Today: 9 TV Tips to Get the Best Watching Experience
What's happening
Picture settings on your new TV might not be ideal right out of the box.
Why it matters
Getting the best image possible out of your TV will make all your shows and movies pop.
What's next
We break down all the settings you'll need to adjust to get the best picture quality.
Netflix's adaptation of Neil Gaiman's The Sandman comes out today. But before you get too cozy on the couch watching the king of dreams, there are a few TV picture settings you'll want to change to get the best possible viewing experience.
Believe it or not, your TV doesn't always come looking its best right out of the box. It may be surprising, but the default settings that your TV uses before you make any changes don't always deliver optimal performance. If you want the best out of your TV, especially as you prepare to watch this fantasy series based on the popular DC comic, you'll likely need to make a few adjustments to your picture settings.
That's exactly what we do here at CNET as part of our TV review process. We immediately dig into the menus to adjust the picture settings to make sure the televisions we're testing have optimal picture quality.
Fortunately, you don't have to be an expert to get your TV looking great. Every TV has numerous adjustment options, including different picture modes and controls for brightness, backlight, sharpness, smoothing and more, that you can change to improve the TV shows, movies and video games you watch every day.
We've broken down all the settings you might need to tweak to get the best picture out of your TV. Just keep in mind that picture setting names can vary from one manufacturer to another. A setting that one TV company calls "brightness," for example, could control something totally different on another television. We tackle a lot of the variations below, but we can't account for every TV maker, especially when it comes to older models.
Start with the right picture mode
Your TV's picture mode has the largest effect on overall picture quality. This one setting controls multiple other settings to change the overall "look" of your TV. If you've never changed this setting it's probably still the default mode, typically labeled Standard, Vivid, Dynamic, Bright or something similar. The TV is usually at its least accurate in this mode, with typically blown-out colors and image "enhancing" features that might catch the eye on a shelf in a store, but at home might make the TV look worse than it could.
The easiest way to get accurate color? Put your TV in Movie or Cinema mode.
Sarah Tew/CNET
A place to start is switching to the mode called Cinema, Movie, Calibrated or Filmmaker. These will dial back some of the picture's more garish aspects. At first, the TV might even look soft or too warm ("reddish"). We'll discuss below why that is, but for now trust that you're actually seeing more fine detail, and the image is more lifelike.
Read more: What's the Best Picture Mode?
Let's move on to some specific controls.
Backlight or OLED light
Controls the light intensity of the entire display
Too high and it can cause headaches or eye strain, waste energy and, in some cases, cause premature wear on the TV
Too low and the image is too dim and difficult to see
Nearly all TVs will have some control that adjusts the overall light output of the TV. It's usually labeled as the backlight control, or OLED light, or something similar. On newer Sony TVs this setting is labeled Brightness, and on Roku TVs there are five settings (Brightest to Darkest) in addition to a backlight control. Whatever the label, this setting is the actual brightness, which is generally separate from the control labeled "Brightness" (see below).
You should adjust this setting based on room lighting and personal preference. Brighter rooms and daylight viewing will call for a higher setting, while home theater or nighttime viewing often looks better at a lower setting. On an LCD TV, a bright backlight can wash out the image somewhat and reduce contrast and pop, especially on models that lack full array local dimming.
The brighter the TV is, the more energy it will consume, if you're concerned about how much electricity you use. Higher brightness also makes OLED TVs somewhat more susceptible to image retention and burn-in -- although that's unlikely with typical viewing habits, even at maximum brightness.
Read more: OLED Screen Burn-In: What You Need to Know in 2022
Contrast
On the left, what the image of some friendly beachside 'roos should look like. On the right, when the contrast control is set too high. Notice the lack of detail in the sand and how the clouds are blown out.
Geoffrey Morrison/CNET
Controls the white or bright parts of an image
Too high will erase detail from clouds, snow and other bright objects
Too low will look dim and flat
The contrast control adjusts how bright the bright parts of the image are. There is an upper limit, however. If you set the control too high, it "clips" the whites, making near-white details totally white. This effectively erases any detail in bright objects like clouds without making the image actually brighter.
To set contrast by eye, you'll need something with a lot of bright areas of the image. Baseball works pretty well for this -- a fly ball, pop fly, home runs, something with shots of the sky -- or skiing (depending on season, clearly) or something with clouds. What you're looking for is a bright image, but still with highlight detail. In other words, the bright areas of the image still have detail, and aren't just awash in white.
Once you've found something you think will work, turn the contrast control up until you start losing detail. Clouds will cease being clouds, snow will just be glare. Now turn the control back down till you see detail again. Somewhere in this range will be ideal. Since all content is a little different you might need to tweak it a bit as you watch other shows/movies.
Don't want to mess with all that? Just leave it at the default for the Movie or Cinema setting.
Brightness or black level
On the left, what the teahouse should look like. On the right, when the brightness control is set too low. Notice how the shadows disappear completely.
Geoffrey Morrison/CNET
Controls the black or dark parts of an image
Too high will look flat and washed out
Too low will erase detail in shadows and dark areas of the image
On most TVs, the brightness control doesn't actually control the TV's "brightness." Instead, it adjusts how dark the darkest parts of the image are. Like with contrast, there's a fine line between too high and too low. In this case, too high and the image will appear washed out. Too low and all shadows will disappear into black. (On newer Sony TVs, this control is labeled Black Level.)
A closeup from the image above. Notice how you can't see anything in the shadows in the image on the right.
Geoffrey Morrison/CNET
To set brightness, you're looking for the opposite type of content from contrast. Dark movies, like Aliens or The Dark Knight, are perfect for this. Some famously dark TV episodes might be too dark to use for this.
Turn the Brightness control down until everything disappears into blackness (or something close). From there, turn it back up so you can see detail in everything, but the image doesn't look washed out. Another test for this is a darker scene with someone with long hair. The underside of their hair (I don't know what people with hair call it) away from the light can be a good place to spot shadow detail -- also dark coats at night. Again, you might need to try a few different shows or movies to get it right.
Sharpness
On the left, the original image of the walls of Tallinn. On the right, what it could look like if you set the sharpness control too high.
Geoffrey Morrison/CNET
Controls artificial edge enhancement, not image sharpness
Too high erases image detail, adds a halo to fine lines
Depending on the TV, set to 0 there's no effect, or a slight softening
Believe it or not, the sharpness control doesn't really improve sharpness. In a way it improves apparent sharpness, but at the expense of actual fine detail and usually with additional noise. On nearly all TVs the sharpness control adds "edge enhancement," artificially accentuating any edges the TV finds in the image. The problem is, doing this hides the actual detail in the image, so the result looks more artificial with less actual detail.
A close-up of the example above. Note the extra noise and artificial "halo" around the spires on the right.
Geoffrey Morrison/CNET
So it may seem counterintuitive, but you should turn the sharpness control down, way down. Some TVs look best with the control at 0. Others look best within the first 10% or so of this control's range. If you're used to how your TV looks with the sharpness control way up, as it typically is in the Dynamic or Vivid modes, it might appear soft at first when you turn it down. Find some high-quality 4K content and you might be surprised how detailed it now looks. You should be able to find the sweet spot on your TV looking closely for textures in clothing, wrinkles in faces, hair and beards, that kind of thing.
Read more: Why You Need to Turn Down Your TV's Sharpness Control
Color and tint
Controls color saturation and red-green shift
A holdover from the analog TV days
Generally will be correct, or close enough, out of the box
Generally, the color and tint controls will be reasonably close to correct out of the box, especially in Cinema or Movie mode. You can experiment with their effects, but it's rare they're off by more than one or two steps in either direction.
At the top, the color temperature is set too low, or warm. At the bottom, it's set too high, or cool.
Geoffrey Morrison/CNET
Color temperature or white balance
Controls how warm or cool the image looks
Too high and the image will be too blue
Too low and the image will be too red
Color temperature is a difficult one. Your brain gets used to the color temp of your TV, so if you change it, it's going to seem "wrong." In fact, this is probably the first thing you'll notice if you switch to the Cinema or Movie mode. It's going to look too warm or "reddish." On most TVs, this is actually the most accurate and lifelike. Your TV has been lying to you for years!
Switch to your TV's warm color temperature mode and watch it for a few days. If it still seems off to you, try the standard mode. I promise the cool mode will look far too blue once you get used to warm.
Check out my article on color temp and why it matters for more info.
Motion interpolation or smoothing (the soap opera effect)
David Katzmaier/CNET
Controls how "smooth" motion is by artificially creating new frames of video
Too high, or even enabled at all, it can be annoying to some
Too low and the TV might appear soft with motion, such as sports
As TV settings go, motion interpolation is a rather controversial topic. Many people, including film purists and pretty much everyone who works in Hollywood, hate it. It makes movies look like a cheap soap opera or a video you'd shoot on your phone. If you've ever looked at a new TV and just felt something was off, or the image just didn't look real, it's probably this. Some people like it, but a lot of people don't. Your new TV almost certainly has this feature turned on in non-Cinema or Movie modes. Turning it off might change how you feel about your purchase.
Read more: Tom Cruise Wants You to Turn Off Soap Opera Effect. Here's How
Game mode
Reduces input lag, or how long it takes for your input to register onscreen
Usually disables features that might make the image better
Useful for any game that requires timing or aiming, especially online multiplayer
Input lag is how long it takes for you to press a button on a game controller and then to have an onscreen effect in the game. For many people this delay, measured in milliseconds, isn't noticeable. For others, especially with certain types of games, it can make a massive difference. From jumping puzzles to pixel-perfect aim in a first-person shooter, getting the timing right in many games is crucial.
Minimizing input lag, usually via a feature called game mode, can make a significant difference. If you've bought a new TV and suddenly your scores and rankings have dropped, this might be why. It's not something you want to leave enabled all the time, since it usually disables processing features that can improve the TV's picture quality.
Some TVs and consoles now support switching to this mode automatically.
Further steps
As mentioned above, the next step to fine-tuning your TV to perfection is getting a setup disc. The Spears & Munsil disc is a great option because it gets you right to the patterns without any extraneous fluff. If you just want someone else to do it, ideally with specialized test equipment, see if there are any TV calibrators in your area.
Lastly, make sure any sources you have, like a streaming stick or a cable or satellite box, are set to your TV's resolution (4K for 4K TVs, etc). Generally speaking they should do this automatically, but it's worth digging into the settings to be sure. Your 4K TV won't look its best without 4K content. You might need to pay for a higher tier to get that, depending on the service.
Lastly, HDMI. Chances are whatever HDMI cables you have are fine. If you try to send 4K from a media streamer and it doesn't work, it's possible your HDMI cables can't handle the additional resolution. But new HDMI cables are cheap. If your TV is getting the resolution you want from your sources, new HDMI cables won't make the image look or sound better, so you can save your money.
For more, check out CNET's lists of the best 55-inch, 65-inch and 75-inch TVs you can buy. You can also take a look at the best 4K TVs available.
As well as covering TV and other display tech, Geoff does photo tours of cool museums and locations around the world, including nuclear submarines, massive aircraft carriers, medieval castles, airplane graveyards and more.
You can follow his exploits on Instagram and YouTube, and on his travel blog, BaldNomad. He also wrote a bestselling sci-fi novel about city-size submarines, along with a sequel.
Best ev charger for 2022 jeep best ev charger for nissan leaf best ev charger for chevy bolt best ev charger for tesla best ev charger for bolt best ev charger for mach e best ev charger consumer reports best ev charger for nissan leaf best ev charger for tesla model 3 best ev cars 2022 best ev vehicles
Best EV Charger for 2022
Best EV Charger for 2022
If you're taking the plunge and buying your first electric car, pickup or SUV, you'll also want to buy and install a Level 2 home charger.
There are things to think about when you pick a Level 2 EV charger, but the value in one is straightforward. For the vast majority of drivers, Level 2 will limit and probably eliminate reliance on a public charging station, and it will remove the anxiety that goes with finding an unoccupied public charger when you need it. Just about any Level 2 charger should fully charge your electric vehicle's battery overnight, even if the battery is nearly depleted.
A Level 2, 240-volt home charger will charge your electric car much much faster than the Level 1 charger that comes with the vehicle. There are more Level 2 chargers to choose from each month, and they might be less expensive than you'd guess. Set up and installation don't have to be complicated or expensive, either, depending on your circumstances. Many Level 2 EV chargers can be plugged into an outlet just like the Level 1, which comes with your car. Others can be hard-wired into household electrical if that's the better option for your purposes. Many have their own phone apps to manage charging and minimize cost.
This list aims to give you some foundation for choosing a home EV charger. I've studied a broad range of chargers across the price spectrum and based my recommendations on expert interviews, user feedback, personal experience and the work of testing labs such as Consumer Reports and Underwriters Laboratories. Browse the full list before you click through, then follow on for a primer on just about everything you need to know when choosing an electric vehicle charger.
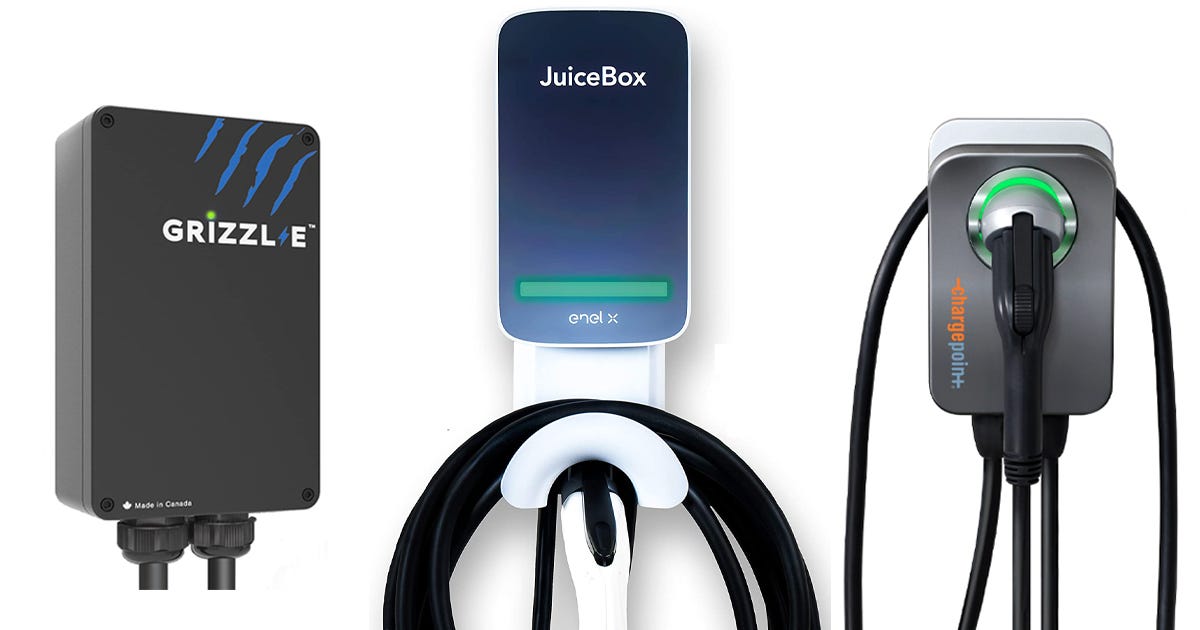
Enel X
The JuiceBox 40 delivers everything you need and most of what you'll want in a Level 2 home charge station, at a reasonable price. It's UL listed, built to exceed NEMA 4 standards and great for outdoor use. It can be hardwired or plugged in. It will charge any electric car, pick-up or SUV available in North America, including Tesla with the brand's standard J1772 adaptor, and it comes with the industry standard three-year warranty. Perhaps most important, it hits the magic charge-rate threshold of 40 amps, which means it will replenish any substantially drained EV (current or forthcoming) in an 8- to 10-hour time frame for years to come.
Beyond its foundational features, the JuiceBox 40 is finished with some polished and useful details. It's easy to install, and it's 25-foot connector cable allows maximum flexibility in use. Even its plug-in cord is longer than most, and that adds flexibility when mounting the box in relation to the necessary 240-volt plug. JuiceBox 40 has a built-in cable rack and security lock and, according to experts, one of the best control apps going. It can be started with voice commands through Amazon Alexa or Google Home, and you can use the app to set reminders, program charge hours and monitor energy consumption (and cost) precisely.
ChargePoint
ChargePoint started in the EV business building public charge stations. The Home Flex represents its expansion into residential, Level 2 chargers.
Home Flex has nearly everything you'll find in our Best Overall JuiceBox 40, with even a bit more to like. Its box is compact and stylish, and its connector locks into its holster or a charge port with a smooth, authoritative click. The holster is ringed with a softly glowing halo of an LED. More significantly, Home Flex can raise the peak charging rate to 50 amps if it's hardwired. While that's almost overkill in a Level 2 charger, given that 40 amps should still charge any EV overnight for years to come, Home Flex will charge a few more current EVs (a couple Teslas and the Ford Mustang Mach E) at their fastest possible rate on residential Alternating Current.
Wired for 50 amps, Home Flex is likely to add some installation cost. Its connector cable is a couple feet shorter than JuiceBox 40's, and its box-to-outlet cord is shorter, too. Those things can matter, but they're not what relegate Home Flex to runner-up status, in our estimation. It's just simple, rational arithmetic. ChargePoint's Home Flex costs at least $100 more than JuiceBox 40, and that cash would make a significant contribution to whatever installation costs there might be.
United Chargers
The Grizzl-E Classic car charging station is designed and built in Canada, and that could be one of the reasons we like it. The Classic ships as a plug-in, to minimize potential installation costs, but it's also suitable for hardwiring. It's manually adjustable from 16 to 40 amps, and that can save on installation, too, in the short run (as in you might not need a higher-rated, more expensive circuit breaker until you have a car that needs the higher charge rate).
Throw in a 24-foot connector cord, and that's about it. There's no Bluetooth connection or phone app here. Yet calling the Grizzl-E Classic a no-frills, charge-your-EV-fast Level 2 undervalues one of its other strengths. This thing is built like a tank, and packaged in a dustproof, fire-resistant aluminum case that's built to NEMA 6 standards, which protect against full water immersion to one meter for 30 minutes. Most other home stations are "upgraded" at NEMA 4.
This is a great charger for folks who like it simple. The Classic is well built, well warrantied (three years) and often cited for good customer service. You'll look a long time trying to find another home station with 40 amps of charging and this kind of quality at this price.
United Chargers
The Grizzl-E Duo is a carbon copy of our Best Value Grizzl-E Classic. Or maybe that's a double copy, because the Duo adds a second 24-foot cable and connector to charge two cars simultaneously.
Beyond that, it's basically that same no-frills, rugged, high-output charge station, though there is another feature unique to the Duo. It adds an intelligent power-sharing circuit to maximize available current between the two charging cars according to each car's need, up to 40 amps total. That in turn maximizes charge speed for each vehicle, without risk of blowing a circuit.
Wallbox
The Pulsar Plus is an extra-compact Level 2 residential charge station. It's suitable for outdoor use, with 40 amps of charging power and most of the preferred features, including a 25-foot connector cable and a mobile app. And if the app loses its connection with the charger, or you don't feel like messing with it, you can just plug in your EV and charge.
Yet what separates Pulsar Plus from nearly all other home charge stations is its Power Sharing feature. This allows more than one unit to be connected to the same electrical circuit to safely charge multiple EVs at once without exceeding the circuit's capacity. Built-in smart power management automatically balances charging to ensure the most efficient energy distribution among the various chargers on the circuit, no need for extra hardware. Further, Wallbox says it's developing the capability to meter each Pulsar Plus charger separately and directly bill individuals. This might be your future if home is a multi-unit dwelling shared with other occupants.
ClipperCreek
ClipperCreek began building home and commercial chargers at its factory in Auburn, California, in 2009, and its HCS-40 Level 2 home station is one of the best-selling chargers to date. In 2022, the box that houses the hardware is larger than most competitors, and the HCS-40's charge rate maxes out at 32 amps. That will still charge most electric vehicles on the road today at their highest rate possible on household current, but it's about 20% less than experts recommend for the long view.
Beyond that, the HCS-40's features still hold up well. Its case is rated NEMA 4 for extreme weather, and its connector cord measures 25 feet. It comes with a remote connector holster that you can hang where you want it -- as in right next to your EV's charge port, wherever that may be. It has a keyed lock that can secure the connector in your charge port or the holster, and there's even an optional cord retractor. It's warranted for three years, and ClipperCreek's customer service is praised in EV circles.
Siemens
Siemens has been making industrial electrical equipment, automotive components and imaging devices for 170 years, and it was an early adaptor to home EV chargers, too. When it was introduced in 2016, the US2 VersiCharge was consistently rated one of the best Level 2 home charge stations available.
Today, the VersiCharge console or case is bigger than just about any out there, and its connector cord is hardly the longest (20 feet). With a peak charge rate of 30 amps, it will still max charge most EVs on the market, but it doesn't leave much growth for the future.
Still it's prized by many EV owners. That's partly for its charm and partly for its build quality. US2 VersiCharge meets NEMA 4 standards for rough weather, with a rugged metal case that looks like the adornment on a big Art Deco building. It even offers its own bespoke outdoor post. It has a couple of buttons that let you delay the start of charging when you plug it in up to 8 hours, and it's known for reliability. It's also warranted for three years, which remains the industry max.
Dcbel Energy
Designed and built by Montreal-based Dcbel Energy, the R16 is much more than a Level 2 home charge station. Think of it as the electrical command center for the home of the future, with its own operating system.
The R16 allows solar-collected Direct Current to charge your EV or home batteries, and DC is by far the fastest way to charge your car. It will turn solar DC into Alternating Current to power your home, and it can turn your EV into a household power bank in the event of utility failure. The R16 can integrate and replace up to five pieces of hardware early solar and low-carbon adopters now use in their homes.
It will work like a conventional Level 2 home charge station on AC, in case you're still in the process of building your solar array. It has two connector cables to charge two electric cars, pickups or SUVs at once. Foremost, the R16 represents the next big thing in EV charging. It's one of the first chargers to market that allows bi-directional charging, which can turn your electric vehicle--or at least some electric vehicles, like the new Ford F-150 Lightning -- into backup power for you home when it's sitting in the driveway. Depending on the size of your car's battery, that could power your home at full bore for at least a day or two, or on emergency rations for 10 days or more. For more on bi-directional charging, read on to EVSE 101.
MeGear
The MeGear Level 1+2 Charger looks a lot like the manufacturer-issued Level 1 charge cord that comes with the typical electric vehicle. It's 25 feet long and has an adapter that allows you to plug it into a typical, three-prong, 120-volt household outlet. If you do that, the MeGear Level 1+2 will charge your EV at essentially the same rate as the cable that came with the car. But if you happen to have access to a 240-volt outlet with a NEMA 6-20 plug (a lot of electric clothes dryers use these), MeGear Level 1+2 will raise your charge rate to 240-volt Level 2. A device like this one is the cheapest path to Level 2 charging.
Now, we've seen this charger marketed under a few different brand names. While the other chargers on our Best list all come with a three-year warranty, the MeGear Level 1+2 is warranted for only a year. It's also the only one that won't restart itself after a power interruption, even if that interruption is only momentary. You'll have to restart it yourself, so hopefully the interruption doesn't occur just after you turn in for the night.
Like we said: this is the cheapest path to Level 2 charging. Quite a bit cheaper, even, than buying a replacement Level 1 cord from your EV dealer. The MeGear Level 1+2 charges on 240 at the lowest Level 2 rate of 16 amps -- much lower than the optimal, future-protecting 40 or 50 amps. Yet at 16 amps, Level 2 should charge your EV about three times faster than the Level 1 cord that came with it. With this charger you can continue to save your pennies for a more powerful Level 2 home station. In the meantime, you'll be able to take advantage of Level 2 when you can and worry less about making it to work the next morning if you can't find a public charger on the way home.
Comparison of the best EV chargers for 2022
Charger
Level 1 or 2
Max charge rate
Connector cable length
Hardwired or plug-in
Phone app
Features
Best EV charger overall
Enel X JuiceBox 40 Smart Electric Vehicle Charging Station
2
40 amps
25 feet
Both
Yes
Everything you need for fast, easy home charging, and most of what you'll want. The right features at a good price.
Best EV charger overall runner-up
ChargePoint Home Flex Electric Vehicle Charger
2
50 amps (hardwired)
23 feet
Both
Yes
A bit slicker than best overall, and it can raise max charge rate to 50 amps (assuming your car could take that charge rate). But it also costs more, and fitted for 50 amps, could cost more to install.
Best EV charger value, especially if it's going outdoors
United Chargers Grizzl-E Classic EV Charging Station
2
40 amps
24 feet
Both
No
A simple, rugged home station that charges EVs fast. Comes with the highest weather protection standard.
Best EV charger for charging two cars
United Chargers Grizzl-E Duo Plug In EV Charger
2
40 amps
24 feet
Both
No
Two connectors, and internal controls that automatically balance power for maximum efficiency and charge speed.
Best EV charger if you need two or more ganged
Wallbox Pulsar Plus Electric Vehicle Smart Charger
2
40 amps
25 feet
Both
Yes
Safely allows multiple chargers on a single electrical circuit. According to the manufacturer, it'll soon add separate metering (and billing) for each one.
Best EV charger from the start of the new EV age
ClipperCreek HCS-40/HCS-40P Charging Station
2
32 amps
25 feet
Both
No
An all-time top seller, from an early adapter known for customer service.
Best EV charger from an old-school brand
Siemens US2 VersiCharge Universal EV Charger
2
30 amps
20 feet
Both
No
Built like a tank, looks like Art Deco, from one of the world's oldest electrical suppliers. Still charges most electric cars at the maximum possible rate on household current.
Best home EV charger if money is no object
Dcbel R16 Home Energy Station
2+
DC charging capable (with solar)
Up to 20 feet
Hardwired
Yes
More like a home electricity substation, managing solar, batteries, charging and household supply with its own OS. As a Level 2 EV charger, it's one of the first to enable bi-directional charging, which can turn your EV battery into a power bank for your home.
Best EV charger for cheapskates, bi-voltage edition
MeGear Level 1+2 Home Electric Vehicle Charging Station
1 or 2
16 amps at 240 volts
25 feet
Plug-in
No
About the least expensive path to Level 2 charging, and it will work as a Level 1 until you have access to 240-volt AC. Much slower than more powerful level 2s, but still about three times faster than the Level 1 that comes with your car.
Wallbox
EVSE 101
The thing you use to plug in an electric car, pickup or SUV is not, technically, a charger. The charging hardware and control system are actually inside the vehicle's powertrain. The plug-in thing is Electric Vehicle Supply Equipment, and it allows the transfer of energy between an electric utility and the EV. This equipment includes charge cords, charge stands (residential or public), attachment plugs, vehicle connectors and bits of electrical hardware that ensure safe operation for user and vehicle. But don't worry. You can call your EVSE a charger.
Every electric car should come with a charger -- invariably a heavy cord with a large, block-shaped device between the vehicle connector and the wall plug. If you bought your electric vehicle used and it didn't come with its charge cord, I hope you accounted for that in the transaction price.
These cords are called Level 1 chargers, and they plug into a standard 120-volt electric outlet on your house or in your garage. They're fine for plug-in hybrid vehicles, which typically have fairly small batteries and a gasoline engine to power the car, and a Level 1 cord will charge a full electric, no-engine car. It won't charge a pure EV anything close to quickly. If your daily electric-car rounds amount to 20 or 25 miles, you can probably live with Level 1. But if you happen to pull your electric car into the driveway with its battery nearly depleted, it can take literally days with a Level 1 charger to replenish to full capacity.
Dcbel Energy
I wouldn't recommend buying another Level 1 charger, unless you need to replace the one that came with your EV or want a second for an alternate location. No Level 1 charger -- from the vehicle manufacturer or an aftermarket supplier -- will charge your EV substantially faster than the cord that came with it. The money you'd spend on a Level 1 charger will get you a long way toward something called a Level 2 charge station, and you can still take the Level 1 cord that came with your car wherever you go. If you want maximum convenience and don't want to rely on public, high-speed charging stations, you probably want Level 2. If your daily rounds regularly use 100 miles of range or more, you absolutely want Level 2. I'll elaborate shortly.
First, I'll answer a question many EV shoppers are likely to have. Every electric car, truck and SUV sold in North America comes with the same connector in its charge port. Every car that's not a Tesla, that is. This standard connection is called SAE J1772, and it means that you don't need to worry about buying the wrong EVSE. Every charge cord and station, home or public, will plug into every electric car, truck or SUV on the road -- including Teslas. That's because every Tesla vehicle comes with an adaptor that allows a J1772 plug to fit in its proprietary charge port. And as Tesla ponders rolling out its private, national Supercharger charging network to non-Tesla owners, it's developed an adaptor that allows its proprietary connection to fit into the J1772 port on other manufacturers' electric vehicles.
Take it up a level
Level 2 EV chargers are a major upgrade from the Level 1 device that comes with an electric car. While it won't charge as quickly as a public DC charger, Level 2 is the best most of us will get for home charging -- or at least those of us who aren't certified millionaires or better. There are 480-volt fast chargers that can theoretically be installed for residential use, but they're expensive to begin with and have specific power requirements, including a dedicated power line. In short, the cost of a 480-volt charge station is prohibitive for the typical homeowner.
ChargePoint
How big is the Level 2 upgrade? A Level 1 charger delivers about 12 amps, give or take a couple, and adds three to five miles of range to a typical electric car in an hour. A Level 2 charger delivers a minimum 16 amps and as many as 80, with a rate of 12 to 60 miles of range per hour of charge, depending on the car and the specific charger. Bottom line, a Level 2 charger can charge an EV three to 10 times faster than a Level 1 charger can, and you can buy good, higher-amperage Level 2 charging stations for $500 all day.
Level 2 chargers require 240-volt electrical supply. If you're not up to speed on electrical current, you shouldn't let that requirement put you off. While there may be some preparation or installation costs, drawing 240 volts from typical residential electrical is not a major or particularly expensive proposition. Many homes already have 240. Yours may, too, if you have an electric water heater or clothes dryer, and if you do there's a good chance it's already in the garage, where you'll need it for a Level 2 charge station.
If you live near a major population center and don't drive a lot, you may not need a Level 2 EV charger. If you live in a rural area with less developed infrastructure, you probably do need one. Wherever you live, the more and further you drive your electric car, pickup or SUV, the more valuable a Level 2 charger will be. Level 2 can substantially reduce the small hassles and anxiety of owning an electric car. For upwards of 90% of the driving public, it can eliminate reliance on public charging stations, unless or until you take your electric car on a long-distance driving vacation.
ChargePoint/Dcbel/United Chargers/Wallbox
Getting ready
There are a handful of things to think about before installing a Level 2 charger, but the first comes down to where you live and who controls your electrical supply.
If you own a home, that's probably all you need to know. You're the boss, and you can proceed with a Level 2 charging station. If you own a condominium, you'll likely need permission from the owner's association. That could be as simple as filling out a form, or it could require jumping through a few more hoops, but you should start by reaching out to the association or property management company. If you rent a home or live in an apartment with reserved parking or a garage, hope is not lost. You'll still have to get the landlord's permission, then determine how much power is available in the parking area and how it's metered.
If you don't have 240-volt current, that's not a huge challenge. The first thing you need is an electrician to tell you whether your existing electrical panel has sufficient capacity for a 240-volt line. There's a reasonable chance it does, but if it doesn't, you'll have to upgrade. And even if you have existing 240-volt service, it's best to consult an electrician as you prepare for a Level 2 charging station.
Let's say, for example, that you already have an electric dryer, and it's in the garage not far from where you want your Level 2 charger. There's a good chance you can find a Level 2 charger that will plug into the same outlet as the dryer (most plug-in Level 2s offer one or two of three common 240 plugs -- NEMA 6-20, 6-50 or 14-50, with NEMA standing for the National Electrical Manufacturers Association). This path means you'll never be able to charge your car and run the dryer at the same time, however, so a good electrician seems like a good place to start. Different surveys by different organizations put the average cost of installing a Level 2 charge station between $650 and $800. That's on top of the charger, of course.
Wallbox
While you're waiting for the electrician, think about where you want the charge station to go. That's typically on a wall inside or outside the garage, or on a post near where you park. Outside is no problem, but you should know it's going outside before you pick your charger, and you should also know where the charge port is located on your electric car, truck or SUV. No two electric vehicle makes put their charge ports in exactly the same place, and the cords on Level 2 charge stations typically range from 12 to 25 feet.
Lastly, check what's available in your locale when it comes to rebates, tax credits and other incentives for installing an EV charge station. The IRS offers a tax credit equal to 30% of the cost, up to $1,000. Your state and local government may offer incentives as well, and don't forget to check your electrical utility.
Big things to think about
Home chargers for electric cars are proliferating, and there are more to choose from all the time. Nearly every vehicle manufacture offers its own, branded charge station through its sales points, typically with third-party installation. If convenience is more important than cash outlay, or if you're a committed brand geek, you can certainly go with the manufacturer's product. On the other hand, you'll do at least as well on quality and performance for less money if you choose your own Level 2 charger. Often substantially less money.
Question 2 when choosing a Level 2 home charger for your electric car, pickup or SUV: Do you want one that's hardwired or one that plugs into an outlet, like the Level 1 charger that comes with the car? Hardwiring means the station is semi-permanently connected to your home's electrical grid, and you won't be able to move it without opening a junction box and detaching the wiring. A plug-in station simply plugs into a 240-volt electrical outlet. Think of it like a permanently installed light fixture versus a plug-in lamp. Other things being equal, a plug-in charge station will work as well as one that's hardwired. The primary advantage of the plug-in is that you can more easily remove it and bring it with you -- if you relocate, for example.
Dcbel Energy
Other things are rarely equal, though, and there are a few more subtle things to consider when choosing between hardwired and plug-in. Most local electrical code will require a charge station installed outdoors to be hardwired. Plug-in charge stations are limited to 40-amp output, and while 40 amps of charging power is more than adequate for the foreseeable future (I'll get to that next), the ultimate future-proof charging station might have a higher charge rate. A plug-in charger won't eliminate additional installation cost, either, unless you happen to have an appropriate 240-volt plug in your garage, in close proximity to where you want the charge station. If that's the case, we'd definitely recommend a plug-in Level 2.
Most Level II chargers are packaged in a case designed to be mounted to a wall or post. Removal and relocation require that they be detached, which can be as simple as removing a couple of fasteners. Yet there are an increasing number of more portable Level 2 chargers, as well as bi-voltage chargers that work at Level 1 or Level 2 depending on the receptacle they're plugged into. These look similar to the Level 1 charger that comes with the car -- usually a long, heavy cord with a plastic brick somewhere between the outlet plug and the vehicle connector. Portables can be useful for travel or commuting because they'll work at Level 2 in the event you have access to a 240-volt plug at work or a vacation residence. The drawback is simple, however. Portable bi-voltage chargers often max out at 16 amps output, or occasionally 20 amps, and while that's better than anything Level 1 can deliver, it won't bring the potential charge speed of higher-amperage Level 2 home stations .
With Level 2 charge stations, output amperage is king. Sort of. Level 2 delivers at least 16 amps and as many as 80, and the chargers tend to get more expensive as output amperage increases. Accounting for one important limitation, the charger with the highest output amperage will charge your electric car fastest. Yet that limitation is big, and it's the reason you need to know the maximum charge rate your electric car, pickup or SUV will accept.
Siemens
You'll find your electric vehicle's maximum charge rate in its owner's manual, on the spec sheet or in the worst case from the manufacturer. It may be listed in kilowatts, or kW, and if that's the case you should Google a kilowatts-to-amperes conversion calculator and convert the kW at 240 volts. This isn't a safety issue: A charger with a higher charge rate won't somehow melt your electric car. But your car's maximum charge rate matters when you decide how much to spend on a Level 2 charger, and which one to choose. If its max charge rate is 16 amps, it's never going to charge faster than 16 amps on household current, no matter how many amps your Level 2 charger can deliver. Find one of those expensive 80-amp chargers, which will very likely require some serious infrastructure improvements to your household electrical, and your car is still not going to accept a charge rate greater than 16 amps.
Does that mean you should never buy a charger that delivers more amps than your electric car, pickup or SUV can accept? It definitely does not mean that, unless you consider the charger a short-term investment to ditch when you get your next car. A short history of the current crop of electric cars explains why choosing a Level 2 charger based strictly on your current car's max charge rate might not be the best idea.
When it was introduced in 2011, the Nissan Leaf could accept a maximum charge of about 14 amps on household current, adding five or six miles of range per hour of charging. With updates for model year 2016, the Leaf could charge at 28 amps. Around 2018, the Chevy Bolt, Jaguar I-Pace and Kia Niro EVs debuted with a max charge rate of about 30 amps, good for 23 to 24 miles of range per hour. Ford's recently introduced Mustang Mach E, and some Tesla models, can charge at 48 amps on AC, adding 35 miles of range per hour of charge. And charge rates for electric cars are likely to increase further over the next several years as new models roll out.
If the point isn't clear, we'll put it another way. Your first electric car may charge at a max of 16 amps, but it's very likely that your next one, brand new or used, will take a charge at a faster rate. Given the outlay for a Level 2 charge station, you probably want to protect your investment. You might save a few bucks now with a low power Level 2, but there's a good chance you're going to want a more powerful one when you get your next electric car.
Megear
If you're now wondering by exactly how much you should future-proof your Level 2 charge station, we have a simple rule of thumb. Experts generally agree that a home charger output of 40 amps -- or 50 amps at the extreme -- will be sufficient for the typical electric car owner for years to come.
"Forty amps seems to be the sweet spot," says Barry Woods, the director of vehicle innovation at ReVision Energy in Maine, and a board member for the trade group Plug In America. "A 40-amp charger is sized correctly for most residential locations, and 40 amps is going to be relevant for a while. That's based on driving habits more than technology. Given the batteries we have now, and what we anticipate, 40 amps should adequately meet the needs of the vast majority of users."
A 40-amp Level 2 charger should cover the daily range requirements of more than 95% of drivers in the United States, including those in rural areas, based on reams of data collected over decades. Your next electric car could charge at a rate faster than 40 amps, but 40 amps will still replenish its deeply depleted batteries in an 8-to-10-hour time frame. Ten hours at 40 amps will add roughly 300 miles of range, depending on the vehicle.
You could consider a 50-amp charger, to take advantage of the higher household charge rate in a few current electric vehicles, but the charger will cost more than a 40-amp max charger. The 50-amp demands heavier-gauge wiring, a higher-rated circuit breaker and a higher-capacity electric panel, so there's a good chance it will cost more to install, and its advantage for household use is minimal -- maybe just bragging rights. A Level 2 charger rated at more than 40 amps will have to be hardwired, so it eliminates the option of a plug-in charge station that you can take with you when you move.
ClipperCreek
In 2022, a 40-amp Level 2 charge station almost certainly delivers the best cost/benefit breakdown for your electric car, pickup or SUV, and it should deliver sufficient charge speed for years to come. And remember. Even if your current electric vehicle charges at a maximum rate less than 40 amps (most do), there's nothing to worry about. The electric car controls how much electricity its battery absorbs when it's charged, so you can't damage the vehicle with a charger capable of a higher rate.
More things to look for
If the charge amperage thing gets confusing, think of 40 amps as the target and work up or down from there, based on cost, features and preferences. The next thing to think about when choosing a Level 2 charger is the weather -- or specifically, whether your electric car, pickup or SUV is going to sit out in the weather. If you can't or won't park your electric car in a covered garage, the charge station probably needs to go outdoors, too. In that case, to be in code, it will need to be hardwired and not plugged in. It will also need to be rated for outdoor use.
Most Level 2 chargers, including those on our Best list, are rated at least NEMA 3, and NEMA 3 is acceptable for outdoor use. Some chargers are built to NEMA 4 standards, which add another layer of protection and shield the box against direct pressure from a garden hose. If there's lots of rain where you live, and it's often driven by stiff winds, NEMA 4 is a good choice. Whether your Level 2 charger is going in the garage or out, it's always smart to choose one listed by Underwriters Laboratories or Edison Testing Labs. The UL or ETL listing designates compliance with safety standards established by these nationally recognized testing labs.
Next are the physical features of the charger itself, starting with the connector cord. Level 2 charge cords typically range from 12 to 25 feet, and longer is almost always better. A 12-foot cord can cut it close in the best of circumstances, and might require that you park your car in the same direction or orientation every time you plug it in. The 25-foot one should allow you to park in at least two different spots if your garage has two bays or more. It should cover things if you the charge port on your next electric car is in an entirely different spot than your current car's.
ChargePoint
Many chargers come with a horn to hold the looped cable. Others expect you to wrap the cable around the box, or a long nail of your choosing, or to simply leave the cable coiled on the ground or floor. Pay attention to these details if you're not fond of clutter, trip hazards or excessive dust accumulation. Look for a charger that has a holster for its connector, or at least a cap to cover the connector when it's not in use. Finally, consider the dimensions of the charger box itself. A really wide one might not fit the space between two single garage doors. A thick one that sticks out relatively far might make it more difficult to squeeze between the car and a wall in a tight, single-car garage.
Some early electric car chargers would not restart themselves if the power temporarily failed and then came back. You had to unplug the connector, then plug it back in to restart. Most current Level 2 chargers, including those on our Best list, will restart automatically, but make sure that's the case when you choose. It's better than waking up to find your electric car is not sufficiently charged.
Beyond that automatic restart feature, some chargers have just a few LEDs to tell you what they're doing. Others have a few hard buttons to set features or manually delay starting the charge once the vehicle is plugged in. Still others come with a phone or tablet app that connects to the charger via Wi-Fi or Bluetooth and shares a range of data and control options.
With the apps, you can typically monitor your car's charge progress, keep statistics on energy use and know fairly precisely what it's costing to operate your electric vehicle. Some allow voice interface with the charger ("Alexa, charge my car!") and communication with local utilities, so you can participate in demand response programs and charge your car when the electricity is the cheapest or cleanest available. Some Level 2 charger apps let you load-share two chargers on the same circuit without tripping the breaker.
Enel X
These programs can definitely be useful, but if you're not fond of fiddling with phone apps, or you just want to plug in your car and charge it, there's no reason to pay up for charger with a control app. If you do want some of those app features, or you're basically a data geek, you still might not have to pay up for a charger with an app. Electric vehicle manufacturers have their own apps that communicate with their vehicles, and there's almost certainly one that goes with your electric car, pickup or SUV. Learn what the vehicle app can do before you buy the charger. There's no reason to pay extra for charger features that are redundant.
The next big thing
When Ford Motor Co. unveiled its 2022 F-150 Lightning in May 2021, one of the truck's second-level features grabbed almost as much attention as Ford's first electric, full-size pickup did on its own.
With the right Level 2 home charging station, the F-150 Lightning can essentially turn itself into a giant power bank on wheels. During a household power failure, the truck can automatically direct the electrical energy stored in its expansive battery pack back into the household wiring grid. If a Lightning with the upgrade, 155 kWh extended-range battery were fully charged when the power failed, based on the average household electrical consumption of about 30 kWh per day, this pickup should be able to power most households full speed for three or four days. With more carefully metered household usage, running essentials like the refrigerator and freezer, modest lighting and communication, the F-150 might provide power for 10 days or a bit longer.
Sounds like a nice capability to have, but if you want in with the Lightning and you're not already in line, don't hold your breath. Ford has promised the first Lightning deliveries by March 2022, with a base price starting just north of $40,000, but it also claims the first three years of Lightning production are sold out -- even with its decision to double its initial assembly capacity a few months after the Lightning was revealed.
Dcbel Energy
You don't have to wait for a Lightning, and you definitely don't have to use Ford's Level 2 home charger. The power-bank concept represented by Ford's electric pickup is sometimes called vehicle-to-grid or V2G -- or, more frequently, bi-directional charging. In its basic form, bi-directional charging uses a Level 2 home charge station as a two-way bridge between an electrical utility grid and an electric vehicle's battery. It's more than a potential source of back-up power because many experts see bi-directional charging as a means to even out electrical demand and make utilities more efficient as electric cars proliferate. The thinking is that cars can be charged during off-peak demand, as the world sleeps, and then supplement utility power when they sit during the day during high-demand, potential brown-out periods.
It's nascent technology, yes, but bi-directional charging can already be achieved. The Nissan Leaf is the only current EV that allows it, and its biggest battery has only about a third of the capacity of the F-150 Lightning's (several other current EVs do allow bi-directional flow from the vehicle, but only for appliances plugged into the vehicle itself, rather than the house grid). Going forward, many and maybe most new electric cars, pick-ups and SUVs will offer bi-directional charging. Hyundai, Kia, Lucid and Rivian all have promised the capability, though Tesla seems less likely to offer it, given its commitment to its Powerwall home battery. Further, bi-directional charging is not limited by the hardware in most current EVs. It's mostly a function of the binary bits in the control software, and some vehicle manufacturers are considering software updates to allow their existing vehicles to charge bi-directionally.
The first handful of bi-directional Level 2 home charge stations have hit the market, including our Best If Money Is No Object Dcbel R16. Yet the least expensive bi-directional we've found is about six times more expensive than our Best Overall Juicebox 40, and in the typical household it will require higher installation costs.
Wallbox
If you're committed, and you have the resources, you might want to think about bi-directional charging for your Level 2 home station. Or you might want to limit your investment now, with the most basic Level 2 charger you trust, and wait for bi-directional to play out.
"It's not exactly here yet, but bi-directional is coming soon," says Plug In America board member Barry Woods. "In most respects it's fairly simple technology, and the barrier is acceptance more than technical.
"It's one more consideration choosing a Level 2 charger. The first step has three filters. Do you want basic charging, smart (app-based) charging or bi-directional? Once that's clear, it's basic consumer requirements like reliability, warranty and customer service."
Written by J.P. Vettraino for Roadshow
EV charger FAQs
Is a Level 2 charger worth it?
The short answer: A Level 2 charger is always better at charging than a Level 1 charger, which typically comes with every electric vehicle. Whether a Level 2 is worth the additional cost depends on your living circumstances, your driving habits and your access to public charging stations. That cost runs from maybe $200 on the low end to $2,000 on the high end, installed, contingent on the charger and required electrical upgrades.
If your daily electric-car rounds amount to 20 or 30 miles, you can probably live with Level 1. But if you happen to pull your electric car into the driveway with its battery nearly depleted, it can take literally days with a Level 1 charger to replenish to full capacity. Or you can find an open public charging station in convenient proximity to your home.
If you want maximum convenience and don't want to have to rely on public, high-speed stations, you probably want Level 2. If your daily rounds regularly use 100 miles of range or more, you absolutely want Level 2. If you live in a rural area with less developed infrastructure, you probably need Level 2. Wherever you live, the further you drive your electric car, pickup or SUV, the more valuable a Level 2 charger will be. Level 2 can substantially reduce the small hassles and anxiety of owning an electric car. The right Level 2 home charger will charge any electric vehicle from nearly depleted to nearly full in the typical overnight time frame, or say 8 to 10 hours. For upwards of 95% of the driving public, Level 2 can eliminate reliance on public charging stations, unless or until you take your electric car on a long-distance driving vacation.
Are all EV home chargers the same?
Definitely not. There are Level 1 chargers (3 to 5 miles of range per hour of charging in the typical electric car) and Level 2 chargers (12 to 60 miles of range per hour, depending on the car and the specific charger). Level 2s can be portable, plug-in or hardwired, with different max charge rates and different operating features.
That said, you don't need to worry about buying the wrong charger, because certain hardpoints are the same. Any Level 1 or Level 2 charger will safely charge any electric car, truck and SUV sold in North America. You can't charge your vehicle too quickly, or over-charge it, because its own on-board electronics will protect it. Every electric vehicle comes with the same connector in its charge port -- or at least every electric vehicle that's not a Tesla. This standard connection is called SAE J1772, and every charge cord and station, home or public, will plug into every electric car -- including Tesla. That's because every Tesla vehicle comes with an adaptor that allows a J1772 plug to fit in its proprietary charge port.
Which is the best charger for electric cars?
The best EV charger for you depends on a host of circumstances: how and where you plan to use it, how soon or frequently you expect to move, whether you want to use an app to manage it and even the electric vehicle you plan to charge. Read the full report above for more thorough guidance
If you're looking for a fairly guideline on what to buy, this can help: Choose a plug-in Level 2 charger with a peak charge rate of 40 amps. In 2022, a 40-amp Level 2 charge station almost certainly delivers the best cost-benefit breakdown for your electric car, pickup or SUV, and it should deliver sufficient charge speed for years to come. A plug-in is easy to move. Even if your current electric vehicle charges at a maximum rate less than 40 amps (most do), there's nothing to worry about. The electric car controls how much electricity its battery absorbs when it's charged, so you can't damage the vehicle with a charger capable of a higher rate.
Can you buy a Level 3 charger for home?
Level 2 is the best most of us will get for home charging -- or at least those of us who aren't certified millionaires or better. There are 480-volt fast chargers that can theoretically be installed for residential use, but they're very expensive to begin with and have very specific power requirements, including a dedicated power line. In short, the cost of a 480-volt charge station is prohibitive for the typical homeowner, and rarely necessary to begin with.
Really high-voltage chargers will typically convert residential and commercial alternating current, or AC, to direct current, DC. Fast-charge public stations use DC, because DC is by far the fastest way to charge your electric car. If you happen to have reasonably expansive solar array, you can take advantage of DC at home without a full Level 3 charger. There are a couple of expensive home charge stations (and probably more coming) that can take the DC collected by solar panels and dump it straight into your electric car. When the sun shines full bore, they can charge faster than the typical Level 2. When there's cloud cover, or it's dark, these chargers will revert to operating on household AC and charge at Level 2.