Portable Bluetooth Speakers

what is video footage

Embark on a Quest with what is video footage

Step into a world where the focus is keenly set on what is video footage. Within the confines of this article, a tapestry of references to what is video footage awaits your exploration. If your pursuit involves unraveling the depths of what is video footage, you've arrived at the perfect destination.

Our narrative unfolds with a wealth of insights surrounding what is video footage. This is not just a standard article; it's a curated journey into the facets and intricacies of what is video footage. Whether you're thirsting for comprehensive knowledge or just a glimpse into the universe of what is video footage, this promises to be an enriching experience.

The spotlight is firmly on what is video footage, and as you navigate through the text on these digital pages, you'll discover an extensive array of information centered around what is video footage. This is more than mere information; it's an invitation to immerse yourself in the enthralling world of what is video footage.

So, if you're eager to satisfy your curiosity about what is video footage, your journey commences here. Let's embark together on a captivating odyssey through the myriad dimensions of what is video footage.

Showing posts sorted by relevance for query what is video footage. Sort by date Show all posts

LG Wing Hands-on: Here's What It's Like To Actually Use The Weird Swiveling Phone


LG Wing hands-on: Here's what it's like to actually use the weird swiveling phone


LG Wing hands-on: Here's what it's like to actually use the weird swiveling phone

These days, phones are either rectangular slabs with one straight screen or, in the case of the Galaxy Z Fold 2 or Motorola Razr 5G, they're slabs with flexible screens that open up. But the LG Wing is neither. Instead, it's a phone with two screens, one of which swivels on top of the other.

Yes, it's weird and yes, it's expensive at $1,000 on Verizon (UK and Australia pricing have not been released yet, but that converts to about £775 and AU$1,394). But the design isn't as crazy or pointless as it seems. After pushing through the initial learning curve, which does take some time, my experience with multitasking and recording video got a boost thanks to the Wing's unusual shape.

The LG Wing isn't for everybody, and LG knows this. Its bulkier design and potentially steep price will automatically lead to many people writing it off. Also, not all apps will accommodate the two screens. Nevertheless, I appreciate LG's willingness to try something different. Swivel phones aren't exactly new, even if they aren't around much anymore: The VX9400 from 2007, for instance, is an early example of an LG phone with a similar design, and I myself owned a beloved Nokia 7370, which featured a screen that swiveled out as smoothly as a switchblade comb. But LG has applied that design thoughtfully enough for this current era of phones.

Whether or not people are willing to pay to give its $1,000 vision a shot is the big question. While it's not impossible to sell an expensive handset amid a pandemic when everyone is more budget-conscious, as Samsung has shown with its Galaxy Note 20, it's certainly risky to do so. And LG's record of selling experimental phones isn't stellar. Its modular G5 from 2016 and curved G Flex from 2014 weren't exactly top sellers. But fitting "more screen in less space" is always appealing, and the LG Wing, at the very least, executes its own concept well. 

In the US the LG Wing will be available first on Verizon, then AT&T in the fall and T-Mobile -- all on their respective 5G networks. 

LG Wing design: Spin me right round

I spent time with a preproduction model and found that the LG Wing is a straightforward phone when it's closed. It has a 6.8-inch display, wireless charging and an in-screen fingerprint reader. But it's also missing a few things that other LG phones have. It doesn't have a headphone jack, which LG usually keeps, and it doesn't have a formal IP rating for water protection.

And while it's not as heavy and thick as the Galaxy Z Fold 2 when it's folded, the LG Wing is still thicker and heavier than regular phones. It's about a third thicker than most phones, not twice like I first assumed, because the top panel is thinner than the bottom.

The phone only opens in one direction, clockwise, so to open it single-handedly, it should be in the right hand. (I'm a left-hander and I thought mine was broken and stuck when I first tried to open it, but it wasn't.) The motion does require some carry-through with the thumb, and if I didn't slide it strong enough, the top display would stop short of clicking straight. But most of the time it rotated fine and the mechanism feels sturdy. While I didn't go buck wild trying to rip these two displays apart, I didn't feel like I needed to be any more careful with it than with any other premium phone. LG estimates that the phone is durable enough to survive 200,000 rotations over the course of five years. If you want more protection, LG is working on cases, but those will undoubtedly add more bulk.  

lg-wing-phone-7868

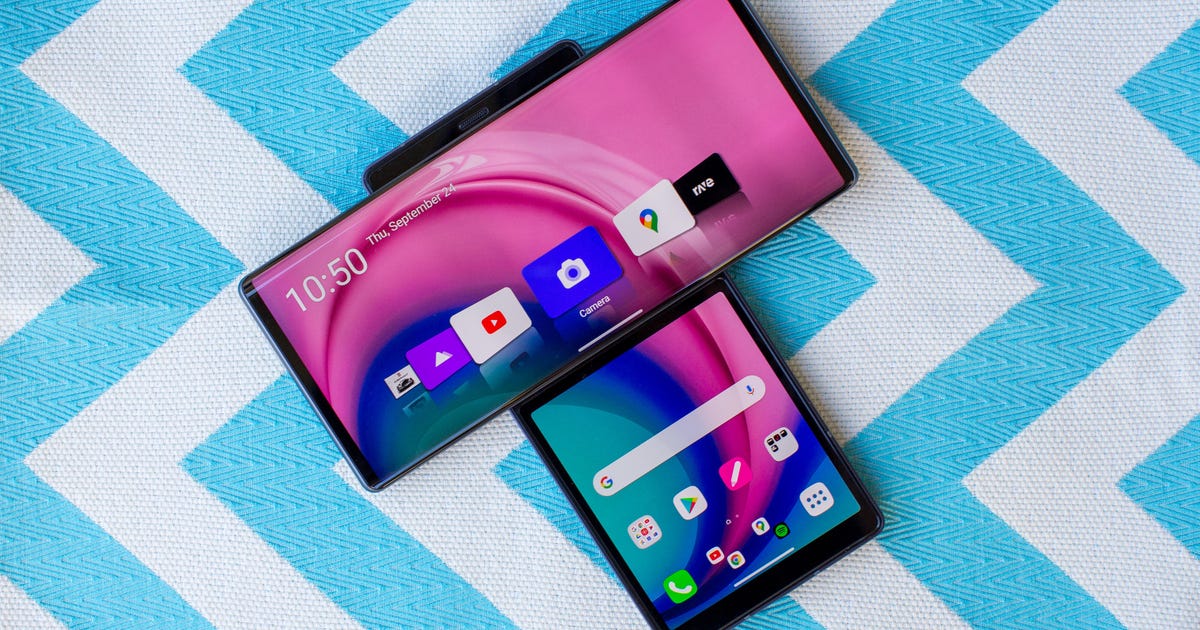
The phone has a 6.8-inch display on top that rotates clockwise.

Angela Lang/CNET

LG Wing's 2 displays do double duty

Once the phone's open, you can do a variety of things in a variety of orientations. Multitasking is the most obvious benefit, like watching YouTube while looking up something on the web. If you're talking to a buddy over the phone and want to check your calendar to schedule a time to meet up, you can do that too. My favorite way to use it is having Maps display on the larger screen and music controls on the other one. This is especially useful in the car, when I want to skip tracks without fussing too much with the phone and taking my eyes off the road. Given the bulk of the Wing though, I suggest having a sturdy phone mount. When I found myself opening the same pair of apps often (Maps and Spotify, for instance), I paired them so they could launch quickly together. 

lg-wing-phone-7900

The back of the phone when opened.

Angela Lang/CNET

When held upside down, the phone opens up different experiences for gameplay. I played the racing game Asphalt 9 this way, with the bigger screen displaying the main gameplay and the smaller one displaying a roadmap. I'm not convinced this was useful, though. Plus the phone is top-heavy when held upside down, so it was uncomfortable to hold the thinly edged display in my hands after a while.

Having two screens to navigate one app is interesting too. With messaging, for instance, I can view a large part of the conversation while texting. But as I mentioned before, not every app is optimized. For instance, I'd love to watch a YouTube video while reading comments on the other screen, but I couldn't do that on the phone. And if you don't want to use the bottom display much at all, it can be turned into either a trackpad to navigate the top display, or blacked out completely and used as a physical grip.

3 cameras and a gimbal

The Wing has three rear cameras: one standard camera and two ultra-wide cameras. One of the ultra-wide cameras has a gimbal inside, which is similar to the Vivo X50 Pro. Gimbals are used to stabilize and balance video even when you're moving around a lot. LG added a special Gimbal Mode with extra controls as well, so you can pan and follow your subject as they move. 

My video footage was steady, even as I was recording while walking quickly. Video looked more stable than the one recorded on the iPhone XS, which we happened to have on hand, and footage from the LG Wing lacked that pulsing effect the iPhone had too. When it came to picture quality though, colors were more true-to-life and objects looked smoother on the iPhone. On the front is a 32-megapixel camera embedded inside the phone and popup from out of the top edge when in use, which is a lot like the OnePlus 7 Pro, Vivo Nex and Oppo Reno 2. The selfies I took were bright, in-focus and clear.

Videographers may be interested in the suite of tools the LG Wing has, and Gimbal Mode adds an extra layer of control and creativity. Gripping the phone vertically while shooting horizontally also made it comfortable to shoot video. But if you're a casual video-taker, this isn't a must-have, and current iPhones and Pixel phones have excellent video stabilization features too. 

In bright, ample lighting the phone takes vibrant and clear pictures.

Lynn La/CNET

Another outdoor image taken on the LG Wing.

Lynn La/CNET

In this closeup shot, the flower petals on the foreground are in focus and sharp.

Lynn La/CNET

A photo taken with the phone's pop-up front-facing camera.

Lynn La/CNET

LG Wing's hardware and other specs

Powering the phone is a Snapdragon 765G chipset and a 4,000-mAh battery. Since I got a preproduction unit, I didn't conduct battery tests. Anecdotally though, the Wing had a decent battery life. With medium usage of both screens it was able to last a full day without charging.

LG Wing 5G specs

Display size, resolution Main screen: 6.8-inch OLED; 2,460x1,080 pixels. Second screen: 3.9-inch OLED; 1,240x1,080 pixels
Pixel density Main screen: 395ppi. Second screen: 419ppi
Dimensions (Inches) 6.67x2.93x0.43 inches
Dimensions (Millimeters) 169.5x74.5x10.9 mm
Weight (Ounces, Grams) 9.17 oz; 260g
Mobile software Android 10
Camera 64-megapixel (standard), 13-megapixel (ultra-wide), 12-megapixel (ultrawide)
Front-facing camera 32-megapixel
Video capture 4K
Processor Qualcomm Snapdragon 765G
Storage 256GB
RAM 8GB
Expandable storage Up to 2TB
Battery 4,000 mAh
Fingerprint sensor In-screen
Connector USB-C
Headphone jack No
Special features Swivel screen design; gimbal camera; wireless charging
Price off-contract (USD) $1,000 (Verizon)
Price (GBP) £775 converted
Price (AUD) AU$1,394 converted

Source

Tags:

GoPro HD Hero2 Review: GoPro HD Hero2


Gopro hd hero 2 camera gopro hero hd review gopro hd hero 2 gopro hd hero 2 software update gopro hd hero camera review gopro hd hero 2 camcorders gopro hero 3 review gopro hd hero 2 gopro hd camera
GoPro HD Hero2 review: GoPro HD Hero2


GoPro HD Hero2 review: GoPro HD Hero2

I've had a bit of a love-hate relationship with the GoPro HD Hero that we've used during the recording of the Car Tech Live podcast for the last year or so. On the one hand, the Hero takes phenomenal wide-angle video, is ridiculously durable thanks to its polycarbonate shell, and (when you get the settings right) relatively easy to use. However, that last bit is also my biggest point of contention with the first few generations of the GoPro Hero cameras; I'm a self-proclaimed techie who's recorded hours of footage using the HD Hero and I still have to break out the poorly written instruction sheet to change any of the settings. More often than not, I just leave the settings where I left them and just point and shoot.

So, when the new generation GoPro HD Hero2 landed on my desk boasting an improved interface, I decided to challenge myself to full-test the device without cracking the spine on its (also improved) 90-page user manual.

Old design with a twist
Looking at the GoPro HD Hero2 side by side with the original HD Hero (hereafter referred to as the HD Hero1), reveals remarkably little change in the unit's form factor. Both units are dimensionally identical and feature the same lens, power button, shutter button, and LCD screen placement. This means that any waterproof cases or lens covers purchased for the HD Hero1 will still work with the HD Hero2, which is a good thing for GoPro devotees. Likewise, both units feature the same rear hook and connection port for GoPro's line of removable BacPacs, which we'll discuss later.

Closer inspection reveals that there's more than the addition of the number 2 to distinguish the new model from the old. For starters, the Hero2 features a new glass lens that should be sharper and more durable than the old lens. Where the Hero1 featured only one red recording indicator LED, the Hero2 features four (one enlarged indicator on the front of the unit and smaller lights on its top, back, and bottom edges). On the right edge (when viewed from the front) are the connections for the proprietary video output, the Mini-USB port for charging, and a 2.5mm microphone input. Thankfully, these three connections are actually labeled this go-round. On the left edge are the full-size SD card slot and a new HDMI video output. Onboard microphones are now located on the top and bottom edges of the unit. Finally, the rear panel is where you'll find the battery door that covers the user-replaceable 1,100mAh lithium ion battery.

I mentioned that the HD Hero2 ships with the same waterproof housing as the Hero1. For those unfamiliar with this housing, it's a clear, polycarbonate shell that holds the Hero camera to whatever mounting option you chose to use. Spring-loaded waterproof buttons give users access to the selection and shutter buttons and a clear lens bubble protects the HD Hero2's lens from scratches. In the event that this bubble is damaged, a replacement can be ordered and affixed with a small screwdriver. At the back of the shell is door that locks shut with a plastic latching clamp. (The plastic latch on our HD Hero1 busted after only a few weeks of use, so this bit worries me. Fortunately, it's a relatively simple fix.) Users are given the choice between two easily swappable doors that ship with the HD Hero2. The first is a sealed waterproof door that keeps the camera dry, even when submerged to a depth of 197 feet. The second door is a "skeleton door" with openings that sacrifice waterproofing f or increased sound quality.

The mounting options included in the box will depend on which HD Hero2 kit you pick up. The Motorsports Edition, for example, ships with a suction cup mount on an articulated arm and five adhesive mounts. The Surf Edition packs a pair of surfboard mounts and a special "Floaty" back door that will keep your camera from sinking to the bottom of the ocean in the event of a detachment. Finally, the Outdoor Edition includes a helmet strap, a head strap, and a selection of adhesive mounts. Additionally, additional mounts for handlebars, roll bars, chest straps, etc. are available from the manufacturer for additional cost.

Same screen, new interface
Of all of the changes to the HD Hero, the most drastic is the overhauled interface present on the tiny monochromatic LCD. For starters the HD Hero2 uses larger, bolder icons for identifying the current recording mode. So tapping the selection button on the front of the unit fills the screen momentarily with a large icon for the newly selected mode that is easier to read with goggles on or at an arm's length. When the moment is passed, the screen returns to its default state with a smaller icon indicating the mode and a new text-based setting identifier. So rather than memorizing that "R7" is 1080p video at 30 fps, the unit simply displays "1080-30," which is much easier to decode. Likewise, photo modes are clearly identified with, for example, "5 MP 0.5 sec" which can easily be identified as "take a 5 megapixel shot every half second."

Likewise, the menu system has also been made clearer, with more easily identified icons for each setting that leads to a drop-down menu where the different options can be viewed clearly. Navigating the GoPro's many options with just the select and shutter buttons is still an exercise in patience. For example, setting the date to 11:11am on 11/11/11 can take as many as 60 or more button presses. (Fortunately, the date is something you should only really have to set once.) That's an extreme example, but even simpler tasks (such as changing the video or still-photo resolution) can take as many as 10 button presses.

On the bright side, the fact that the GoPro HD Hero2 even offers granular access to all of its settings right on the camera is an advantage that it holds over simpler camera systems, such as Contour's.

There are still a few icons that don't make much sense. (I doubt many can tell me what this icon means without first checking the manual.) However, the important bits--changing the resolution of photos and video, setting time-lapse intervals--and the options that you're likely to find yourself wanting to fiddle with before bombing down that double-black-diamond slope are extremely easy to understand.

I started the review with the intention of never cracking open the GoPro HD Hero2's instruction manual and I'm pleased to state that I didn't need to use it. (Although, I did flip through the manual and found that it is both more thoroughly written and better organized than the old sheet. So if you do find yourself needing help, it's a great resource.)

Recording modes
So, we've discussed the chassis and we've explained that it's easy to use, but what sort of video and photos can you expect to get out of this camera?

Like the Hero1, the HD Hero2 features a wide range of video and photo modes to chose from. Where moving images are concerned, the HD Hero2's highest recording resolution is 1,920x1,080 pixels (1080p for short) Full HD video at 30 frames per second (fps) with a wide-screen 16:9 aspect ratio. Users can also select a 1,280x720-pixel (720p) wide-screen mode with options to capture at 30 or 60 fps. There's also 1,280x960-pixel Tall HD mode that records at a 4:3 aspect ratio with options to capture at either 30 or 48 fps. Finally, there are the 800×480-pixel (480p or WVGA) modes that capture relatively low-resolution video but at high 60 or 120 fps speeds, which can be slowed down using software to create slow-motion video.

Most video modes capture at the lens' full 170-degree wide-angle field of view (FOV), but users can choose to step down to medium 128-degree or narrow 90-degree FOVs. To my eye, 1080p video captured at these narrower FOVs appears to be grainier with visible pixelation, which leads me to believe that GoPro is using some sort of digital zoom technology to compensate for the lens' fixed focal length. This likely won't bother many, particularly at the medium FOV, but I couldn't unsee the image degradations once I'd noticed them and stuck with the full wide FOV for most videos captured after the official testing had concluded.

Still photos are captured at a maximum of 11MP with space-saving 8MP and 5 MP modes also available. Like the video mode, still photos take advantage of the full 170-degree FOV, but can be set to capture at a medium 128-degree FOV. (The narrow FOV is unavailable for still photos, presumably because the digital zoom artifacts would be too visible in a still shot, but that's just speculation.) Photos taken outdoors at the full resolution with full FOV are sharp and pleasing. The wide angle makes framing shots easy, but without the aid of the optional LCD BacPac, shot composition is a bit of a guess-and-check affair.

When shooting still photos, there are a few trigger modes to choose from. The first is a single shot. Press the button, capture a photo. It's the simplest of the available modes. Next is a self-time mode that captures a single shot after a 10-second delay. The next mode is one of my favorites: Time-lapse mode continuously captures a still photo at timed 60s, 30s, 10s, 5s, 2s, 1s, and 0.5s intervals. (Note: The fastest interval of 0.5s requires a high-speed Class 10 SD card to keep up.) Users can then stitch those photos together into a cool time-lapse video that compresses hours of actions into minutes of video.

Finally, the HD Hero2 gains a new trick made possible by its new faster digital image processor called Photo Burst Mode. In this mode, the camera can capture 10 full-resolution 11MP photos within the span of a single second. Personally, I found timing the Burst to be tricky, particularly because there's a few seconds of lag after a burst is captured while the HD Hero2 writes the contents of its buffer to the SD card. However, with practice this could be another cool tool in your GoPro toolbox.

In sum
About the only think that I didn't like about the previous-generation GoPro HD Hero was that maddeningly difficult interface. And while in my opinion GoPro still hasn't perfected its menu structure and usability, it's gotten pretty damn close within its self-imposed constraints (two-button interface, maintaining compatibility with older hardware). GoPro also states that its low-light image quality has been improved between the two generations, which you can see yourself by comparing the indoor photos below. There's no question in my mind that this is the best GoPro camera yet.

But is it the best HD sports camera? To figure that out, we have to compare it to its most fierce competitors from Contour's lineup, particularly the ContourGPS. (Contour's top tier Contour+ is significantly more expensive, so we're leaving it out of the running for now, but many of the same points I'm about to make will still apply.)

Ease of use is a tie. Both camera systems excel here in different ways. The Contour camera's supersimple slide-and-record interface and laser-pointer aiming makes it easier for first-time users to pick up and shoot with. However, the GoPro HD Hero2 excels where on-device flexibility is concerned. If you're, for example, trackside with the Hero2 and you want to switch capture modes, every still and video setting is available right there on the device itself. The ContourGPS features two user presets that can be selected with the flip of a switch, but if neither of those is what you need at the moment, then you'll need to fire up the Contour smartphone app or bust out your laptop to pick a new preset. Additionally, the Contour cameras give no visual indication of what mode they're in, where the GoPro always displays its capture mode on a display. Trust me, there's nothing worse than getting back from a full day of recording with an SD card full of photos when you wanted videos. To the p oint, users who enjoy constantly fiddling with settings on the fly will prefer the GoPro, but if you're the kind of person who sets up the camera once and never changes modes, perhaps the Contour cameras are a better fit.

One place where Contour has the GoPro system beaten is where applications are concerned. Contour's included desktop editing and uploading software makes it easy to cut the good part out of a long video. Conversely, GoPro's experience is a B.Y.O.-software affair. Contour's top-tier models also capture GPS position, speed, and elevation data that can then be displayed alongside an uploaded video. GoPro does not, but if you don't mind spending a few extra bucks, the GoPro system can be upgraded with longer battery life, an LCD display, or the ability to capture 3D video thanks to its BacPac system.

The GoPro has the Contour cameras flatly beat on ruggedness. The Contour+ and ContourGPS require an additional purchase of a waterproof housing to match the GoPro in the wet. The entry-level ContourRoam is waterproof out of the box, but not nearly to the same depth as the GoPro. And if the HD Hero2 and the ContourGPS fell off of the same car at speed, the GoPro camera would definitely fare better. When you're talking about action cameras, durability is a top-tier attribute.

Deciding which camera system is best is truly a tough decision, and depending on your particular needs, you may disagree with me. At $299, the GoPro HD Hero2 is a slightly better buy than the ContourGPS, which is the same price--provided that the collection of GPS metadata isn't one of your top priorities. The learning curve is slightly steeper (and only just barely thanks to the upgraded interface), but once you're over it, the GoPro HD Hero2 is a much more flexible and durable device.


Source

How To Edit Video In Photoshop CC And CS6


How to edit video using photoshop edit video in photoshop cc how to edit video using photoshop how to edit a video on photoshop how to edit a video in photoshop how to edit a video in photoshop how to edit video in photos app windows 10 how to edit video in photoshop how to edit video on canva how to edit videos on obs how to print screen
How to edit video in Photoshop CC and CS6


How to edit video in Photoshop CC and CS6

photoshopvideo-mainss.jpg
Screenshot by Lexy Savvides/CNET

Did you know that you can edit video within Adobe's image-editing program? There is no need to learn the ins and outs of Premiere or Final Cut when Photoshop does just fine for some simple edits and transformations.

Video editing has been part and parcel of Photoshop since CS3 Extended. If you are running an older version of Photoshop, here is our tutorial on how to cut video using CS5 Extended.

Photoshop CC and CS6 are mostly the same when it comes to video features. Photoshop can read the following major file formats and more:

  • .264

  • AVI

  • MPEG-4

  • MOV (QuickTime)

  • MTS

A full list of supported file formats is available on this Adobe support page.

Getting started

Open up Photoshop and head to the Window menu. Make sure that Timeline is selected, which will bring up the video toolbar at the bottom of the screen. Alternatively, head to Window > Workspace > Motion to bring up the entire suite of video controls.

Now it is time to import the video file. Either drag a supported video into the Photoshop main window or click the filmstrip icon in the timeline and select "Add Media."

Alternatively, for more precise control over the file when it comes to exporting, go to File > New. Select Film & Video from the drop-down menu and change to the appropriate values. Once the new document has been created, import the video file itself by going to Layer > Video Layers > New Video Layer from File.

photoshopvideo-new.jpg
Screenshot by Lexy Savvides/CNET

The video will now be available for editing in the timeline. Like any traditional video editor, Photoshop lets you scrub through the footage and gives you some basic controls over audio. Note that if you playback the file within the edit window, Photoshop may drop the frame rate to keep displaying the footage in real time.

The next thing you may want to do before launching into the edit is to turn the video layer into a Smart Object. This will allow you to apply filters to the entire video image in one particular layer -- even if there are cuts or transitions.

Choose the correct layer name and then select Layer > Smart Objects > Convert to Smart Object.

photoshopvideo-smartobject.jpg
A purple clip means that the layer has been converted to a Smart Object. Screenshot by Lexy Savvides/CNET

Once this has been done, any adjustments you make through filters will be reflected in all frames on that particular layer.

Making edits

Editing video using Photoshop uses many of the same principles you may be familiar with when working with still images.

Depending on the camera and lens combination used to shoot your video, you may want to apply a lens-correction filter. Photoshop may be able to automatically detect what camera the video was filmed with. Head to Filter > Lens Correction, and Photoshop should autodetect the camera.

Note that Photoshop may not detect it if the video was created using a smartphone. If this is the case, you can apply corrections to the video image using the Custom tab in the Lens Correction window.

The controls are quite comprehensive, including the ability to add or remove a vignette, make adjustments for chromatic aberrations, or adjust perspective.

Add some custom lens corrections in this window. Screenshot by Lexy Savvides/CNET

Videos can be split by selecting the scissor tool on the Timeline. This will cut the video in two at the position of the playhead. Like any other video editor, in Photoshop you can move clips back and forth to other layers on the Timeline.

The adjustments palette. Screenshot by Lexy Savvides/CNET

Add in any extra audio files using the dedicated Audio Track layer. Click the musical-note icon to import music or other sounds. To make adjustments to the audio recorded with the video file, right-click on the appropriate clip, and then select the musical-note icon to adjust the volume or mute it.

Some basic filters will be accessible via the Adjustments layer palette in the workspace.

Options available include black-and-white, photo filter, curves, exposure, and brightness/contrast adjustments.

Photoshop will include these filters as a separate, nondestructive layer that you can toggle on or off using the regular layers palette.

photoshopvideo-curves.jpg
Toggle adjustments for curves, exposure, and more from the layers palette (on the right) to see the Before and After effect. Screenshot by Lexy Savvides/CNET

Transitions

Photoshop has some common transitions built in, such as fades and crossfades. These can be found in the Timeline toolbar, denoted by the split-square transitions icon.

Select a transition from the menu, then drag it on to the appropriate layer on the Timeline. Transitions can be extended or shortened by dragging the duration slider just underneath the video image on the Timeline. Alternatively, right-click on the transition itself to change the duration with more precise control.

A list of the simple transitions available in Photoshop CC. Screenshot by Lexy Savvides/CNET

To change the speed of a clip, right-click on the appropriate layer. Select "Speed" to increase or decrease playback speed using the slider or a percentage value. To slow down motion, choose a speed such as 50 percent.

Transitions can also be applied to audio. Again, to work with audio recorded with a video, right-click on the appropriate clip, and go to the musical-note icon. Apply fade-in or -out transitions where desired.

Text and objects

Photoshop lets you add text to videos using the same method as still images. First you will want to create a new video group so you can adjust the position of the text and placement over the clip. Do this by selecting the filmstrip icon in the timeline and selecting "New Video Group."

photoshopvideo-text.jpg
Screenshot by Lexy Savvides/CNET

Select the text tool from the side toolbar, place the cursor on the image, and start typing. Photoshop places the text on a new layer so you can move it to the desired place in the timeline.

To add a transition to text, simply use the same method outlined above for the video image -- just drag the transition over the text layer instead.

Adobe has detailed information on working with more complex motion on its website.

Exporting

When your masterpiece is ready to go, head to File > Export > Render Video. Make any adjustments to Output File Type, or select one of the many Adobe presets to make a YouTube or Vimeo-ready short film. Make sure that "Adobe Media Encoder" is selected rather than "Photoshop Image Sequence", or you will end up with a series of still JPEG images rather than a video.

When you are satisfied with the export settings, press Render, and let Photoshop make your movie.


Source

These Galaxy S22 Ultra Camera Features Mean Better Pictures Of Your Dog


These galaxy s22 ultra camera features means these galaxy s22 ultra camera features meanings these galaxy s22 ultra camera failed these galaxy s22 ultra camera capabilities these galaxy s22 ultra these galaxy s22 phone these galaxy flip
These Galaxy S22 Ultra camera features mean better pictures of your dog


These Galaxy S22 Ultra camera features mean better pictures of your dog

The Samsung Galaxy S22 Ultra's appealing display and sneaky hidden S-Pen stylus is exciting, but as a professional photographer, it's the camera setup I'm most keen to dive into. 

The S22 Ultra, launched at today's Unpacked event alongside the Galaxy S22, S22 Plus and Galaxy Tab S8, is already starting from a good place. Its predecessor, the S21 Ultra, had a superb camera, and much of it hardware carries over: The main camera still has a 108-megapixel resolution, the ultra-wide camera is 12-megapixels, there's a 10-megapixel lens offering 3x optical zoom and an additional 10-megapixel periscope lens offering 10x optical zoom. It's an almost identical setup to the S21 Ultra, but Samsung uses this as a foundation for changes that largely affect the software side. 

Read moreThe Galaxy S22 Ultra fails to excite this pro photographer. And that's a problem

The bad news is that if you were hoping for some photography revolution, like the rumored 200-megapixel sensor or continuous zoom, then you'll be disappointed. Let's dive into what has and hasn't changed.

Improved low light and AI

The main driving force behind Samsung's promised boosts in low-light photos is something called "pixel binning" in which multiple pixels combine to form a larger pixel that's capable of capturing more light. In the S22 Ultra's case, 9 individual pixels combine to create a single pixel in a process called "nona binning." But the image also uses details captured by the 108-megapixel camera to create a shot that's bright, vibrant and free of image noise, but still packed with detail. At least, that's the idea. 

1-34-galaxy-s22-ultra-nightography2-li

We're looking forward to seeing how well the phone copes in dark situations like this.

Samsung

Samsung also says it's improved the AI processing of images, especially night shots, to further reduce image noise and improve the overall quality. Whether these software tweaks make a noticeable difference in night-mode shots remains to be seen, but the phone will have to work hard to compete with the night mode shots from the iPhone 13 Pro and Pixel 6 Pro

Read more: Samsung's Galaxy S22 vs. iPhone 13 and Galaxy S22 vs. Pixel 6 Pro

Better portrait blur, now with added doggos

Portrait mode photos with artfully out-of-focus backgrounds aren't new, but they've been getting steadily better over the past few years, yielding more natural-looking results. Samsung reckons its most recent algorithm updates can pick out even a single strand of hair from its background, ensuring your subject stays entirely in focus, with a natural blurred background (called "bokeh") around them. 

The phone will apparently be able to do this even with complicated backgrounds. Samsung showed one demo involving a girl standing in front of what looked like a fishing net, and the blurring around her looked spot-on. 

1-28-galaxy-s22-ultra-s-pen-writing-li

Once you've captured the perfect dog photo you can use the S-Pen to draw all over it like the monster you are.

Samsung

But more excitingly still is that it apparently will work just as well with portrait photos of dogs and maybe other pets too. Whether it can really identify every hair around a poofy Pomeranian very much remains to be seen, but anything that encourages more photos of beautiful golden retrievers gets the seal of approval from me. 

Improved video quality

Like its predecessor, the S22 Ultra can shoot videos at up to 8K resolution from its main rear camera and at 240 frames per second at full HD for cool slow-mo videos. And while we aren't getting any more great leaps in resolution, high speed or video zooming here, there are some "behind the scenes" tweaks Samsung has made to improve video quality generally. 

The AI algorithms have apparently been boosted across the board, resulting in better HDR video footage, balancing those bright skies and those shadowy areas for a more even-looking shot overall. The AI also promises better auto focus and lower noise, particularly at night. 

1-30-galaxy-s22-ultra-portrait2-li

Samsung promises better-looking low light in video, too.

Samsung

Videos can now be shot using an automatic, variable frame rate, which will change depending on conditions and could help reduce that annoying flicker you can get when shooting under artificial lighting. A higher frame rate can also help achieve smoother footage when filming fast-moving objects, such as cars whizzing past at a motor race. 

The downside is that variable frame rates can be very difficult for video editing applications like Adobe Premiere to handle, so if you plan on shooting and editing your footage this might be a function to avoid. 

Samsung's also added an auto-framing option for video, whereby the camera will automatically zoom in and out when you're filming people to capture everyone in the scene. It can detect up to 10 individual faces, and tapping on one person's face will allow the camera to automatically zoom in and track them in the scene. 

I can't think of a lot of occasions where this function would be all that useful to me, but that might just be because I've not been around more than three people at once since the end of 2019. 

1-08-galaxy-s22-ultra-back8-burgundy-design-li

Expert Raw sounds like it could offer great images. But why does it need to be a separate app?

Samsung

Expert Raw for better pro shots

Samsung is introducing a dedicated pro photography app -- called Expert Raw -- which will allow for manual control over settings like shutter speed, ISO and white balance, while also allowing for capturing images in 16-bit DNG raw format. Raw images typically allow for much more control over editing in apps like Adobe Lightroom, while also capturing more details in bright highlights and dark shadows than JPEG images are usually able to. Exactly how this will differ from its existing "Pro" mode, which also gives control over those settings and lets you shoot in DNG raw, remains to be seen.

Samsung also mentioned in its briefing that Expert Raw will also allow for "high dynamic range pictures in multiframe raw format" -- potentially meaning it will be able to combine different exposures into one HDR image with better dynamic range, yet still produce a DNG raw file that offers the flexibility of raw editing. This sounds very much like computational raw photography and it's exactly what Apple did with the introduction of ProRaw on the iPhone 12 Pro. 

However, it's not clear at the time of writing if this definitely is computational raw, or if it's just regular raw files that may allow you to pull back a bit more highlight detail. I've reached out to Samsung for clarification and will update this article when we hear more. If it is then that could be an exciting step forward for the phone's photographic capabilities, but it's baffling why this is only something you can apparently only do in a dedicated Expert Raw app that requires downloading from Samsung's Galaxy Store, rather than directly from the main camera, as you can do with the iPhone. 

For more, check out how Samsung's new Galaxy phones compare, what to know about nightography and what the Galaxy S22 means for the Galaxy Note series. Looking to buy one of the new handsets? Take a look at CNET's guide to Galaxy S22 preorders


Source

DJI FPV Drone Hands-on: A High-speed Immersive Flying Experience With 4K Video For $1,299


Dji fpv drone fly more dji fpv drone footage dji fpv drone only dji fpv drone skins dji fpv drone video dji fpv drone footage dji fpv drone uk dji fpv drone case
DJI FPV drone hands-on: A high-speed immersive flying experience with 4K video for $1,299


DJI FPV drone hands-on: A high-speed immersive flying experience with 4K video for $1,299

The DJI FPV drone is made for everyone but is not for everyone. It's built for speed and agility, but its features and capabilities cater to both beginner pilots and those who can keep a drone in the air without the assistance of sensors and GPS. The FPV drone is also much more about experiencing flight than it is about what the camera can do. 

In the box for $1,299 (£1,249, AU$2,099) you'll get the FPV drone, DJI's FPV Goggles V2, a new gaming-style controller and a single battery. That means out of the box you have everything you need for FPV flying and, with the exception of a firmware update, it's also ready to fly. That's unusual for the category, which is still mainly a DIY situation. Even the prebuilt drones this size usually require some setup. 

dji-fpv-09

The FPV has obstacle detection to help beginners.

Drew Evans/CNET

No fear of flying (well, almost)

If you've never flown using an FPV headset, it can be simultaneously thrilling and terrifying, with a little bit of nausea thrown in for good measure (at least for me). It really does feel like you're in the pilot's seat of an aircraft as you soar through the air or zip above the ground at speeds up to 87 mph (140 kph). It also means one small control slip-up could take you out of the sky and empty your wallet. 

If you've ever built your own racing drone, you're likely good to repair damage from crashes. Trying to lower that bar, DJI made some of the FPV's parts easily replaceable, specifically the landing gear, the plastic top shell (an extra is included), the gimbal and the propellers. It's sturdier than DJI's other drones, too, which helps if you get a little too close to a tree, building or other obstacles. 

The large battery is integrated into the frame and securely clips in. DJI says it will last up to 20 minutes, but that's going to depend on how aggressively you're flying. Still, I didn't have any problems getting past the 10-minute mark in Sport mode, which is about the best you can do. It's typical for an FPV drone to only last five to 10 minutes in the air. 

dji-fpv-06

Most of the main body is a battery.

Drew Evans/CNET

Choose your own adventure

The FPV has three flight modes -- Normal, Sport and Manual -- with varying degrees of automated assistance. Normal mode is the closest to flying something like DJI's Air 2 or Mini 2 camera drones. Cameras on the bottom can keep the drone hovering in place without your help, while more on the front will slow you down as you approach obstacles. The top speed is 30 mph. 

Switching to Sport mode lets you fly at up to 60 mph, but the front obstacle detection is shut off. In Manual mode, you're pretty much on your own, although by default it starts with an attitude limit that can be turned off. There is no obstacle detection and no help hovering in place. You can even open up the back of the controller and adjust the stick tension so they don't spring back to the center. 

No matter what mode you're in though, you get an emergency brake on the controller and the same button will trigger the drone to return to the home point. Plus, there's a Find My Drone feature that you can use if you crash and can't see exactly where it went down. 

Analog performance with digital clarity  

dji-fpv-02

The Goggles are lightweight and comfortable. 

Drew Evans/CNET

Most FPV drones aimed at consumers typically rely on using an app and your phone in a VR-type headset. That's fine for casual flying, but the latency of the video feed from the drone's camera to the phone won't be much good at speeds up to nearly 90 mph. On the other hand, FPV racing drones generally use low-resolution analog cameras to send a low-latency feed to a headset while a second camera records the action. The image quality isn't great but when milliseconds count, you want as little delay in the video as possible. 

The FPV drone paired with the FPV Goggles V2 solves these problems by using DJI's transmission technologies to give you low-latency video with great visual clarity. When DJI launched the Goggles I said it's like the difference between a VHS tape that's been played a few too many times and a remastered DVD. 

It's the clear, cinematic live view at 810-pixel resolution that drives the immersive experience from the FPV. Plus, since all of the pieces are paired and ready out of the box, it's a hassle-free experience. Turn on the drone, the headset and the controller and you're ready for take-off. 

A controller fit for FPV gaming

dji-fpv-03

The controller ties it all together. 

Drew Evans/CNET

Many transmitters used for FPV drone racing are large, clunky and loaded with switches. DJI's controller has more in common with your favorite gaming console controller. Flying by FPV feels a lot like you're playing a racing game with a view from behind the wheel, so it's fitting that the controller feels like one made for gaming. 

On top, you just have the two sticks, the power button and a programmable shortcut button. The sticks unscrew and can be stored in the controller's grips and the antenna flips down so it's easier to slip into a bag. The back of the controller is loaded with buttons to control the camera and performance. For example, there's a switch for jumping between flight modes as well as a switch and a dial for moving the camera up and down on its gimbal. 

DJI also made a single-handed pistol-grip motion controller. There are buttons for camera controls, the emergency brake and take-offs and landings. Flying, however, is done by pulling back on a trigger and tilting your hand to the sides or up and down. It's available for $200. 

More a drone with a camera than a camera drone

dji-fpv-05

The FPV's camera records 4K video and transmits a view to the headset.

Drew Evans/CNET

The FPV's camera can record video: up to 4K resolution at 60 frames per second and 128 Mbps, or 1080p at up to 120 fps. It's on a single-axis gimbal for image stabilization, as opposed to the three-axis gimbals found on most of DJI's drones. The gimbal helps when rotating vertically, but most of the shake and vibration is controlled with DJI's RockSteady electronic stabilization. The results are overall good, especially given how quickly the drone moves, but it's not without some motion artifacts. If you're expecting the silky smooth -- and level -- video of a three-axis gimbal, you're better off with a Mavic 2 Pro

Also, recording video is pretty much the end of the road for camera features. There are no drone modes or any other automated camera moves. There's no subject tracking or panorama photos. You can correct distortion to remove the fish-eye look from your recordings and video can be stored in H.265 or H.264. That's it, though, and all of the settings are navigated with a mini-joystick and buttons on the headset. Also, there's a microSD card slot on the headset so you can record the FPV video, but it won't have the RockSteady stabilization. 

dji-fpv-06

A big battery for big power. 

Drew Evans/CNET

The DJI FPV is fun to use. For beginners, there's just enough flight assistance to take some of the intimidation out of flying. Experienced pilots will appreciate the additional camera control and how agile and fast the drone is and the great-looking video in the headset. And it's also a good, albeit expensive, way to grow as an FPV pilot without needing to cobble together your own drone, headset and transmitter combo. 


Source

Best Action Cameras Of 2022


Best action cameras of 2022


Best action cameras of 2022

When you think of action cameras, there's a good reason that GoPro is often the first brand name that comes to mind. GoPro cameras are compact, lightweight and built to be tough enough to withstand extreme adventures. But GoPro isn't the only game in town. If you're looking for a good high-resolution, mountable, rugged waterproof camera to take on your next incredible outing, we can help you find the best action camera for your needs. 

A good action camera offers a variety of features to help you make a great video recording of your most extreme exploits. Some features are must-haves, like image stabilization and a waterproof case. Others aren't necessarily make or break for a sports camera, such as a touch screen, 4K resolution and remote control compatibility.

With that in mind, here are the best action camera models we've tested. All of these action cams are portable, tough and, depending on the shooting mode, have solid video quality. Keep reading to find the best action camera for you. If you've had good results from an action camera not mentioned here, please share it in the comments.

Joshua Goldman/CNET

This is the best single-lens action camera you can get from GoPro at the moment in features and performance. Compared with the Hero 8 Black, there are new tools for photos and videos like being able to schedule recordings or set them for a specific duration -- from 15 seconds to 3 hours -- and it now records at 5K at 30 frames per second. That might sound like overkill, but you can pull high-quality stills from the video, making 5K video good for when you can't choose between getting a movie or stills. 

However, the biggest changes are in the design of the GoPro camera. The Hero 9 Black is larger to accommodate a bigger, more powerful battery. The lens cover is also now removable so it can be replaced easily if it gets scratched. It also allows you to add lenses including the new GoPro Max Mod Lens that gives you an ultrawide view with hypersmooth stabilization. The action camera is currently on sale for $400, but if you sign up for GoPro's service, the camera price drops to $350 and that includes the service costs. 

Read about the GoPro Hero 9 Black.

Josh Goldman/CNET

While GoPro has long called itself the most versatile camera, the Insta360 One R takes versatility to another level. The One R's modular design lets you swap out camera modules for different features and shooting options. At the moment, the module options include a 4K video wide-angle camera for that traditional 4K action camera experience with 4K footage; a dual-lens 360-degree camera; and a Leica-engineered camera with a 1-inch sensor for the best image quality possible even in low light conditions. 

Each camera has its own unique capabilities letting you really push your creativity. However, should you get stuck, the company's mobile app and the Insta360 community are a constant source of inspiration. Speaking of the mobile app, it has superintelligent editing features that make it easy to create sharable clips. And all your footage will look incredibly smooth when you use its FlowState image stabilization. 

But one of the best parts of the Insta360 One R is that the company never stops improving it and adding features. For example, it just updated the device so it can be used as a webcam, and with the camera's WiFi you can now livestream with the 360 camera. There is no shortage of accessories for it, either, including a dive housing and a selfie stick that disappears from view when you use it with the 360 camera. 

Sarah Tew/CNET

The Hero 8 Black's image quality, stabilization and features aren't too far off from what you get with the Hero 9 Black, but its price is certainly more affordable. This 4K video camera was the company's first to feature the redesigned waterproof housing body with built-in mounting fingers to attach the camera directly to a GoPro mount. This HD video camera also has a customizable interface with shooting presets and improved video stabilization and image quality from the Hero 7 Black. The lens, while not removable like the 9's, is made with Gorilla Glass that's twice as impact-resistant as the glass on past Hero models.

Read our GoPro Hero8 Black review.

Sarah Tew/CNET

For a company known for its camera drones, DJI got a lot right with its first action cam. One of its stand-out features is its front color screen. Osmo Action might be small, but it's enough to make sure you're centered in the shot when the camera lens is facing you on a selfie stick. Another great feature of the camera is that it responds to voice commands -- the view can be switched with a voice control. It's also waterproof and rugged with removable lens covers, it has great electronic image stabilization, shoots HDR video and has customizable presets so you get to control the shooting modes you want without diving into menus. This is an excellent waterproof camera for people who are looking for better control when shooting photos and videos.

Read our DJI Osmo Action preview.

Josh Goldman/CNET

Good 4K video for less than $150 and it has a front display. The Brave LE is quite the deal. The body is water-resistant but, along with a variety of mounts, two batteries, a charger and a wrist remote, Akaso includes a dive housing good to 40 meters (131 feet). A touch screen on the back lets you tap your way through its simple interface to change modes and camera settings. A long press on the Mode button on top lets you switch to the front display so you can see yourself while you shoot. 

You get several shooting options with this 4K action camera including video and photo time-lapse modes, slow motion and loop recording. It has Diving and Driving modes: the former to compensate for the lack of red light in underwater scenes, the latter will turn on and off with your car when you have the camera connected to your car for power. 

As for picture quality, you'll want to keep this budget action camera set to 4K30 with the image stabilization and video quality set to high for the best results, though. Also, while it offers a solid mix of resolutions and frame rates, not all of them have image stabilization including 1080p120 for slow motion.  

Read more about all types of cameras


Source

Tags:

Search This Blog

Menu Halaman Statis

close