Portable Bluetooth Speakers

Dell xps 13 plus review this slim premium laptop computers dell xps 13 plus review this slim premium laptop cases dell xps 13 plus review this thing dell xps 13 plus reviews dell xps 13 9370 dell xps 13 price dell xps 8940
Dell XPS 13 Plus Review: This Slim Premium Laptop Isn't Afraid to Shake Things Up


Dell XPS 13 Plus Review: This Slim Premium Laptop Isn't Afraid to Shake Things Up

When you open up the XPS 13 Plus, three things will immediately strike you as... unusual. Those design choices make the XPS 13 Plus stand out so much visually, but they also make for an unconventional experience. Not necessarily a bad one, but certainly one that fights years of laptop design muscle memory. 

First is the touchpad, which sits, disguised, along the edge-to-edge palm rest. It's there, but you can't actually see it. The touch-sensitive part of that front area is indistinguishable from the part you just rest your hands on. 

Apple laptops still have a distinct panel for touch, some laptops from Dell's own Alienware line have touchpads that literally glow in different colors, but here it's guesswork. In practice, however, I found the touch-sensitive area relatively easy to use. It runs from the left edge of the spacebar on one side to the right edge of the Alt key on the other. Sure, it would be cool to have the touchpad run the entire length of the body, but that would be a nightmare for palm rejection AI and probably not as useful as you'd think.

Like

  • Inventive new design
  • Very slim and light
  • Excellent performance
  • Great OLED display
  • Included USB-C dongles

Don't Like

  • You might not love the new touchpad, keyboard and function keys
  • Underwhelming battery life
  • Heat and fan noise
  • Low-resolution webcam
  • No headphone port

But the larger point remains -- people are used to how touchpads work and what they look like, so you mess with that shared experience at your own peril. In this case, the touchpad's overall feel is good for a Windows laptop, but it could also feel either too sensitive or not sensitive enough, depending on what I was doing. The best word for an overall vibe would be "floaty," and it suffers in comparison by landing on my desk immediately after the latest MacBook Air, which is the platonic ideal of touchpad feel and functionality. 

Dell makes a big deal of the haptics of the touchpad. It feels like you can click it down, but it's not actually depressing. MacBook touchpads have worked the same way for years. Personally, I'm a tapper, not a clicker, so it didn't make a huge difference to me. 

xps13-4.png

The invisible touchpad. 
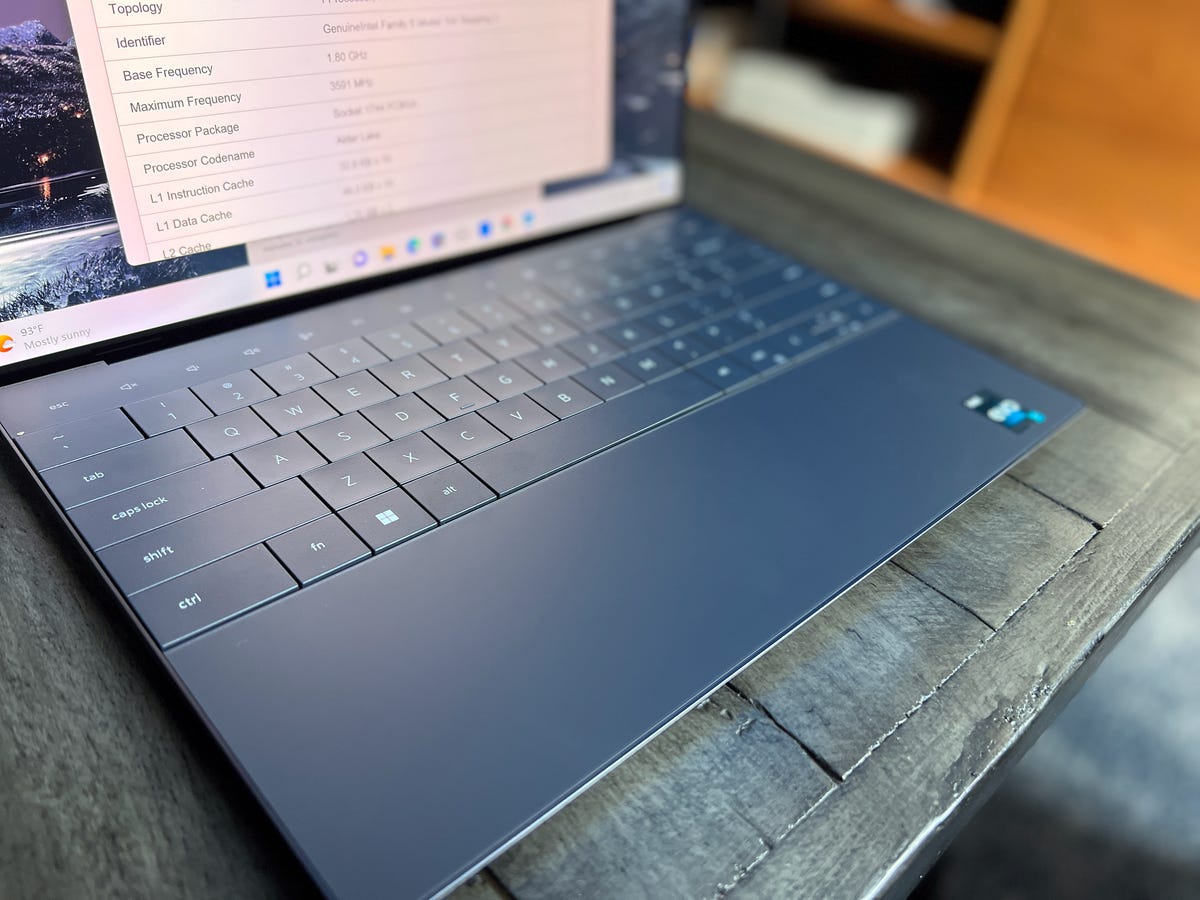
Dan Ackerman/CNET

Next is the keyboard, which ditches the standard island-style keys -- flat with a modest space between each one -- for an edge-to-edge design, where each key brushes up against its neighbor. It's a style that popped up occasionally in the 2010s, but one I haven't seen in a while. It lets you offer a larger top surface for each key and in some cases, helps make a laptop thinner. I got used to it quickly but, again, my muscle memory fought it. It also lacks the satisfying snap of a good island-style keyboard. 

The last big change is to the Function key row. It reminds me of the now-deprecated Apple Touch Bar, as it's a backlit row of touch-sensitive icons. The media and system commands are lit by default -- brightness, volume, keyboard backlight and so on. Hold the Fn key and you see the typical F1 to F12 keys. You can swap the behavior the other way if you prefer. 

Why do this? Again, I believe it's to shave some thickness from the system and allow for its hinge mechanism. I'm not against the idea in principle, but the MacBook Pro's rough go of it shows that people aren't itching to swap physical buttons for virtual ones. And this isn't a full-color user-assignable OLED screen strip like Apple's version, either. But in the end, the only thing I think you'll miss is having a physical Esc key, which can be important in your day to day use. I liked how clear the icons were and how they were boldly backlit. 

xps13-6.png

Function keys are replaced by a touch strip. 

Dan Ackerman/CNET

Configuration and performance

Once you put aside those three breaks with laptop design orthodoxy, the rest of the XPS 13 Plus is a conventional and mostly excellent premium 13-inch laptop experience. The XPS 13 line has always been one of my favorite Windows laptops, and this looks and feels like a high-end machine that will be a conversation piece whenever you whip it out. 

The XPS 13 Plus starts at $1,299 and the model I tested is currently $1,949. It includes an upgraded CPU, RAM and display. I liked that there are four 13.4-inch screen options, both OLED and LCD, ranging from a 1,920x1,080 non-touch screen to a 3,840x2,400 touchscreen.

Inside, the version here has a 12th-gen Intel Core i7-1280P, and all the engineering to squeeze it into this 15mm-thick body is impressive. That said, the fans spin up audibly, sometimes sounding like a little white noise machine in the background, and even then, the system got very warm, especially on the bottom panel. 

xps13-3.png
Dan Ackerman/CNET

Performance with that 12th-gen Core i7 is a highlight, and it's nice to have this much raw horsepower in a high-design, executive-class laptop. I've compared it to Apple's latest mainstream and Pro laptops, as well as comparable Windows systems. It's part of Intel's Evo program, which is a designation for premium slim laptop designs with good performance. If you go with the least expensive configuration, you get a Core i5 from the same generation. 

In the preloaded My Dell app, you can switch between performance presets (navigate from My Dell > Power > Thermal). The Performance mode was indeed faster, but also cranked the fans up even more, created a lot of heat, and certainly didn't help the already limp battery life. 

Display and webcam 

The display is also a highlight. I tested the 3,456x2,160-pixel touchscreen version, which is an impressive-looking OLED panel. Dell calls this 3.5K and you can also get a true 4K version, but that's no OLED panel. Either one is a $300 upgrade from the base non-touch Full HD 1,920x1,080-pixel model. There's also a FHD touch panel for $100 more, and if you're looking to cut costs, it's probably where I'd go. On a relatively small laptop, you can get away with FHD resolution, but adding touch is going to be valuable. 

I'm less pleased with the 720p webcam. Premium laptops have made a major switch to FHD cameras in the past couple of years, even dragging long-time holdout Apple in with the latest MacBook Air Dell says the lower-res camera here benefits from image processing help on the software side, but I found it to be merely ok. Jumping into a Zoom meeting in low light, I had a distinct orange hue. Adding a higher-resolution camera would likely mean a thicker lid, so I get that there's a size-versus-functionality tradeoff. 

win-20220808-14-20-00-pro

A great webcam, this is not. 

Dan Ackerman/CNET

The camera is also used for Dell's presence-detection features, which I find interesting. It can wake from sleep mode when the camera detects your face, or it can lock itself when you walk away. But the feature I liked most was called Look Away Detect, which will dim the screen if it sees you looking away. That's good for both battery life and privacy, and worked so well that I think more laptops should have a feature like that. 

It has just two Thunderbolt USB-C ports, which is frankly fine for most people these days, and it matches the most recent 13-inch MacBook Pro. But, Dell kills the headphone jack, which might be rarely used, but is a notable exclusion nonetheless. A USB-C-to-audio dongle is included in the box, as is a USB-C-to-USB-A one. That's a nice bonus, and one that some companies (ahem, Apple...) would probably make you pay extra for. The downside is, if you keep it plugged into power and use the headphone adaptor at the same time, you're out of ports. 

Battery life and roadworthiness 

Despite focusing on some of the unusual design choices and limitations, there's a lot I love about the XPS 13 Plus. I love a sharp, original design and am willing to trade a little familiarity to push the edges a bit. This level of performance in a slim, light laptop like this is enviable (as long as we're sticking on the non-dedicated GPU side of things), and the hidden performance modes offer more flexibility than I'm used to seeing in similar laptops. 

But there's one more wrinkle in the formula. Battery life. In benchmark testing, the XPS 13 Plus ran on the short side, at about 4 hours while streaming online video, which is far from the most strenuous thing you might ask it to do. In hands-on use, it felt a little better depending on what I was doing, but it also dropped from almost 70% to under 30% in less than 2 hours while I was writing this review. 

xps13-5.png

Ports are limited, but dongles are included. 

Dan Ackerman/CNET

Use the optimized performance preset, turn down the screen brightness, close unused apps and you can likely push the battery life to a better place. But I don't feel confident that I could pick up this laptop in the morning and work on it all day without charging. It helps that there's an express charging preset for powering up part of the battery quickly. 

The nearly 4K screen doesn't do the battery any favors, although the fact that it's an OLED panel should help. That's one reason I'm cautious about recommending 4K laptops -- higher-resolution screens are a battery killer. 

The XPS 13 Plus has a lot of innovative ideas -- some of which are important, while others seem like change for the sake of change. We may even disagree on which is which. If I were working on the next generation of this laptop, I'd keep the design updates but suggest sacrificing a little thickness for a bigger battery so this could be a more travel-ready companion. 

Geekbench 5 (multicore)

Acer Swift 5 (SF514-56T-797T)

Lenovo Yoga 9i (14-inch, Gen 7)

Apple MacBook Air (13-inch, M2, 2022)

Dell XPS 13 Plus 9320

Asus Zenbook S 13 OLED

Note:

Longer bars indicate better performance

Cinebench R23 (multicore)

Acer Swift 5 (SF514-56T-797T)

Dell XPS 13 Plus 9320

Asus Zenbook S 13 OLED

Lenovo Yoga 9i (14-inch, Gen 7)

Apple MacBook Air (13-inch, M2, 2022)

Note:

Longer bars indicate better performance

3DMark Wild Life Extreme

Apple MacBook Air (13-inch, M2, 2022)

Dell XPS 13 Plus 9320

Lenovo Yoga 9i (14-inch, Gen 7)

Acer Swift 5 (SF514-56T-797T)

Asus Zenbook S 13 OLED

Note:

Longer bars indicate better performance

Online streaming battery drain test

Apple MacBook Air (13-inch, M2, 2022)

Lenovo Yoga 9i (14-inch, Gen 7)

Acer Swift 5 (SF514-56T-797T)

Note:

Longer bars indicate better performance

System Configurations

Dell XPS 13 Plus 9320 Windows 11 Home; 1.8GHz Intel Core i7-1280P; 16GB DDR5 6,400MHz RAM; 128MB Intel Iris Xe Graphics; 512GB SSD
Apple MacBook Air (13-inch, M2, 2022) MacOS Monterey 12.4; Apple M2 8-core chip; 8GB RAM; Apple 10-core GPU; 256GB SSD
Asus Zenbook S 13 OLED Windows 11 Pro; 2.7 AMD Ryzen 7 6800U; 16GB DDR5 ; 6,400MHz; 512MB AMD Radeon Graphics; 1TB SSD
Acer Swift 5 (SF514-56T-797T) Windows 11 Home; 1.8GHz Intel Core i7-1280P; 16GB DDR5 6,400MHz RAM; 128MB Intel Iris Xe Graphics; 512GB SSD
Lenovo Yoga 9i (14-inch, Gen 7) Windows 11 Home; 2.1GHz Intel Core i7-1260P; 16GB DDR5 5.200GHz RAM; 128MB Intel Iris Xe Graphics; 512GB SSD

How we test computers

The review process for laptops, desktops, tablets and other computer-like devices consists of two parts: performance testing under controlled conditions in the CNET Labs and extensive hands-on use by our expert reviewers. This includes evaluating a device's aesthetics, ergonomics and features. A final review verdict is a combination of both those objective and subjective judgments. 

The list of benchmarking software we use changes over time as the devices we test evolve. The most important core tests we're currently running on every compatible computer include: Primate Labs Geekbench 5, Cinebench R23, PCMark 10 and 3DMark Fire Strike Ultra. 

A more detailed description of each benchmark and how we use it can be found in our How We Test Computers page. 


Source

Read substack for free is there a substack app does substack have an app does substack have an app getting started with substack substack what is it is substack free to use substack app win 10 getting started with substack substack deutschland
Substack Debuts iOS App for Reading Newsletters


Substack Debuts iOS App for Reading Newsletters

Substack has just unveiled its first mobile app, which operates like an RSS reader for Substack writers.

Launched in 2017, Substack provides a publishing platform for monetizable newsletters covering a variety of topics, including politics, tech, finance, culture, parenting, music, comics and food.

Instead of scrolling through their email inbox, users of the Substack Reader app can access a feed of the newsletters they follow, available in a reader view with comments included.

Substack

Users of the Substack app can digest their favorite newsletter in a reader format.

Screenshot/CNET

Followers get notifications when new installments are available, and can tap into an author's related content, including podcasts and videos. They also receive recommendations for new authors.

Substack writers benefit, too, the company said, with reliable delivery and "multiple media formats in a single package."

In a series of tweets Wednesday morning, Substack co-founder Hamish McKenzie compared the new app to the dearly departed Google Reader, the RSS reader that shuttered in July 2013.

"I remember how good it felt to be a thinking person who liked to read on the internet," wrote McKenzie, a former journalist. "I remember being able to follow my favorite writers and read them at length, where their arguments could be made calmly, where there was a point in aiming for beauty."

Hearkening back to "the time before we gave up our minds for dopamine hits," McKenzie said the Substack app "makes me feel like a reader again."

The Substack Reader is currently only available in the Apple App Store. A representative told CNET a waiting list is available for those who want to be notified when the Android version launches.


Source

Adjust the blur of portrait mode photos on any iphone with dual sim adjust the blur of portrait mode photos on any iphone with largest adjust the blur of portrait photography adjust the blur of portrait of a lady adjust the blur of portrait of dorian adjust the blur of portrait background adjust the blur of portrait artist
Adjust the blur of portrait mode photos on any iPhone with Google Photos


Adjust the blur of portrait mode photos on any iPhone with Google Photos

One of the big selling points of the iPhone XS, XS Max and iPhone XR is the ability to edit the depth effect in portrait mode photos. These new iPhone models let you edit portrait mode photos to increase or decrease the background blur effect -- aka bokeh -- to your liking. It's certainly a handy feature and gives you much greater control of photos taken in portrait mode. And now you don't need to upgrade to Apple's latest crop of iPhones to get this depth editing, thanks to a recent update to Google Photos.

Google Photos for iOS has a new depth-editing tool for your portrait mode photos. You can also change the focus point and use the new Color Pop filter for portrait mode photos that keep the foreground subject in color while desaturating the background for dramatic effect. 

Depth editing with Google Photos

To adjust the background blur, open a portrait mode photo in Google Photos and tap the edit button. You'll see a belt of filters (including the new Color Pop filter, which I'll get to in a minute), but you'll need to tap the edit button again to get to the Depth slider. It sits below the usual sliders for Light and Color. Move the Depth slider to the right to increase the blur effect and to the left to decrease it.

google-photos-ios-depth-edit
Screenshot by Matt Elliott/CNET

Change the focus point

If you find that the edges between the foreground subject of your portrait and the blurred background aren't quite right, you can tap on the photo to adjust the focus point. A white circle appears to help you find the right spot. You can also tap the background to bring it into focus and blur out the foreground subject for some sort of crazy reverse portrait.

Color Pop filter

The new Color Pop filter isn't offered for regular photos, but it's the first filter you'll see for portrait mode photos. It puts the blurred background in black and white while keeping the foreground subject in full color. After selecting it for a handful of photos, I found I needed to tap a photo to change the focus so that the edges lined up better between the subject in color and the monochrome background. You can also adjust the monochrome effect of the filter. After selecting it, tap the Color Pop filter thumbnail again to use a slider to adjust its intensity and add back a bit of color to your background.

google-photosd-ios-color-pop-filter
Screenshot by Matt Elliott/CNET

CNET's Holiday Gift Guide: The place to find the best tech gifts for 2018.

Best Black Friday 2018 deals : The best discounts we've found so far.


Source

Most annoying ios 16 features and how you can fix them in spanish most annoying ios 16 features and how you can fix a tire most annoying ios 16 features and how you can fix the pressure most annoying ios 16 features battery most annoying ios 16 beta most annoying ios 16 issues most annoying ios download most annoying commercials
Most Annoying iOS 16 Features and How You Can Fix Them


Most Annoying iOS 16 Features and How You Can Fix Them

As with every new release of iOS, there are features and settings that you'll absolutely love, and others that you'll downright hate. 

And the same can be said for iOS 16, which won't be available to the general public until sometime in the fall, but which you can try out right now as a public beta on your iPhone.

Read more: The iPhone 14's Future May Be Hidden in iOS 16

Fortunately, there's a way to get rid of or disable some of the more annoying features and settings in iOS 16, like the brand-new search button on the home page that's easy to accidentally tap and the redesigned notifications that now appear at the bottom of your lock screen. 

We'll explain how to turn off these irritating settings below. Also, if you want to learn more about what iOS 16 has to offer, check out these hidden features, like password-protected photo albums, and two new features available in Apple Maps.

Stop featured photos and memories from popping up on your iPhone

Apple's artificial intelligence helps surface photos and videos in various places across your iPhone it thinks you might want to see, as a friendly reminder of family vacations, couple photos and holidays -- but you may not always want your personal photos to pop up unexpectedly, especially if they're private, embarrassing or inappropriate.

Fortunately with iOS 16, you can now prevent Featured Photos, as well as curated collections known as Memories, from appearing in photo widgets on your home screen and the Search and For You sections in Photos. 

To block these tailored photos, launch the Settings app, go into Photos and toggle off Show Featured Content. All featured content will no longer appear across your device -- instead, it'll only be available in your photo library and albums.

Featured Content disabled on iPhone

Once Show Featured Content is turned off, featured photos and memories across your device should disappear.

Nelson Aguilar/CNET

Prevent the side button from accidentally ending your phone calls

The side/power button on the side of your iPhone allows you to quickly sleep and wake up your device, but if you accidentally hit it during a phone call, you'll prematurely end your call. If that's something you've encountered in the past, iOS 16 finally allows you to prevent that from happening.

In Settings, go to Accessibility > Touch and toggle off Lock to End Call to prevent the side button from ending your calls. If you do hit the side button accidentally, your screen will go to sleep, but you'll stay on your phone call, uninterrupted.

Lock to End Call setting on iOS 16

This feature is hidden in the Accessibility section of your settings.

Nelson Aguilar/CNET

Remove the search button from your home screen

The Search feature on your iPhone allows you to quickly find what you're looking for, whether it's a text message, third-party app, file, note and location -- pretty much anything on your device or on the web. And the best thing about the feature is that it's easily accessible from the home screen; all you need to do is swipe down anywhere on the screen, and it appears. 

And iOS 16 has added another way to access Search from the home screen, via a small button right above your dock. Unfortunately, it's easy to accidentally trigger, because it's near where your thumb might go when you swipe between your various home pages.

Fortunately, like many new features on iOS 16, this one can be disabled as well. Simply launch the Settings app, go to Home Screen and toggle off Show on Home Screen to remove the search button from your home screen. The Search bubble should disappear, replaced by a few small dots representing your various home screens.

Search button on home screen of iPhone

Even if you remove the Search button, you can still access the feature by swiping down from anywhere on your home screen.

Nelson Aguilar/CNET

Go back to the old lock screen notifications

Apple's latest redesign brings widgets, customizable fonts and colors, a wallpaper gallery and stylized date and time to the lock screen, as well as one overlooked change to notifications. Instead of appearing at the top of your lock screen, notifications now appear at the bottom, which you can then tap on to appear full screen.

However, not everyone may be happy with this change. If you want to go back to the way notifications appeared on iOS 15, launch the Settings application and go to Notifications > Display As. You'll then see three options:

  • Count: Notifications appear as a numbered count at the bottom of the screen.
  • Stack: Notifications appear in a stack at the bottom of the screen.
  • List: Notifications appear fully across your screen.

To go back to the old notification style, choose the List option.

Notifications on the lock screen

You can also pinch the notifications to switch between the three Display As options.

Nelson Aguilar/CNET

Source

Get a new mac here s what you need to know about setting itself right get a new mac here s what you need to know about setting itaitek get a new mac here s what you need to know about settings get a new mac here s mud in your eye origin get a new mac here s the thing alec baldwin get a new gmail account how to get a new medicare card get a new ss card
Get a new Mac? Here's what you need to know about setting it up


Get a new Mac? Here's what you need to know about setting it up

Apple's newest computers -- MacBook Air, MacBook Pro and Mac Mini -- are fast, have impressive battery life and can even run iPhone apps. The difference between this crop and previous models? These are powered by the Apple Silicon M1 processor. It's the same kind of processor the company uses in the iPhone and iPad. If you spoiled yourself and picked up a new Mac this holiday season, or were lucky enough to get one as a gift, don't rush through the setup process. 

Whether you're replacing a worn-down MacBook or getting rid of a tired PC, it's only natural to want to tear open the box, hit the power button and cruise through the setup prompts. But before you do that, take a deep breath and a step back. There are some things you need to know about setting up a Mac.

For starters, the process can take several hours if you plan on transferring your data from another computer. Then there are other things to consider: Do you need FileVault? How can you get information off of your old Mac or PC and onto the new one? Those questions are exactly why we're here.

img-1734

There's something special about getting a new computer. 

Dan Ackerman/CNET

What you'll need

Make sure to set aside around an hour to get your Mac set up. The process will take longer if you plan on restoring your Mac from a Time Machine backup of another Mac.

In addition to a reliable internet connection, you'll need your Wi-Fi network information, your Apple ID username and password, and the Mac's charger or power cord. 

Having a piece of paper and a pen nearby is helpful. During the setup process, you'll be asked to create a user account, which includes a username and password. We don't recommend storing passwords on paper -- it's much safer to use a password manager -- but a piece of paper is helpful for temporarily storing this kind of information until you can enter it into your password manager. Just make sure to destroy the piece of paper when you're done. 

Once you have everything in order, connect the charger or power cord to your Mac and turn it on. 

Mac Setup Assistant.png

Setting up a new Mac isn't hard, but it can take some time. 

Apple

Apple's Setup Assistant walks you through most of the process

The first time your Mac turns on, a setup assistant will greet you. The assistant will walk you through selecting your country and language, and connecting the Mac to the internet. You'll also be tasked with creating a user account on the Mac and signing into your Apple ID. 

Throughout the process you'll be asked if you want to enable services like FileVault, iCloud Keychain or Find My Mac. You'll also be asked if you want to enable Siri or provide any logs to developers when issues are detected. Here's what some of those features mean for you.

FileVault encrypts your Mac's hard drive to prevent unauthorized access to the information you store on it. If you aren't sure, you can always enable or disable it in the future.

iCloud Keychain is Apple's password manager that's built into all of its devices. If you use iCloud Keychain on an iPhone ($500 at Best Buy) or iPad ($176 at Amazon), those usernames and passwords will also be available on your Mac. iCloud Keychain also stores your Wi-Fi network credentials, meaning you won't have to log into a Wi-Fi network on your Mac if you've previously connected to it on your iPhone. It's a good idea to turn on iCloud Keychain. 

Find My Mac works with the Find My app to help you track down a lost Apple device. I recommend turning on Find My Mac, even for a rig as large as an iMac ($990 at Best Buy) that's less likely to disappear, because you never know when you might end up with a lost or stolen MacBook. There's no drawback to turning it on.

If you have a MacBook, you'll also be tasked with setting up Touch ID, the fingerprint reader that unlocks your computer, lets you sign into apps or approve Apple Pay purchases. All of it is pretty straight-forward, just continue to follow the prompts, entering any required information such as your Apple ID or creating a user name, to finish the core of the setup process. 

macos-high-sierra-migration-assistant

Migration Assistant makes it easy to transfer all of your information. 

Apple

Restore from a Time Machine Backup

During setup, you'll be asked if you want to restore your new Mac from a Time Machine backup of another Mac through Migration Assistant. If so, you'll need the storage device your Time Machine backup is stored on. 

If you haven't backed up your old Mac through Time Machine, it's not too late. We have a guide that walks you through the process. Or if you'd rather directly transfer your files and settings from one Mac to another, Migration Assistant can do that, too

Follow the prompts in the Migration Assistant tool, selecting that you want to transfer your information from a Time Machine backup. Select the Time Machine drive that's connected to your new Mac, and select the most recent backup.  

Next, you'll be asked to confirm which information you want to transfer -- including home folders, applications, settings, user accounts and other miscellaneous documents. 

The process can take several hours, depending on how much you have to transfer. If it's going to be awhile, you don't have to babysit it. It's perfectly fine to leave your computer and go watch a show, let it process overnight, or even run some errands. 

One thing to keep in mind, and Migration Assistant will remind you if you run into this, is that your new Mac needs to be on the same OS update as your old Mac (or vice versa). So you may have to finish the setup process without using Migration Assistant, then update your OS (directions covering how to do that are below), and then run Migration Assistant. 

If you're switching from a PC to a Mac, you can use Apple's Migration Assistant, but the process is a little bit more involved and technical (just at the beginning). Apple walks you through the process in this support article. 

48-macbook-pro-16-inch

Once you have your Mac all set up, it's time to get to work! 

Sarah Tew/CNET

Install any software updates

Once you've completed the Setup Assistant and find yourself looking at your Mac's desktop, it's a good idea to check for any pending software updates. 

To do that, click on the Apple logo in the top-left corner of the screen followed by System Preferences > Software Update

Once your Mac's software is up to date, you'll also want to check and make sure all of the preinstalled apps are updated in the App Store. Find the App Store icon in the app dock along the bottom of your screen. Click on it to open the App Store and then select Updates and then update any apps with pending updates. 

Now that you have your Mac all set up, it's a good idea to be prepared for any hiccups you may run into. Here are system tweaks you may want to make right away. If this is the first time you've used MacOS Big Sur, we have plenty of tips to help you get started. When your Mac inevitably slows down, learn how to speed it back up again


Source

Bill gates wordle strategy involves very specific rules of hinduism bill gates wordle strategy involves very specific rules are a major bill gates wordle strategy involves very specific type bill gates wordle strategy involves very specific shirts bill gates wordle strategy involves very specific t shirts bill gates wordle strategy first word bill gates wordle strategy youtube bill gates wordle strategy words bill gates wordle game bill gates and wordle
Bill Gates' Wordle Strategy Involves Very Specific Rules for Vowel, Consonants


Bill Gates' Wordle Strategy Involves Very Specific Rules for Vowel, Consonants

Bill Gates can't get enough of Wordle. The Microsoft co-founder and billionaire philanthropist took a break from the online puzzle game to write about his Wordle "obsession" and what kinds of words he starts the game with in a blog post published Tuesday. 

"If you've played Wordle, you know how important it is to make your first guess strategically," Gates wrote in the post, titled "I can't stop playing Wordle!"

Gates has kicked days off with a game of Wordle for several months, and that's not all. After attempting the Wordle of the day, he moves on to spinoffs like Quordle and Octordle, according to the post. Once he's puzzle-solved to his heart's content, he checks email "to see how I stacked up against the friends and family who share my obsession."

"Unlike some time sinks, Wordle and the other puzzles are a great way to stay connected with people, because they're the same for everyone," Gates wrote. "Every day you can ask your fellow Wordle fans, 'Are you ready to discuss it?' ... And by seeing who sends out their scores first, we know who got up earlier and who maybe stayed up too late the night before."

Wordle  tasks players with guessing a five-letter word in six tries or less. When a Wordler offers up a word, the letters show up in different colors that designate if they're in the right place in the word or not. With Quordle, a player guesses four words; with Octordle, it's eight words. 

So how does Gates approach a game of Wordle? According to the blog post, he likes "to start with a word that contains lots of vowels, like AUDIO or OUNCE. ADIEU is a good one too." (Want more starting words? Here are some of CNET's favorites). 

Next, he wrote, "it helps to think about which consonants (consonants = not a vowel) can go next to each other," like C and H, or S and L.

"Then the consonants that are almost never paired with others-like Q, V, X, and Z-really jump out," Gates wrote. 

Gates says he has to remind himself that vowels can be at the start or end of words. 

He wrote that he usually solves the Wordle in the span of "four guesses, sometimes five." But he did offer a time when the puzzle bested him.

"One time, I had the last four letters of a word: A-S-T-Y. I just needed the first letter, but I was down to my final guess," Gates wrote. "Thinking of obscure words, I tried PASTY. But I'd forgotten one of the cardinal rules of Wordle: Letters can be used more than once. The answer was TASTY. I lost, thanks to that lousy double T. Lesson learned."


Source

Redmagic 7 pro precio redmagic 7 pro 5g redmagic 7 pro ár red magic seven pro nubia redmagic 7 pro price in pakistan redmagic 7 pro gsmarena redmagic 7s pro 日本 redmagic 7s pro case
RedMagic 7S Pro's Highlight Feature May Be Its Hidden 16MP Selfie Camera


RedMagic 7S Pro's Highlight Feature May Be Its Hidden 16MP Selfie Camera

What's happening

RedMagic 7S Pro's international model has an under-display selfie camera and will be available in the US.

Why it matters

Putting a front-facing camera underneath the screen makes sense for a gaming phone like the RedMagic 7S Pro, as it gives you more screen real estate to play with.

What's next

As photo quality improves for under-display cameras, mainstream phones may adopt this style in 2023 and beyond.

Nubia's new RedMagic 7S Pro could be one of the first US phones to get the most benefit out of an under-display camera. The international model of the gaming phone was revealed Tuesday, with a price tag of $729 (£669, roughly AU$1,160). It has a 16-megapixel front-facing camera hidden underneath its display and it runs on the new Qualcomm Snapdragon 8 Plus Gen 1 chip. The phone is similar to a version released earlier in July in China. Putting the selfie camera under the display means you get more screen real estate for games.

We've seen under-display cameras before, but they either produce grainy photos, like the one on the Galaxy Z Fold 3, or they don't make it to the US, like the 32-megapixel one on the ZTE Axon 20. To be clear, the 4-megapixel under-display camera on the Galaxy Z Fold 3 is intended for video calls only. The phone has a dedicated selfie camera built-into the external display.

Given how unusual it is to see a US phone with an under-display camera, I immediately fired it up. I took a few selfies and called a friend on Google Duo to see how it holds up. For better or worse, it's hard to see where the front-facing camera is exactly. When using the default camera app, the dark borders on the display make it nearly impossible to see the under-display camera's position.

Selfie photo from RedMagic 7S Pro

The 16-megapixel front-facing camera takes an OK photo, considering the camera is hidden underneath the screen.

Mike Sorrentino/CNET

These aren't the best front-facing photos I've ever taken, but just the fact that they look OK and are able to pick up facial details from behind a screen is impressive.

The RedMagic 7S Pro's under-display implementation hints at what mainstream phones may do in their quest to eliminate the notch. It also reveals some of the advantages of holding on to it -- when I launched a Google Duo video call with my best friend Gary, the app added a visual "notch" around the camera to show me where to look. Google's virtual notch is likely an indication of just how rare under-display cameras are on phones.

Taking into account that I was using an under-display camera, Gary said the image quality for the video call was on nearly par with other phones I tested with him. I'm grading on a curve because I made the video call with a camera behind a screen.

RedMagic 7S Pro running Google Duo.

While running a Google Duo video chat on the RedMagic 7S Pro with my friend Gary, the software inserts its own "notch."

Mike Sorrentino/CNET

I haven't yet tested the phone's rear cameras, which include a 64-megapixel main camera, an 8-megapixel ultrawide and a 2-megapixel depth sensor. It's a similar setup to the $629 RedMagic 7. Photos from that phone were fine, but not likely the reason someone would pick up a gaming phone like this.

Many of the RedMagic 7S Pro's other features prioritize speed, graphical power or keeping the phone from overheating. Nubia says the new Qualcomm chip can reach a peak speed of 3.2GHz. The phone also has a dedicated gaming chip called the Red Core 1 and a built-in cooling fan that increases airflow by 16% over the RedMagic 7. The 7S Pro has a 5,000-mAh, dual-cell battery and comes with a 65-watt adapter. While I haven't tested battery charging on the 7S Pro, the RedMagic 7's 4,500-mAh battery fully charged up in 30 minutes using the same adapter.

The phone's 6.8-inch AMOLED screen supports a full HD resolution and a 120Hz refresh rate -- which means silky smooth animations. Keep in mind that the RedMagic 7's display can crank up to 165Hz. Nubia notes that the 7S Pro's screen has a touch sampling rate between 480Hz and 960Hz, which minimizes the lag between pressing an on-screen button and seeing that you did. I played a few rounds of the mobile version of Mortal Kombat and cranked up the graphics settings in Apex Legends Mobile, finding that both games ran smoothly and responsively.

The RedMagic 7S Pro phone playing Mortal Kombat

The RedMagic 7S Pro is able to support games with higher refresh rates and more demanding graphic settings.

Mike Sorrentino/CNET

As with previous RedMagic phones, you can flip an external switch on the side of the phone to boot up the Game Space launcher. The app minimizes menus to help you focus on gameplay and adds shortcuts for the phone's refresh rate, processor speeds and the cooling fan.

We're currently testing this phone alongside the RedMagic 7 Pro phone, which the 7S appears to be displacing, and will update with comparisons in later coverage.

The RedMagic 7S Pro phone

When playing a game from the RedMagic's Game Space launcher, you can quickly access performance settings for the processor and the refresh rate.

Mike Sorrentino/CNET

The RedMagic 7S Pro's $729 model has 12GB of RAM, 256GB of storage and a design called Obsidian. The step-up version is $899 and includes 18GB of RAM, 512GB of storage and RGB lighting for its cooling fan. It's available in supernova or a silver transparent mercury design. The RedMagic 7S Pro will be available to preorder on Aug. 2 and goes on sale at Amazon and RedMagic's website on Aug. 9.


Source

Search This Blog

Menu Halaman Statis

close