Gopro captures marriage proposal 10 000 feet above the ball gopro captures marriage proposal 10 000 feet above the clouds gopro captures marriage proposal 10 000 feet above the ground gopro captures marriage proposal 10 000 feet above sea gopro captures marriage proposal 10 000 feet equals gopro captures marriage proposal 10 000 feet gopro captures marriage proposal 10 muharram gopro captures marriage counselors gopro captures marriage of figaro gopro captures synonym gopro captures crossword gopro captures de transferencias
GoPro captures marriage proposal 10,000 feet above the Earth
GoPro captures marriage proposal 10,000 feet above the Earth
It's hard enough to look like a fool getting down on one knee to give an engagement ring to the one you love, so doing so while free-falling from 10,000 feet in the air must be terrifying.
But that's what skydiver Brandon Strohbehn did recently, proposing to his girlfriend while skydiving over sunny San Diego, Calif.
Strohbehn captured the proposal with a GoPro Hero 3+ camera so he and now-fiancee Nicole Nepomuceno can relive the adrenaline-filled moment any time they please. And what a crazy moment it was, as just after Strohbehn showed her the ring, he sent her plunging to the Earth below, though she thankfully caught her breath enough to open her parachute.
And, more importantly, he managed to not drop the ring. I imagine it would be even more difficult to track down a lost engagement ring than it would be to find Carmen Sandiego in America's Finest City.
The video was posted Thursday on GoPro's YouTube channel.
Shortly after jumping out of a plane, Brandon Strohbehn offers his girlfriend an engagement ring. Video screenshot by Anthony Domanico/CNET
V moda headphones on sale v moda headphone review v moda in ear headphones v moda xs review v moda m 100 review v moda headphones for sale la moda en los 80 v moda s v moda crossfade 3 v moda crossfade lp2
V-Moda S-80 Review: These Headphones Mystified Me, But They Do Have One Saving Grace
V-Moda S-80 Review: These Headphones Mystified Me, But They Do Have One Saving Grace
V-Moda's new S-80 on-ear headphones have not being getting good reviews -- and it's pretty easy to see why.
First, they're an on-ear headphone, which are a dying breed as consumers who eschew earbuds gravitate toward over-ear models if they're going the full-size headphone route. Secondly, they're expensive at $400. And at 355g -- just 31 grams lighter than Apple's 386-gram AirPods Max -- they're heavy: The headband can put a little pressure on the crown of your head. (I shifted it off the apex of my head, moving it forward slightly.)
Like
Impressive build quality
Great sound, particularly for an on-ear headphone
Removable ear pads and swappable faceplates (both adhere magnetically
Don't Like
Heavy
Expensive
Could be more comfortable
Lacks features for the price
No carrying case
Additionally, they don't have such features as active noise-canceling, a transparency mode or much of anything extra except for swappable faceplates that adhere magnetically (that's nice) and an automatic volume boost that turns the headphones into sort of a wearable speaker when you turn the ear cups face up when the headphone are around your neck. They don't even come with a carrying case or an option for wired listening (they're rated for 20 hours of battery life).
So the question is: Why on earth would anybody buy them instead of the Sony WH-1000XM5 and Bowers and Wilkins PX7 S2 -- along with several other excellent headphones -- are being offered for the same price? I don't have a good answer other than to say they S-80 are really well-built and have one major strength: They sound great. In fact, they may just be the best sounding on-ear headphones out there right now. They also sound better than V-Moda's Crossfade 2 Wireless headphones, offering better clarity and depth, though that model is more comfortable to wear.
The headphones have 40mm drivers and removable ear pads that adhere magnetically.
David Carnoy/CNET
Equipped with 40mm drivers, they offer well-balanced, detailed sound with sparkling highs, natural-sounding mids and punchy, powerful bass that never gets boomy. They support the AAC, AptX HD and SBS audio codecs but not AptX Adaptive. They have a relatively spacious soundstage -- particularly for an on-ear headphone -- and they're a headphone you can listen to for long stretches without any hint of listening fatigue. That said, some folks simply won't be able to find them comfortable enough to wear for long stretches. I found my comfort zone with them but a comfort zone probably isn't something you want to have to search for with a pair of headphones.
I didn't have a big problem with the lack of active noise canceling because the removable and replaceable ear pads do seal your ears off from the outside world pretty well and offer good passive noise isolation. The speaker mode is a little underwhelming because the volume boost doesn't really take the volume to the same level as the horseshoe-shaped wearable speakers I've tried from Bose and Sony over the years. And voice-calling performance is only so-so outdoors with subpar noise reduction (it's fine indoors with no wind and other ambient noise).
You can buy additional faceplates with some pretty cool designs (you can choose one extra faceplate with your initial purchase of the headphones)
V-Moda
V-Moda S-80: Final thoughts
V-Moda's earlier wired on-ear model, the XS, is being discounted in white for as little as $110. V-Moda spent a lot of time developing that model to create a more compact, streamlined alternative to full-size over-ear headphones. It has a folding headband and is relatively comfortable for an on-ear headphone with decent sound. I'm not sure why V-Moda didn't just create a wireless version of that for around $250.
Instead we got the S-80, which is really well-built and sounds great for an on-ear headphone, but is hard to make a case for at its $400 price when you factor in its ergonomic issues and lack of features. On some level I like it for being different and a weird bird, so to speak. However, it's a bit mystifying and will have to come down in price to make it really worth considering.
Middle class tax refund payment ca middle class relief ftb middle class tax refund california s middle class tax refund california middle class income middle class tax refund ca what is middle class income california california smile dental group california smile dental studio
California's Middle-Class Tax Refund: Do You Qualify for a Check?
California's Middle-Class Tax Refund: Do You Qualify for a Check?
What's happening
California has announced a one-time "middle-class tax refund" that will provide 23 million taxpayers with between $200 and $1,050.
Why it matters
California's economy is the largest in the US. The inflation relief payments are a compromise between Gov. Gavin Newsom and state lawmakers.
Starting this fall, California will send one-time inflation-relief checks to taxpayers. Through the Middle Class Tax Refund, eligible families will receive a one-time payment of as much as $1,050, depending on their income, filing status and household size.
The $9.5 billion in refunds is part of a larger $12 billion relief plan approved by Democratic Gov. Gavin Newsom and state lawmakers in June.
"California's budget addresses the state's most pressing needs, and prioritizes getting dollars back into the pockets of millions of Californians who are grappling with global inflation and rising prices of everything from gas to groceries," Newsom said in a statement.
Here's what you need to know about California's inflation relief checks, including who is eligible for the money, how much they'll get and when they can expect to receive it.
California is just one of numerous states offering residents stimulus payments. Find out which are issuing tax refunds and which are pausing their gas tax and sales tax.
Who qualifies for the California tax rebate check?
The refund plan has been set up in three tiers, based on the adjusted gross income on your 2020 California state tax return.
Single taxpayers who earned less than $75,000 and couples who filed jointly and made less than $150,000 will receive $350 per taxpayer and another flat $350 if they have any dependents. A married couple with children, therefore, could receive as much as $1,050. This is the largest bracket, KCRA reported, representing about 82% of beneficiaries.
Individual filers who made between $75,000 and $125,000 -- and couples who earned between $150,000 and $250,000 -- will receive $250 per taxpayer, plus another $250 if they have any dependents. A family with any children could receive $750.
Individual filers who earned between $125,000 and $250,000 and couples who earned between $250,000 and $500,000 would receive $200 each. A family with children in this bracket could receive a maximum of $600.
Although single taxpayers who earned more than $250,000 and couples who made more than a combined $500,000 in 2020 aren't eligible, the Middle Class Tax Refund is expected to benefit 23 million Californians in all.
You can estimate your payment with the Franchise Tax Board website calculator.
What are the requirements for the tax rebate?
In addition to meeting income requirements, residents must have filed their 2020 tax refund by Oct. 15, 2021, have lived in the state for at least half of the 2020 tax year and still be a California resident on the date the payment is issued.
They also cannot have been claimed as dependents in the 2020 tax year.
When will the California tax rebate payments go out?
According to the Franchise Tax Board, the payments will start going out in October and the last ones should be received in the middle of January 2023.
How will California taxpayers receive their rebate payments?
If you filed your 2020 California state tax return electronically and requested a direct deposit for your refund, you will receive the tax rebate as a direct deposit, as well.
Otherwise, you should receive your payment on a debit card.
What if I didn't file a 2020 California tax return?
Most Californians who didn't file a complete 2020 tax return by Oct. 15, 2021, aren't eligible for the rebate. (The exception is for those who applied for an Individual Taxpayer Identification Number, or ITIN, and had not received it by Oct 15, 2021.)
In addition to the tax rebate, the state is increasing funding for several social programs, including the Supplemental Security Income/State Supplementary Payment, which assists more than 1 million seniors and disabled people. SSI/SSPbenefits will increase by about $39 per month for individuals and by $100 per month for couples.
There are also increases to California Work Opportunity and Responsibility to Kids, aka CalWORKS grants, which provide money and services to eligible families with children. Grant recipients could see their benefits increase as much as $194 a month, KCRA reported.
Hisense amazon fire tv hisense tv brand review hisense amazon fire tv is the hisense tv a good brand who is hisense owned by is hisense worth buying are hisense products any good hisense owned by
Hisense Now Offers Its Own Fire TV Starting at $530
Hisense Now Offers Its Own Fire TV Starting at $530
Hisense now makes a Fire TV. Today the manufacturer announced a partnership with Amazon to produce Hisense's first television featuring the Fire TV platform.
The 50-inch, 4K LED TV has better picture quality specifications than many current Fire TVs made by Toshiba, Insignia and Amazon itself. It will include quantum dot technology and, according to the company, reach up to 600 nits of brightness. It also features Dolby Vision HDR, full-array local dimming, a 60Hz refresh rate and HDMI 2.1 connectivity. The TV costs $530 and will be available starting today exclusively on Amazon. A 58-inch model will be released sometime this fall for $600.
Fire TVs offer deep integration with the Amazon ecosystem, including Alexa, Amazon's smart assistant. The new Hisense TVs come with an Alexa Voice Remote, which can be used to search for content while controlling the TV, as well as for other compatible smart home devices.
The Fire TV platform allows users to download apps from Prime Video and other popular streaming services, but in CNET's reviews we prefer the Roku and Google TV systems. One reason is that Fire TV prominently displays too many ads and promotions for Amazon content throughout the OS -- for example, its screensaver mode can seem like the TV turns into a giant rotating billboard. Fire TV's search results are also less accurate in our experience than the other two.
Hisense joins a growing list of TV manufacturers that have partnered with Amazon to produce Fire TVs, most of which are less-expensive and come without many extras. Toshiba's M-Series of Fire TVs is a recent exception, however. It also comes with full-array local dimming but sports a 120Hz refresh rate, which can reduce blurring in fast motion -- a feature that the Hisense lacks.
Meanwhile, Amazon's Fire TV Omni offers its own distinctive feature: It doesn't require a remote at all, though one is included. The Omni comes with its own built-in, far-field mic, meaning that it works like an Echo speaker and can be completely controlled through voice commands alone.
Of course, you can always add an Amazon Fire Stick to any TV. For example, you could buy a similarly priced non-Fire TV and add a Fire stick to get the same experience.
Correction, May 18: This story initially misstated that a feature was missing from the Hisense Fire TV. The TV includes full-array local dimming.
This story is part of Gift Guide, our year-round collection of the best gift ideas.
Making a decision on what type of air fryer you should buy can be challenging with so many options to choose from. But I can help you decide thanks to my long and, at times, bumpy history with them. I love the idea of a kitchen appliance that circulates hot air to cook food nice and crisp in a matter of minutes without the oil needed for deep frying. But I had one problem. While most of the countertop appliances work the same, every air fryer I bought somehow managed to let me down, except for one: the Ninja Foodi 8-quart, 4-in-1 Dual Zone Air Fryer. And it's worth every penny.
My fiancé and I started out with a $50 Dash Compact Air Fryer that was perfect for small spaces, but it didn't hold enough food to have leftovers. I used a Bella air fryer next, and it didn't have the settings we needed for our cooking preferences. We later upgraded to a Chefman air fryer that's no longer available. Despite cleaning it the right way, the grill plate clips came off and the finish started to peel. We knew it was time for an upgrade that would last.
Update: While this story describes the author's experience with the $139 8-quart, 4-in-1 Ninja Foodi, we're linking the newer, $130 8-quart, 6-in-1 model. It's a similar but updated model that is widely discounted this holiday season.
When the Ninja Foodi 8-quart, 4-in-1 Dual Zone Air Fryer popped onto my radar, I was a new mom with a full-time job, and it's no exaggeration to say the Ninja Foodie changed our lives. With time being a premium and healthy food a necessity, this turned out enough hot food fast for our growing family.
Best yet, the Ninja Foodi isn't just an air fryer -- it's also a food dehydrator, a roaster and the best way to reheat leftovers that stay crisp and not soggy (unlike microwaves). Read on to find out what features really sold me. While you're here, here are extra tips to keep in mind when using an air fryer.
Ninja Foodi Dual Zone Air Fryer upshot: 2 baskets are better than one
Again, this Ninja Foodi is more than just an air fryer. If you're looking to dehydrate fruits for a good trail mix or reheat leftover fries, there are settings just for that. You can also roast chicken without heating up your home with the oven (perfect for summer days). And the temperature goes up to 400 degrees Fahrenheit and you can set the timer for up to an hour at a time. Most air fryers only have timers for up to 25 minutes.
But here's the thing: Depending on what you're cooking or heating, you may be able to do two of these things at once. That's because while most air fryers come with one basket, Ninja's dual air fryer has two. That means you can cook two foods with completely different settings at the same time. You can roast a chicken in one basket while air-frying potatoes in another. Being able to cook almost an entire whole dinner with one gadget is a game-changer for my family.
Remember this summer's air-fried pasta chips? You can make them in a snap.
Allyza Umali/CNET
Smart Finish is the best way for food to finish at the same time
I hate it when my food finishes cooking at different times. Smart Finish is the solution to my problems. Let's say the chicken takes longer to cook in one basket than your vegetables. I just press Smart Finish for the air fryer to finish cooking both baskets at the same time -- regardless of the time or temperature. When it's done, I have hot food I don't have to reheat before getting it on the table. Here's how it works:
1. To start, press Smart Finish.
2. Press 1 and choose your cooking preference: Air fry, Roast, Reheat or Dehydrate.
3. Select the time and temperature for the food in the first basket.
4. Press 2,then repeat steps 2 and 3.
5. Press Start/Pause.
Match Cook gives you more space
You've probably heard about the deliciousness of air fryer chicken wings. They're the perfect wing that's crispy on the outside and juicy on the inside. The only problem is that wings can take up a good amount of space in your air fryer. The best solution I found was using my Ninja Foodie's Match Cook setting as a way to spread out my food in the baskets for even cooking without cramming. Here's how it works:
1. To start, press Match Cook. Both numbers 1 and 2 will light up.
2. Choose your cooking preference, Air fry, Roast, Reheat or Dehydrate.
3. Select the time and temperature.
4. Press Start/Pause.
If you're ever curious about what settings to use when cooking, Ninja includes two stickers on the air fryer to give you recommended times and temperatures for poultry and vegetables when using Smart Finish and Match Cook. These air fryer recipes can help, too.
You'll want to keep the space in mind
The only downside is that this 8-quart Ninja Foodi air fryer takes up more space than other options, but it's still compact for its quart size. It's about 13 inches wide. We also considered the 4-quart Ninja Air Fryer, which has the same settings but only has one basket. For us, the two-basket option won out -- and I'm glad it did.
It's easy to clean, too
After my Chefman air fryer started peeling, I decided to be very careful when cleaning my Ninja baskets. So far, I've had the air fryer for a year and it's been easy to clean with soap and water. Even though the baskets are dishwasher-safe, I've been using the hand-wash method to preserve the finish. If damage to the baskets does occur, you can buy replacement plates on Amazon.
Hands down, this Ninja Foodi is my favorite kitchen gadget, especially for a fast, easy way to eat healthily (it's a toss-up for the best appliance in my house, alongside our cordless Dyson vacuum).
Finally, here's the difference between air-frying versus oven-baking your food and an air fryer that doubles as a microwave that I have my eye on.
Diy pipe shelves stylish affordable and ultra easy lip diy pipe shelves stylish affordable and ultra easy sudoku diy pipe shelves stylish affordable and ultra easy diet diy pipe shelves stylish affordable and luxury diy pipe shelves stylish affordable android diy pipe shelves stylish custom homemade modern diy pipe shelves diy pipe shelving diy pipe bender diy pipe and drape
DIY Pipe Shelves: Stylish, Affordable and Ultra-Easy to Build
DIY Pipe Shelves: Stylish, Affordable and Ultra-Easy to Build
This story is part of Home Tips, CNET's collection of practical advice for getting the most out of your home, inside and out.
Large custom-made shelving can be extremely expensive, especially if you hire a carpenter to make bespoke units that fit your space. But by using pipes you can create a storage system that fits perfectly into any space and doesn't require expert fitting or years of DIY skills to put together. By using commonly available screw-fit pipes and precut timber boards, you can easily make shelves any size you want or fit them into awkward positions, often at a lower cost than commissioning custom-built units.
You can create floor-standing shelves or wall-mounted shelves, shelves that reach up to your ceiling, or shelves that stretch the whole of your wall, turning that lovely spare room into a beautiful library.
The great thing is, it's not even that difficult to do. The pipework screws together and the wooden boards sit on top, so there's very little to go wrong. I'm a total novice with DIY -- I've managed to change a lightbulb, but I've never tackled anything like this -- and when I bought my first home, I knew that a big shelving system was exactly what I needed.
Here, then, is my guide on how to build your own custom DIY pipe shelves. (For more, check out how to make custom poster hangers for just $1 and organization ideas for smaller spaces.)
Read more:Best Office Chairs for 2022
Why do you need custom shelves?
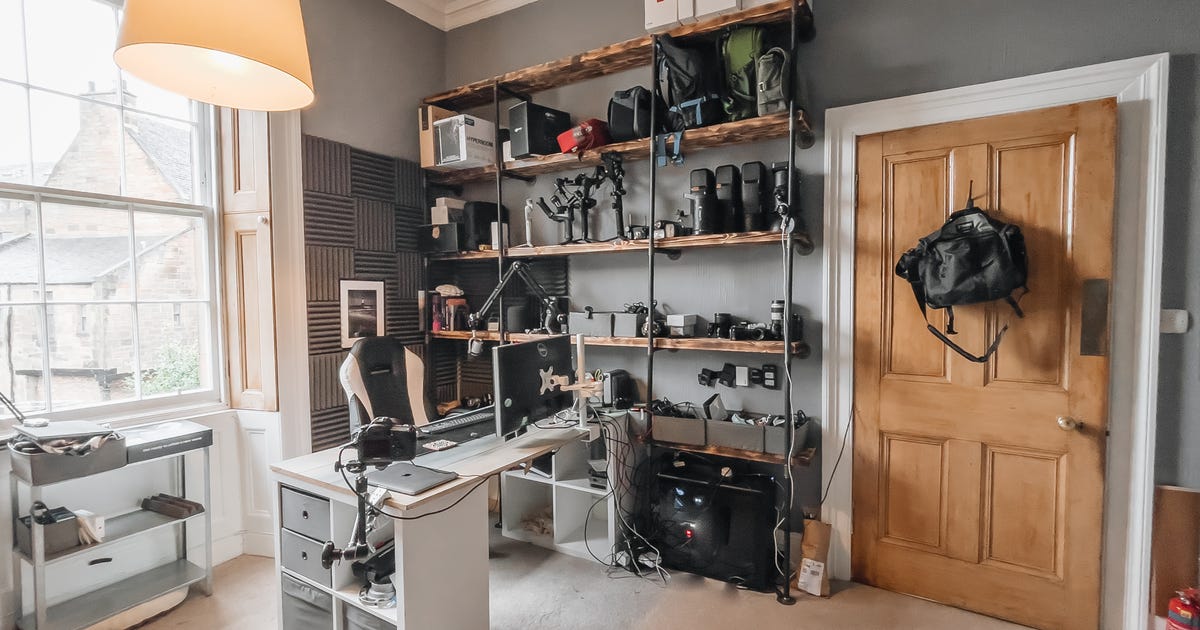
I'm a professional photographer and product reviewer for CNET. That means I have a lot of equipment. Like, a lot of equipment. I work from home and needed my office space to function as a photography studio, so I needed a storage solution that was also an easy-access workspace.
A custom-designed shelving system let me create something that fully suited my needs. But it's not just photographers who'd need it; these shelves would make for a wonderful library wall, or for displaying lots of collectibles. The industrial look can work great in your bedroom, an office or running along the wall of your living room, proudly displaying photos of your family, lovely plants and your collection of Friends VHS tapes from the '90s that you can't bear to get rid of.
This is what counted as a shelving "plan" for me.
Andrew Hoyle/CNET
How to design your shelves
Take a look at your space and really consider what it is you need from your shelves. For me, I needed lots of room for storage, but I also needed a clutter-free workspace. So I wanted to keep the floor clear by maximizing the vertical storage space, building my shelves high and taking advantage of my 13-foot ceilings.
I wanted to incorporate my desk, so I sketched a design that would go around it, with room for my computer tower to fit snugly beneath. With five tiers, each stretching over 8 feet in length, I'd have enough room for all my photography equipment and plenty of space for whatever products I'm testing, leaving the rest of the room free to work in.
Consider how your shelves can fit in your space -- perhaps there's a sloping roof and you can build your shelves to fit beneath the slope. Or maybe fit your shelves in the alcoves either side of a chimney breast. My advice is to sketch out some ideas, no matter how roughly, and see what you think will work best in the space you have. The modular nature of pipe shelves means it's not difficult to fit them in even the most awkward spaces.
The empty wall offered a lot of space to fill with the custom shelving. I have a lot of stuff to store.
Andrew Hoyle/CNET
Think as well about how many tiers of shelves you'll need. If it's fitting in a small space, can you really squeeze four tiers in, or will three layers give you more room between each shelf to store taller objects? If it's for a bookshelf, find your tallest book and make sure you're leaving enough space for it to slide in.
Read more: Best Standing Desks of 2022
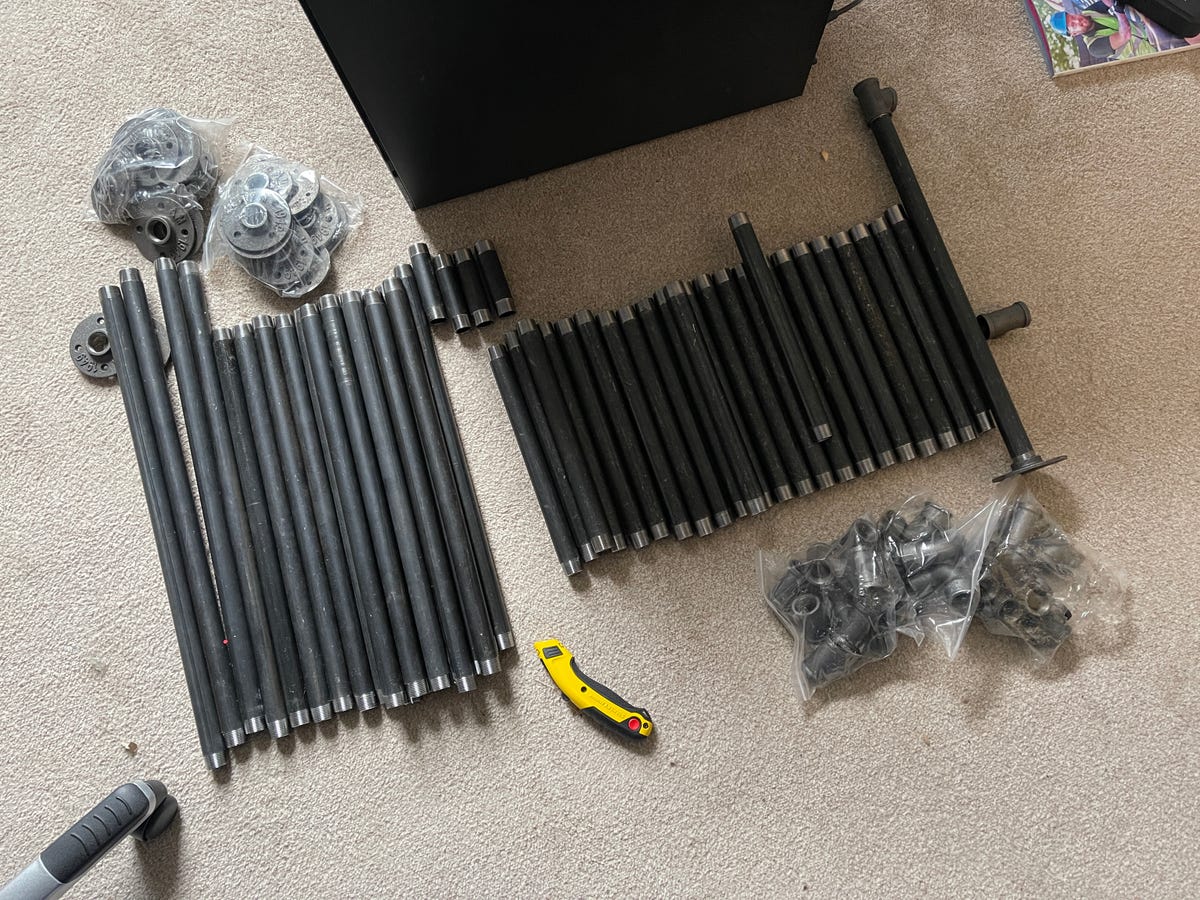
Measuring and buying shelf components
Once you've settled on your design, it's time to measure up. Your specific measurements will depend entirely on the space and the number of shelves you want. For me, I wanted five levels, going up to about 10 feet in height. That meant I needed gaps of roughly two feet between each shelf.
I say "roughly" as my design allowed for some errors, at least on the vertical measurements. I knew there'd be at least two feet of space above the top shelf, so an inch or two difference when measuring upward didn't matter. That's good, as when I measured the pipes between the shelves, I neglected to include the T-shaped connectors. There were five of these on each vertical support, which added about six inches to the total height.
Some of the pipework and fittings.
Andrew Hoyle/CNET
If I were building the shelves to fit perfectly between the floor and the ceiling, then my shelves wouldn't have fit. As it was, they simply reached slightly higher than planned, which wasn't a problem. As long as each of your vertical supports are the same height, that's what matters. If you're measuring for a specific space then make sure you find out exactly how much length your connectors will add so you know the exact height of your shelves when assembled.
Your retailer should be able to help with this. Most big hardware stores will likely sell pipework and fittings that will be suitable, but an increasing number of specialist plumbing companies sell pipes specifically for building furniture. These have often been given an aged look -- or other more visually appealing aesthetic -- that will look great.
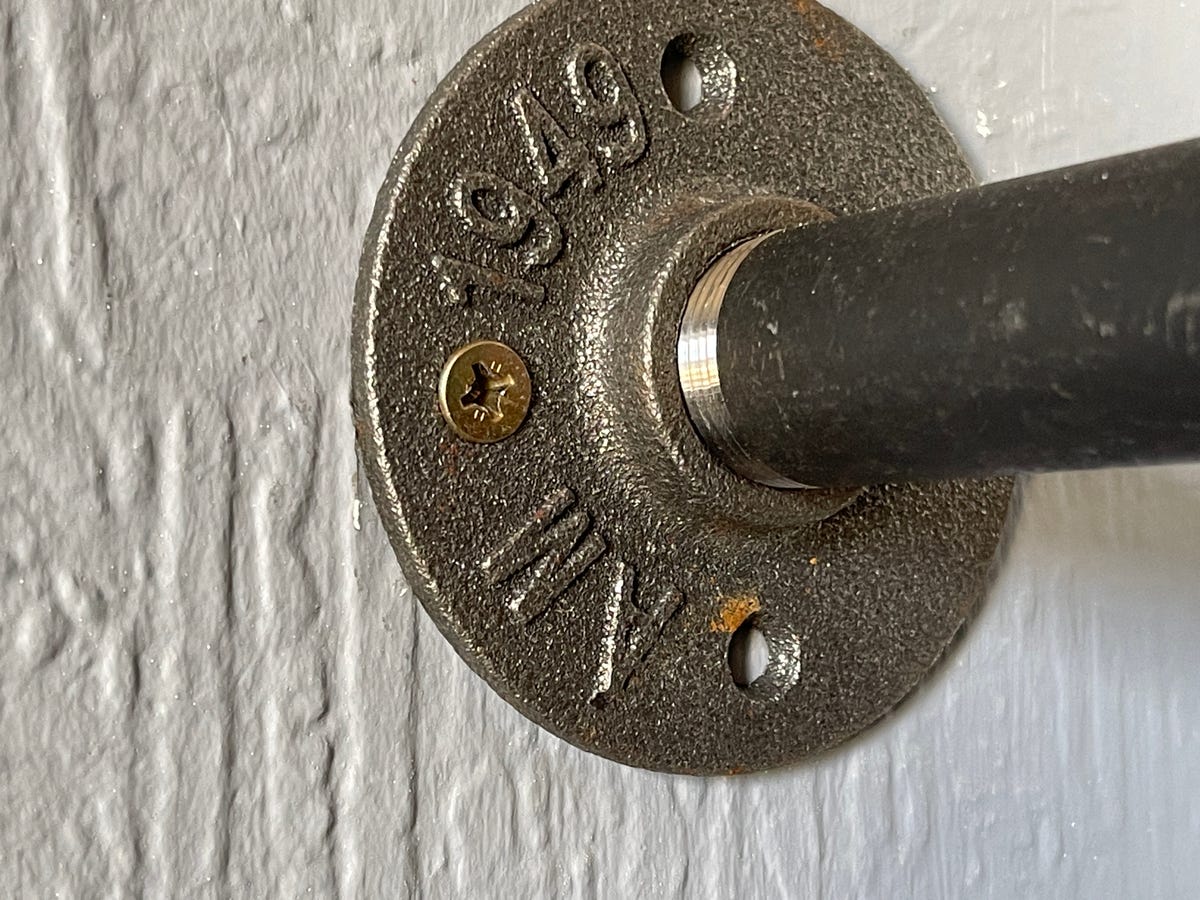
My shelves would stand on the floor but I also mounted them against the wall. For each upright support, I required five longer pipes (the pipes standing vertically between each level), five shorter pipes (connecting between the wall and the vertical pipes, the length being two inches longer than the wooden boards I'd ordered). I then needed five T-shaped connectors and six wall plates (five to attach to the wall, one to act as a 'foot' for the pipes to stand on the floor).
The shelves attach to the wall using these iron 'feet'. Because there are 20 of these, the weight is spread across the whole wall, rather than putting too much weight on a single mounting point.
Andrew Hoyle/CNET
I had four uprights, so ordered four lots of all of the above. Each pipe had been screw threaded to allow it to simply screw into the fittings. I used 3/4-inch steel pipe, which provides more than enough strength to support the shelves. My retailer also provided reclaimed oak timber in various forms so I also ordered that, cut to size, treated and scorched to give a beautiful aesthetic. Oak can be quite expensive however, and you can get similar results with pine or even plywood. Check with your local lumber yard and see what they can offer.
Building DIY pipe shelves
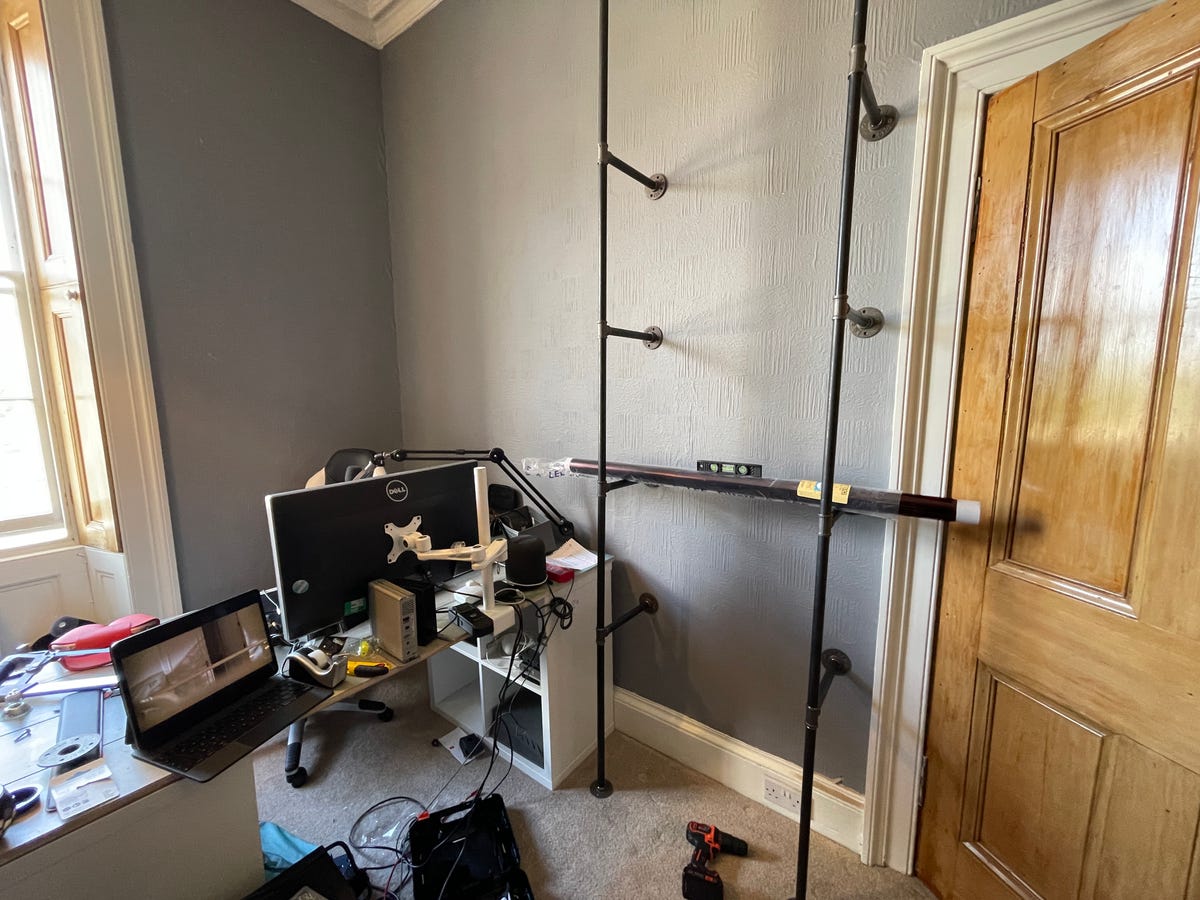
Once your components have arrived it's time to get building. Start by making a cup of tea and putting on a good playlist. Then make sure your work area is clear and you've got the space you need to build and install.
I started by connecting the pipework to build each upright support. It took some doing and I ended up having to put a lot more effort into screwing everything together than I imagined. Once done, I stood the vertical pipe on the floor and leaned it against the wall in the position it would be, using a spirit level to check it was in line both vertically and horizontally. I marked the position of the screw holes using a pen and then laid the pipe back down. Repeat for all four upright supports.
As I installed each vertical strut, I used a spirit level to check it was exactly vertical and used a temporary 'shelf' (in this case, a roll of paper) to allow me to check that the real shelves would also be perfectly level.
Andrew Hoyle/CNET
I used a stud and wire detector at each of the marks I'd make to check if it was safe to drill and then used a 7mm masonry drill bit and a hammer drill to drill around an inch deep. I then hammered in wall plugs to help further secure the screws. Some didn't go quite deep enough so I used wire cutters to trim them down.
When I finished drilling the holes, I held the pipes back up and shimmied them into the perfect position before screwing them into place using screws I'd already checked had wide enough heads to properly secure the mounting plates (the first lot I bought simply passed straight through the holes so would not be suitable).
I was nervous about whether my old walls would support the weight (my house was built in the 1860s) but it was the floor that would take most of the weight, with the rest being spread across 20 mounting plates on the wall. The more mounting points I used across the shelves, the more that weight would be spread out and easier for the wall to hold. A year on, they've not collapsed.
I used a multi-function stud, wire and pipe detector to make sure that wherever I drilled was safe and wouldn't cause any harm to either myself or my house. If you're in any doubt about safety, consult an expert.
Andrew Hoyle/CNET
Once the upright metalwork was in place I laid a roll of paper across and used a spirit level to check that it was completely level. The bubble sat in the middle, so I was all good. Then it was simply a case of sliding the timber boards onto the horizontal supports. The oak boards were almost 2 inches thick, so they're extremely heavy, but there's no flex in them so I wasn't concerned about them bending when I put things on them.
I secured them in place using simple metal brackets that wrapped around the pipes they sat on and screwed underneath the wood. Finally, I loaded up the shelves with my photography gear and took a step back to admire my work.
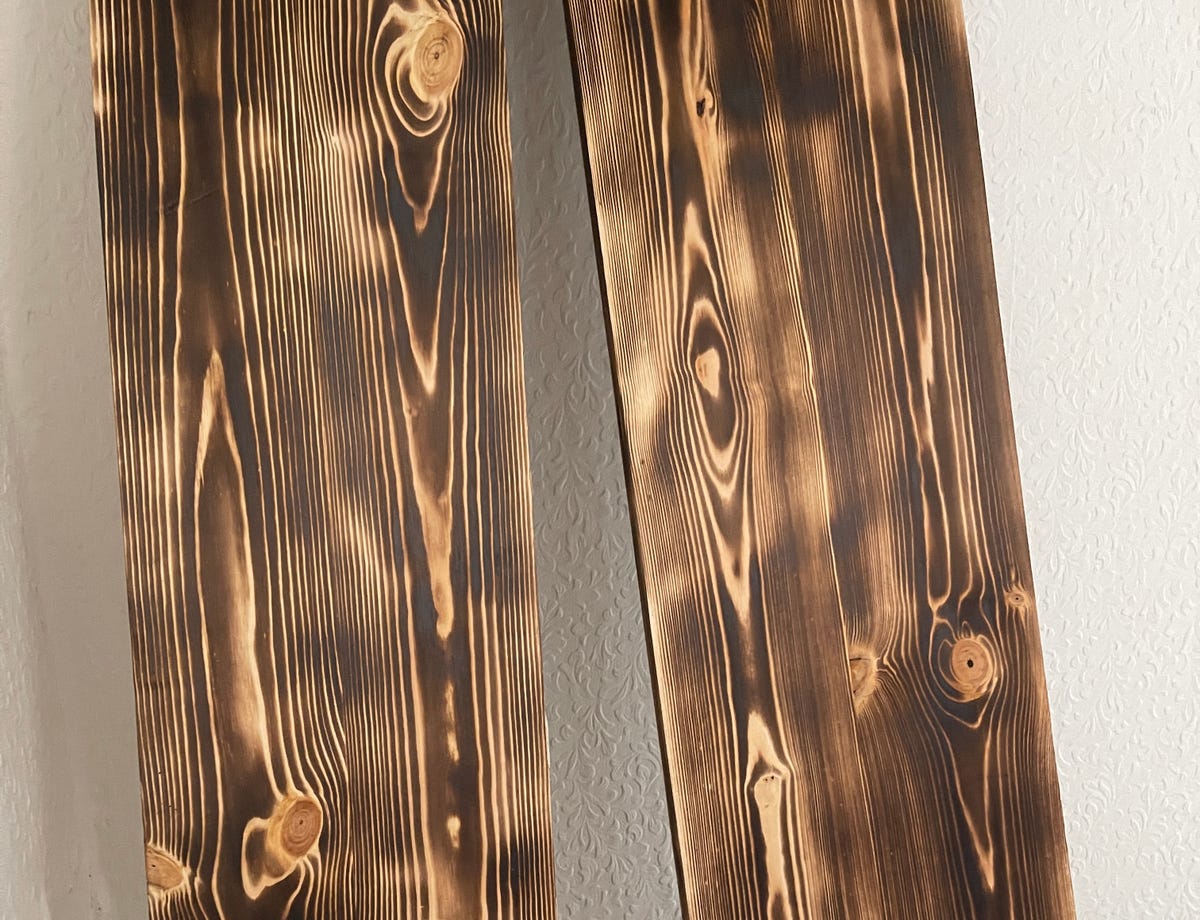
These gorgeous oak boards are actually reclaimed from old planks used by a scaffolding firm. They'd been stripped and aesthetically charred, and although cheaper wood is available, the overall look was exactly what I wanted.
Andrew Hoyle/CNET
Would I build these shelves again?
I was pleased with how straightforward the building process was once I had my plans in place. Having never done anything like this before, I was nervous about getting the measurements wrong or, even worse, managing to collapse the whole wall in the period property I'd just bought. Mercifully, everything seemed to work out pretty well and the shelves have been extremely useful so far.
That said, with a total bill of materials somewhere around the $1,000 mark, it wasn't a cheap process and with zero experience with projects like this, things could easily have gone wrong and that money would have been wasted. While getting a similar custom-designed shelving system installed by professional carpenters would have likely been a lot more expensive (potentially several times over), those risks would be much lower.
I'd absolutely do a similar build again though, even if it's just creating a single shelf or two in my bathroom or some small bookshelves for the bedroom. It's a straightforward process and the pride at having created from scratch a genuinely useful addition into the home is well worth the effort.
For more organization tips, check out the best way to organize a fridge and how to declutter your closet.
How to buy radio shack crypto buy radio shack crypto does radioshack still exist radioshack going out of business locations could not decrypt packet received via radio is radioshack still in business is radioshack still in business is radioshack out of business radioshack near me still open radio shack going out of business who is ceo of radioshack is radioshack out of business
RadioShack is getting into the crypto business
RadioShack is getting into the crypto business
RadioShack, the longtime tech retail chain, plans on selling a new item: cryptocurrency. The company says it's "bringing cryptocurrency to the mainstream."
RadioShack DeFi (short for decentralized finance) is the new venture for the retail chain as laid out on its website as of Sunday. This means it'll allow users to trade tokens among each other rather than at an exchange like Coinbase and Binance.
"RadioShack, and RadioShack alone, can bridge the gap and 'cross the chasm' of mainstream usage for cryptocurrency," the company says on its site.
This might be a bit confusing for those who were familiar with the longtime chain, but here's an explanation of what's happening. RadioShack DeFi, once it's open, will let users who sign up will have the option to trade their crypto tokens with each other without having an entity handling all the transactions. This is done via smart contracts on the ethereum blockchain. Examples of this kind of protocol similar to RadioShack DeFi are Uniswap and SushiSwap.
RadioShack didn't provide a date of when it will open up its exchange, but there's a waitlist for those interested can join. Users will need to link their digital wallets to RadioShack DeFi in order to start trading.
There are currently more than 400 RadioShack stores in the US. The chain was purchased in 2020 by Retail Commerce Ventures, a holding company that is also behind the Atlas USV DeFi Protocol, which will be used for the RadioShack DeFi.