Step into a world where the focus is keenly set on How To Edit Youtube Videos. Within the confines of this article, a tapestry of references to How To Edit Youtube Videos awaits your exploration. If your pursuit involves unraveling the depths of How To Edit Youtube Videos, you've arrived at the perfect destination.
Our narrative unfolds with a wealth of insights surrounding How To Edit Youtube Videos. This is not just a standard article; it's a curated journey into the facets and intricacies of How To Edit Youtube Videos. Whether you're thirsting for comprehensive knowledge or just a glimpse into the universe of How To Edit Youtube Videos, this promises to be an enriching experience.
The spotlight is firmly on How To Edit Youtube Videos, and as you navigate through the text on these digital pages, you'll discover an extensive array of information centered around How To Edit Youtube Videos. This is more than mere information; it's an invitation to immerse yourself in the enthralling world of How To Edit Youtube Videos.
So, if you're eager to satisfy your curiosity about How To Edit Youtube Videos, your journey commences here. Let's embark together on a captivating odyssey through the myriad dimensions of How To Edit Youtube Videos.
Video editing on the iPhone was first introduced with the iPhone 3GS, yet some iPhone owners still don't realize how easy this feature is to use. It is incredibly simple to quickly edit a video you just shot so that you can send a specific moment to friends and family members. This can also come in handy when a video is a bit to long to send; quickly trim unnecessary portions of the video out, thus reducing the file size and enabling you to send it. Read on to learn how to edit video on your iPhone.
We have already shown you how to use iMovie on the iPhone 4, but for some of you, iMovie may be overkill for a simple edit, especially if title screens and transitions aren't needed. Here is an easier method.
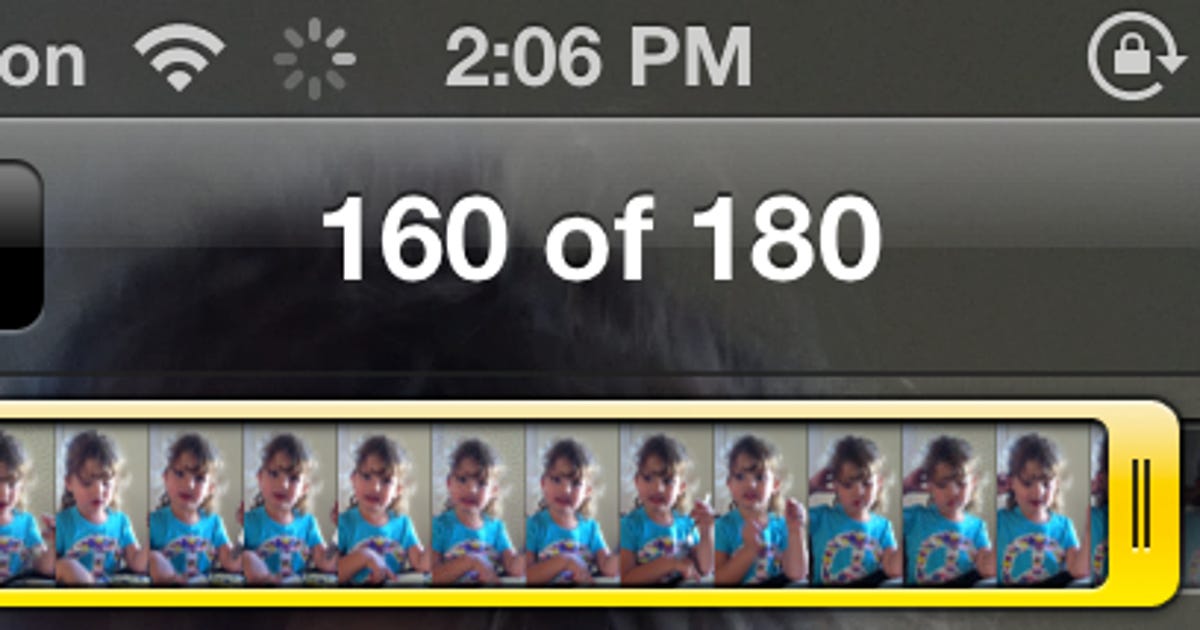
To get started, launch the Photos app on your iPhone and open the video you want to edit.
Click to enlarge Screenshot by Jason Cipriani
While viewing the video (before playing it) you will see a bar that includes frames from the video. On each end of this bar, you will see a spot that allows you to touch-and-drag each end to a new start or stop point for the video.
Click to enlarge Screenshot by Jason Cipriani
Once you have moved either of the ends, the bar will turn yellow. The yellow bars indicate you have cut out portions of the video. You will also see a yellow Trim button in the top-right corner. At the bottom of the screen will be a single Play button. You can press that button at any time to see what you have trimmed the clip down to.
Click to enlarge Screenshot by Jason Cipriani
If you are having trouble editing to an exact frame in the video, you can edit frame by frame by pressing and holding a finger on either end of the yellow bar. You will see the video spread out, revealing individual frames. Slide the end of the bar to either include or cut out video frame(s).
Click to enlarge Screenshot by Jason Cipriani
Once you are happy with your selection, tap the yellow Trim button. You will then be presented with two options for saving the new clip.
Trim Original: Saves the new, shorter clip, over the original clip. The original clip will be lost.
Save as New Clip: Saves the new clip as a separate video clip. The original clip will still be available.
Select your preferred save method.
Screenshot by Jason Cipriani
Once the video is saved, you can view it in your camera roll. From here, you can send it on via e-mail, MMS and the like (iMessage will be an option once iOS 5 is available).
Similarly, you can edit photos in iOS 5, which is expected to be available later this fall. For a full run down of how to edit your photos in iOS 5, be sure to check out this guide.
How to edit video using photoshop edit video in photoshop cc how to edit video using photoshop how to edit a video on photoshop how to edit a video in photoshop how to edit a video in photoshop how to edit video in photos app windows 10 how to edit video in photoshop how to edit video on canva how to edit videos on obs how to print screen
How to edit video in Photoshop CC and CS6
How to edit video in Photoshop CC and CS6
Screenshot by Lexy Savvides/CNET
Did you know that you can edit video within Adobe's image-editing program? There is no need to learn the ins and outs of Premiere or Final Cut when Photoshop does just fine for some simple edits and transformations.
Video editing has been part and parcel of Photoshop since CS3 Extended. If you are running an older version of Photoshop, here is our tutorial on how to cut video using CS5 Extended.
Photoshop CC and CS6 are mostly the same when it comes to video features. Photoshop can read the following major file formats and more:
.264
AVI
MPEG-4
MOV (QuickTime)
MTS
A full list of supported file formats is available on this Adobe support page.
Getting started
Open up Photoshop and head to the Window menu. Make sure that Timeline is selected, which will bring up the video toolbar at the bottom of the screen. Alternatively, head to Window > Workspace > Motion to bring up the entire suite of video controls.
Now it is time to import the video file. Either drag a supported video into the Photoshop main window or click the filmstrip icon in the timeline and select "Add Media."
Alternatively, for more precise control over the file when it comes to exporting, go to File > New. Select Film & Video from the drop-down menu and change to the appropriate values. Once the new document has been created, import the video file itself by going to Layer > Video Layers > New Video Layer from File.
Screenshot by Lexy Savvides/CNET
The video will now be available for editing in the timeline. Like any traditional video editor, Photoshop lets you scrub through the footage and gives you some basic controls over audio. Note that if you playback the file within the edit window, Photoshop may drop the frame rate to keep displaying the footage in real time.
The next thing you may want to do before launching into the edit is to turn the video layer into a Smart Object. This will allow you to apply filters to the entire video image in one particular layer -- even if there are cuts or transitions.
Choose the correct layer name and then select Layer > Smart Objects > Convert to Smart Object.
A purple clip means that the layer has been converted to a Smart Object. Screenshot by Lexy Savvides/CNET
Once this has been done, any adjustments you make through filters will be reflected in all frames on that particular layer.
Making edits
Editing video using Photoshop uses many of the same principles you may be familiar with when working with still images.
Depending on the camera and lens combination used to shoot your video, you may want to apply a lens-correction filter. Photoshop may be able to automatically detect what camera the video was filmed with. Head to Filter > Lens Correction, and Photoshop should autodetect the camera.
Note that Photoshop may not detect it if the video was created using a smartphone. If this is the case, you can apply corrections to the video image using the Custom tab in the Lens Correction window.
The controls are quite comprehensive, including the ability to add or remove a vignette, make adjustments for chromatic aberrations, or adjust perspective.
Add some custom lens corrections in this window. Screenshot by Lexy Savvides/CNET
Videos can be split by selecting the scissor tool on the Timeline. This will cut the video in two at the position of the playhead. Like any other video editor, in Photoshop you can move clips back and forth to other layers on the Timeline.
The adjustments palette. Screenshot by Lexy Savvides/CNET
Add in any extra audio files using the dedicated Audio Track layer. Click the musical-note icon to import music or other sounds. To make adjustments to the audio recorded with the video file, right-click on the appropriate clip, and then select the musical-note icon to adjust the volume or mute it.
Some basic filters will be accessible via the Adjustments layer palette in the workspace.
Options available include black-and-white, photo filter, curves, exposure, and brightness/contrast adjustments.
Photoshop will include these filters as a separate, nondestructive layer that you can toggle on or off using the regular layers palette.
Toggle adjustments for curves, exposure, and more from the layers palette (on the right) to see the Before and After effect. Screenshot by Lexy Savvides/CNET
Transitions
Photoshop has some common transitions built in, such as fades and crossfades. These can be found in the Timeline toolbar, denoted by the split-square transitions icon.
Select a transition from the menu, then drag it on to the appropriate layer on the Timeline. Transitions can be extended or shortened by dragging the duration slider just underneath the video image on the Timeline. Alternatively, right-click on the transition itself to change the duration with more precise control.
A list of the simple transitions available in Photoshop CC. Screenshot by Lexy Savvides/CNET
To change the speed of a clip, right-click on the appropriate layer. Select "Speed" to increase or decrease playback speed using the slider or a percentage value. To slow down motion, choose a speed such as 50 percent.
Transitions can also be applied to audio. Again, to work with audio recorded with a video, right-click on the appropriate clip, and go to the musical-note icon. Apply fade-in or -out transitions where desired.
Text and objects
Photoshop lets you add text to videos using the same method as still images. First you will want to create a new video group so you can adjust the position of the text and placement over the clip. Do this by selecting the filmstrip icon in the timeline and selecting "New Video Group."
Screenshot by Lexy Savvides/CNET
Select the text tool from the side toolbar, place the cursor on the image, and start typing. Photoshop places the text on a new layer so you can move it to the desired place in the timeline.
To add a transition to text, simply use the same method outlined above for the video image -- just drag the transition over the text layer instead.
Adobe has detailed information on working with more complex motion on its website.
Exporting
When your masterpiece is ready to go, head to File > Export > Render Video. Make any adjustments to Output File Type, or select one of the many Adobe presets to make a YouTube or Vimeo-ready short film. Make sure that "Adobe Media Encoder" is selected rather than "Photoshop Image Sequence", or you will end up with a series of still JPEG images rather than a video.
When you are satisfied with the export settings, press Render, and let Photoshop make your movie.
How to deleted download files how to deleted emails in gmail how to deleted history how to deleted google search how to deleted youtube videos how to deleted messages on messenger how to deleted gmail how to draw how to pronounce
How to Delete Your Twitter Account, and Reactivate It if You Change Your Mind
How to Delete Your Twitter Account, and Reactivate It if You Change Your Mind
Elon Musk, CEO of Tesla, Space X and Boring Company, has entered into a $44 billion deal with the social media giant Twitter. Once Musk acquires the company, big changes could be on the horizon, and not just an edit button. The deal will also take the service from public to privately held.
If you've been on the fence for a while about deleting your Twitter account, we'll explain what your options are below, including whether you can change your mind about deactivating your account. For more, Twitter is rolling out a way to let you untag yourself from any conversation.
How to delete your Twitter account on your phone
Here's how to delete your Twitter account from your phone. Note that before you close your account, you may want to create an archive of your tweets. Here's how to download all your tweets.
1. Sign in to your Twitter account and tap your profile icon in the top left corner.
2. In the side menu, scroll down and tap Settings and privacy.
3. Select Your account > Deactivate your account.
4. Select a reactivation period: 30 days or 12 months.
5. Tap Deactivate.
6. You'll be prompted to enter your password and tap Deactivate to confirm.
Depending on which reactivation period you select, you can always undo your decision and reactivate your account before that time is up (see below). Otherwise, your account will be deleted for good after the reactivation period ends.
Read more: Musk, Twitter Must Comply With EU Rules, Official Says
How to delete your Twitter account on your computer
If you're using Twitter on your computer's web browser, here's how to delete your account. Again, before you close it down, think about creating an archive of your tweets.
1. Sign in to your Twitter account.
2. On the left menu, select More > Settings and privacy.
3. Under the Your account section, click Deactivate your account.
4. Choose one of the reactivation periods: 30 days or 12 months.
5. Click Deactivate.
6. You'll then be prompted to enter your password and then you'll confirm you want to proceed by clicking Deactivate account.
If you change your mind, see below for how to undo your account deactivation. If not, your account will be deleted.
Yes, you can reactivate your Twitter account, but only for so long.
Sarah Tew/CNET
Unlink any third-party apps from your account
While you may have clicked the button to deactivate your account, Twitter notes that third-party apps can reactivate your account when you sign in to them. To prevent this from happening, you'll need to revoke third-party app access to your Twitter account, such as those that can automatically delete old tweets.
To get started, sign in to your Twitter account and go to Settings and privacy > Security and account access > Apps and sessions > Connected apps. You'll then select each app one at a time and click Revoke app permissions.
How to reactivate your Twitter account
If you change your mind, you can always reactivate your account for up to 30 days or 12 months, depending on the selection you made. Here's what to do.
1. Log in to your account.
2. You'll see a notice asking if you'd like to reactivate your account. If you select yes, you'll be redirected to your Twitter Home timeline. Note that it could take a while for your Tweets and followers to be restored.
For more, here's how to change the privacy settings on Twitter, how to delete old tweets and why people are leaving Netflix and how to cancel your subscription.
3 Netflix Parental Control Features Beyond the Kids Profile
3 Netflix Parental Control Features Beyond the Kids Profile
The best streaming services for kids offer plenty of great videos, TV shows and movies, but a lot of it is also targeted toward older viewers. Disney Plus is veering into mature content territory and beefing up parental controls, YouTube has new ways for parents to restrict what teens and tweens can watch, and most streaming services have profiles made for specifically for kids. Setting up a profile for your child on Netflix is a great place to start, but the platform has plenty of other settings parents might not know about.
Under the Netflix Kids Experience, your child's profile is tagged with a special logo that ensures only age-appropriate shows and movies are displayed. But what if your family knows how to outsmart the kiddie system to watch whatever they want? While you can enable the parental controls on your devices when it comes to streaming, Netflix has several tools available to help you manage what they see and do.
Assign maturity levels
While activating the Netflix Kids experience is the most obvious choice to ensure your child is watching age-appropriate content, that profile comes with curated titles selected for the 12-and-under crowd. Everything in the kids' profile automatically has a rating no higher than PG. But you can manually adjust those maturity ratings for each individual profile.
On your web browser, open your Netflix account page and head to the Profile & Parental Controls section. Select your child's profile and click change under Viewing Restrictions. You'll be prompted to enter your Netflix account password before being taken to a screen where you can edit the maturity ratings.
Choose a ratings level up to NC-17. Click Save. Note that if you want to include content that's rated above PG (including PG-13 and TV-14), the kids' profile badge will be removed for that user. On the flip side, here is where you can check the box to designate it as a kids profile. The maturity rating will be lowered. A bonus? These settings also apply to Netflix's games.
If you run into an issue with trying to convert a kids profile into one with a higher maturity rating, you may need to delete it and create a new profile.
Block specific TV shows and movies
Did you know you can block certain titles on individual profiles? Whether your child has a kids' profile or a regular one, parents are able to suppress specific titles. You'll follow the same steps above and navigate to your account page, choose your kiddo's profile and launch the Viewing Restrictions section.
Scroll down to where you see Title Restrictions for… and fill in the box with the TV show or film you want to block. Would you rather your 13-year-old not watch Bridgerton, Project X or Big Mouth? Add it to the list and the title will appear in red. Click "Save." The blocked content will not appear in your child's profile.
Should you change your mind when they get older, you can go back in and hit "X" to remove the blocked title from the list.
Lock down your profiles with a PIN
With multiple family members sharing one Netflix account, some crafty kids know how to buck your censorship system. Rather than stick to the rules, they'll skate on over to someone else's profile to watch what they want. By locking all the profiles with a PIN, you can prevent that and stay a step ahead.
Head to your account page from a web browser and scroll to the Profile & Parental Controls settings. Click change on Profile Lock, where you'll be asked to enter your account password. Check the box where it says, "Require a PIN to access XYZ's profile." Enter a four-digit PIN.
If you're the chief Netflix accountholder, you also have the option to check the box indicating that a PIN is required to add new profiles. Click "Save."
Once you set up a profile PIN, you'll have to enter it each time you open your profile on Netflix. But this feature can be used for all the profiles on the account regardless of age. In some cases, certain unsupported devices will not ask for the PIN to unlock a profile; however, it's required to watch content within the profile.
Galaxy s21 ultra 5g review samsung s premier phone is pretty a noun galaxy s21 ultra 5g review samsung s premier phone is pretty an adverb galaxy s21 ultra 5g review samsung s premier phone company galaxy s21 ultra 5g review samsung s9 galaxy s21 ultra 5g review youtube samsung galaxy s21 ultra 5g review galaxy s21 ultra 5g reviews galaxy s21 ultra price galaxy s21 price
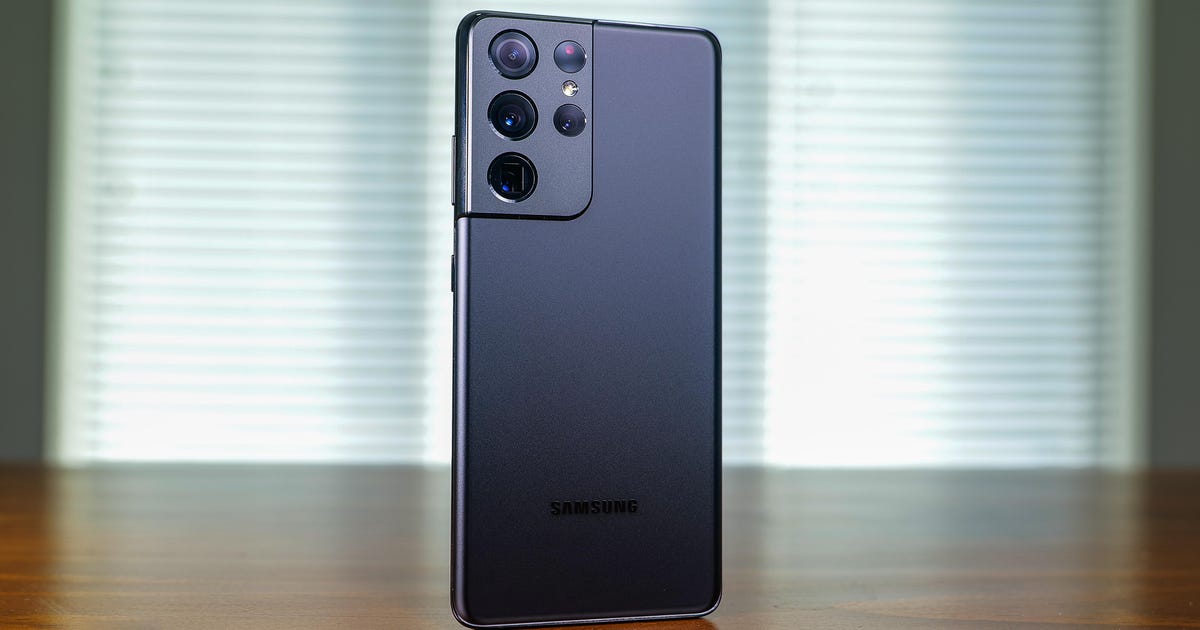
Galaxy S21 Ultra 5G review: Samsung's premier phone is pretty badass
Galaxy S21 Ultra 5G review: Samsung's premier phone is pretty badass
The Galaxy S21 Ultra 5G, unveiled alongside Samsung's Galaxy S21 and S21 Plus phones, proves that sometimes you have to do something twice to get it right. While just as bold as last year's Galaxy S20 Ultra, the S21 Ultra is a refined second take on the concept. There's still the 100x Space Zoom, but it's easier to use. There is still the "big for the sake of being big" design, but it looks more appealing. And there's still a high price, but at $1,200 (£1,149, AU$1,849) it costs $200 less than the S20 Ultra in the US.
If you want the absolute best specs and features, the S21 Ultra is undoubtedly appealing. The phone will also attract camera nerds, thanks to the improvements. The addition of S-Pen support -- it's the first Galaxy S phone to support the stylus -- will likely catch the eye of Galaxy Note users looking for a different option.
Like
Gorgeous phantom black finish
Two telephoto cameras
The screen is spectacular
S-Pen support
Don't Like
It's heavy
Lacks a microSD card slot
$1,200 is still expensive
Last year's Ultra model seemed like it came out of nowhere. It was a phone all about excess that, by sheer fate, was launched at the beginning of a global pandemic and recession. Its bold, behemoth take on the Galaxy S line was undercut by its $1,400 (£1,199, AU$1,999) price and issues with its nearly domino-size camera system.
Overall, the S21 Ultra is a major update both in terms of hardware and software over the S20 Ultra. And when you factor in a lower price, it all kind of makes sense. And that's why the Samsung Galaxy S21 Ultra earned a CNET's Editors' Choice Award. The whole Galaxy S21 lineup is available to purchase -- here's how you can buy one.
Read more: Samsung Galaxy S21 vs. S21 Plus vs. S21 Ultra
The Galaxy S21 Ultra has the best black finish
I wouldn't call the S21 Ultra's design radically different, but my review unit has the best black finish I've ever seen on a phone. It's the stuff that goth dreams are made of. The color is called phantom black, and seeing it in person makes you understand why Samsung made a nearly three-minute video explaining the blackest black finish. The S21 Ultra also comes in phantom silver and there are limited-edition phantom finishes in titanium, brown and navy, which can only be found on Samsung's website.
The camera bump is large and melts into the sides of the phone, which are glossy black. And while the regular S21 and S21 Plus looks snazzy in their two-tone colors, the all-black S21 Ultra is cool, elegant and badass all at the same time.
Read more: Galaxy S21 drop test: It broke on the first drop
The S21 Ultra is heavier than last year's S20 Ultra and the iPhone 12 Pro Max. It's the second heaviest phone I have tested in the past year, just behind the Asus ROG Phone 3.
The display is brighter and adds S-Pen support
Around the front is one of the most impressive displays I've seen. It has a Wide Quad HD resolution and a variable refresh rate between 10 and 120Hz, which is determined by what's on the screen. And just to be clear, it can be set to 120Hz without the hit to resolution that the S20 Ultra had. The 6.8-inch display is bright and the contrast is gorgeous. Covering the front and back is Corning's Gorilla Glass Victus.
Support for the S-Pen means you can draw, write, edit photos and sign documents on the S21 Ultra.
Sarah Tew/CNET
Under the screen is a larger ultrasonic fingerprint reader which feels peppy. I had a hard time telling if it was faster than the one on the S20 Ultra. The display also has S-Pen support.
The Galaxy Note phones line always tempted me, but I didn't think I'd use the S-Pen enough to justify getting one. I like the iPad Pro-Apple Pencil approach Samsung took with the S21 Ultra. Without an S-Pen, you can still enjoy using the S21 Ultra. But if you're S-Pen curious, you can buy a new S-Pen or find an old one and it will work. There's a lot you can do like draw, take notes and sign documents. I love editing photos and making adjustments with the S-Pen.
There are a few S-Pen considerations. The S21 Ultra doesn't come with an S-Pen and doesn't support Bluetooth or gesture functionality. For example, the S21 Ultra can't send you a notification if you leave your S-Pen behind. Also, the Ultra doesn't have a built-in slot to store an S-Pen. Samsung does sell cases for the phone that include S-Pen storage.
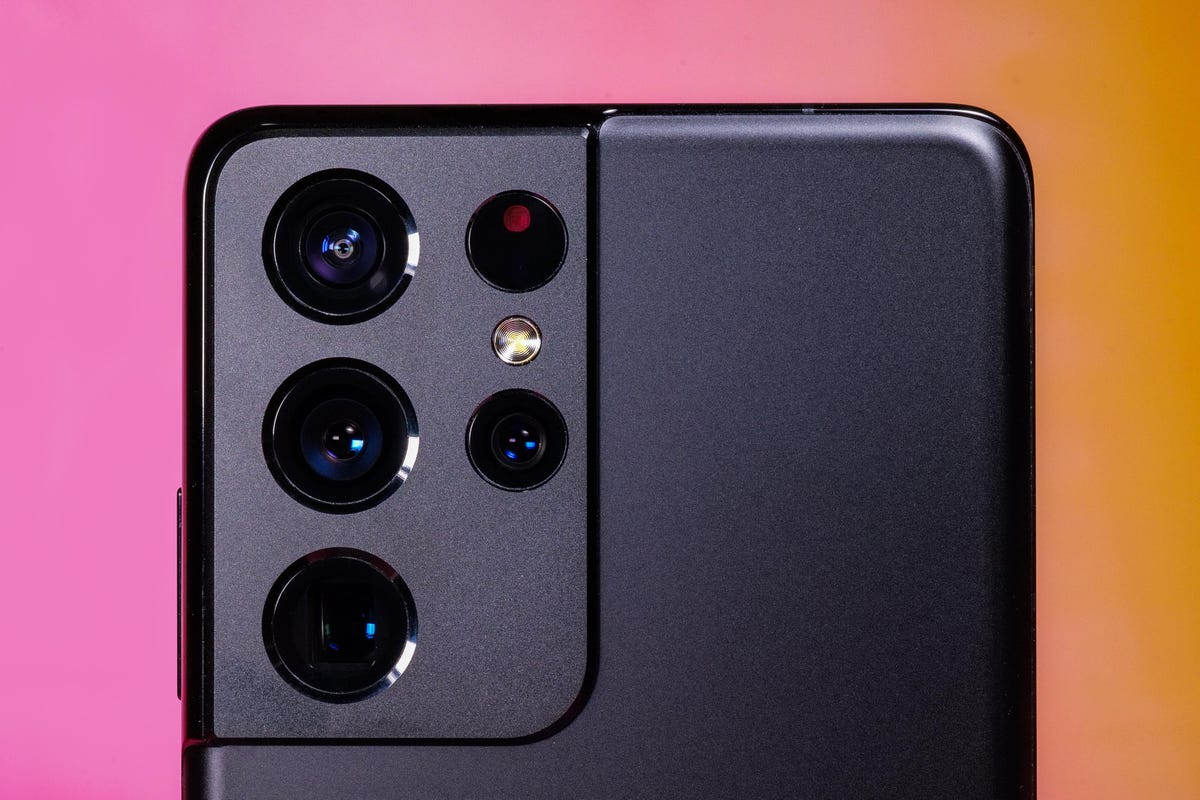
The S21 Ultra has two telephoto cameras
The S21 Ultra's camera system received several significant updates. There are four rear cameras: one wide, one ultrawide and two telephoto cameras. The time-of-flight sensor on the S20 Ultra is gone; in its place is a laser autofocus module.
The 108-megapixel sensor on the main camera is new and has better autofocus for both photos and videos. There's even a new focus enhancer tool that pops onscreen to help the phone focus faster. The tool looks like it might be switching to a wider view to do so.
Read more: S21 Ultra vs. iPhone 12 Pro Max vs. Pixel 5: Which phone has the best night mode?
There are four rear cameras: wide, ultrawide and two telephotos.
Patrick Holland/CNET
The dual-telephoto cameras add a number of benefits. One has 3x magnification and the other 10x. This means when you zoom in, there are two places in your zoom range where the image isn't cropped and where you'll capture the best image quality. Another benefit is stability. The two cameras are paired to help make zooming in, even at 100x, easier and more steady.
At 30x or higher, a zoom guide appears to help you find the specific spot that you're zoomed in at. You can lock it so the cameras don't move, which turns the guide yellow. This works quite well. Obviously you have to be careful not to move the phone around too much, but it's less finicky and frustrating than the S20 Ultra.
Photos from the S21 Ultra are excellent, with good detail and a wide dynamic range. There is a 108-megapixel mode, but I found that the 12-megapixel photos that come from pixel binning look consistently great.
Below are several photos I took with the S21 Ultra.
The main camera was set to 12 megapixels, which uses pixel binning to combine nine pixels into one.
Patrick Holland/CNET
One benefit of pixel binning is that it can bring out the details in a photo. Notice the different textures and details.
Patrick Holland/CNET
I used the single-take mode in the camera app to capture photos and videos of this cute dog. Here's one of the pictures my S21 Ultra chose.
Patrick Holland/CNET
There's so much for the S21 Ultra to capture correctly here: the barren tree branches, the water and the white fluffy clouds in the blue sky.
Patrick Holland/CNET
Here are three different photos I took from the exact same spot using the wide 1x camera (left), the 3x telephoto camera (middle) and the 10x telephoto camera (right).
Patrick Holland/CNET
In low light, the S21 Ultra's night mode is outstanding. Flaring on the lens is minimized and photos look bright without a bunch of image noise or noise-reduction smearing. Below are a few night mode photos I took:
This might be my favorite night mode photo of the bunch.
Patrick Holland/CNET
Here's another night mode capture. I like how the S21 Ultra brought out the colors in the sculpture.
Patrick Holland/CNET
Night mode on any of the S21 Ultra's cameras. I took this shot with the ultrawide.
Patrick Holland/CNET
For selfies there's the same 40-megapixel camera that the S20 Ultra had. You now have an option to change the color tone to either bright or natural which is excellent.
Here is a selfie I took with the natural setting.
Patrick Holland/CNET
Samsung added the ability to take raw 12-bit color photos. There's a new video feature called Director's View, which gives you a thumbnail preview of the video feeds coming from all of the cameras on the phones. As you record, you can switch between them. Within Director's View, there's a vlogger setup that gives you a side-by-side video view or a stacked one if you're shooting vertically. This means you can record yourself with the selfie camera and show what you're seeing or reacting to with any of the rear cameras.
On paper, Director's View seemed like something I might try once and not really use. But after some time using it, some people will definitely be into the feature. A downside to Director's View is that the final video is saved in HD instead of 4K or 8K. I'd love to see a similar thumbnail preview interface of all the rear cameras when recording a regular 4K video.
I'm excited to pit the S21 Ultra and its cameras against the iPhone 12 Pro Max and Google Pixel 5. Each phone takes a different approach to photography and will appeal to different people.
S21 Ultra has a Snapdragon 888 chip and 12 or 16GB of RAM
Powering the S21 Ultra is the new Qualcomm Snapdragon 888 chip, along with 12GB of RAM, or 16GB in the most expensive model -- which also has 512GB of storage (see the chart below for prices). In my benchmark tests, the S21 Ultra scored better than last year's S20 Ultra. And in use, it handled everything I threw at it, even playing Xbox Game Pass Ultimate games on it.
You can use the Xbox Game Pass Ultimate app to play Xbox games on your S21 Ultra.
Sarah Tew/CNET
Supplying juice to the phone is a 5,000-mAh battery. I've easily been averaging a day and a half on a single charge. Battery tests on the S21 Ultra for continuous video playback on Airplane mode clocked an average of 22 hours and 57 minutes with the refresh rate set to Auto 120Hz. That's actually an hour less than the S20 Ultra lasted in the same test. Though keep in mind, in real world use my colleague Jessica Dolcourt found the S20 Ultra's battery drained like it was being bitten by a "thirsty vampire."
Below are the results of my benchmark tests for the S21 Ultra.
3DMark Slingshot Unlimited
Note:
Longer bars indicate better performance
Geekbench v.5.0 single-core
Note:
Longer bars indicate better performance
Geekbench v.5.0 multicore
Note:
Longer bars indicate better performance
Android 11 and 5G support
The Galaxy S21 Ultra runs Android 11 with Samsung's OneUI 3.1 top layer. And I like it a lot. I can now default to Google Pay or Google Discover News feed instead of Samsung's versions. The look for everything from settings to pop-up windows is clean and contemporary. And with a phone this big, OneUI helps make it easier to use one-handed.
Last, the Galaxy S21 Ultra has 5G and supports both sub-6 and mmWave flavors of 5G. You shouldn't get the Ultra for its 5G. But as 5G networks get better, so will your 5G speeds and connection. And then we'll really have something to talk about.