Step into a world where the focus is keenly set on How To Take A Screenshot. Within the confines of this article, a tapestry of references to How To Take A Screenshot awaits your exploration. If your pursuit involves unraveling the depths of How To Take A Screenshot, you've arrived at the perfect destination.
Our narrative unfolds with a wealth of insights surrounding How To Take A Screenshot. This is not just a standard article; it's a curated journey into the facets and intricacies of How To Take A Screenshot. Whether you're thirsting for comprehensive knowledge or just a glimpse into the universe of How To Take A Screenshot, this promises to be an enriching experience.
The spotlight is firmly on How To Take A Screenshot, and as you navigate through the text on these digital pages, you'll discover an extensive array of information centered around How To Take A Screenshot. This is more than mere information; it's an invitation to immerse yourself in the enthralling world of How To Take A Screenshot.
So, if you're eager to satisfy your curiosity about How To Take A Screenshot, your journey commences here. Let's embark together on a captivating odyssey through the myriad dimensions of How To Take A Screenshot.
What buttons do you need to take a screenshot i need to take a screenshot on computer need to take a screenshot what keys do you need to take a screenshot need to take a bath need to take a shower need to take a nap need to take action synonym need to take brandon to the train station
Need to Take a Screenshot on Windows 11? Here's How
Need to Take a Screenshot on Windows 11? Here's How
Screenshots are used for a variety of reasons. Maybe you're sending someone a photo of your screen over Slack to diagnose a problem, or you just need to take a quick snippet of an important document to save for later. Regardless of the reason, there are multiple ways to take a screenshot using a Windows 11 computer.
Whether you want to take a full-screen grab, you only want to capture part of the screen or you'd prefer to use a keyboard shortcut or application, the process is simple. Here are all the ways to take a screenshot on Windows 11.
Don't have Windows 11 yet? Check out these two important things you need to do before you can download Windows 11. And if you're unsure about updating, read more about the major differences between Windows 11 and Windows 10.
1. Take a screenshot of the entire screen
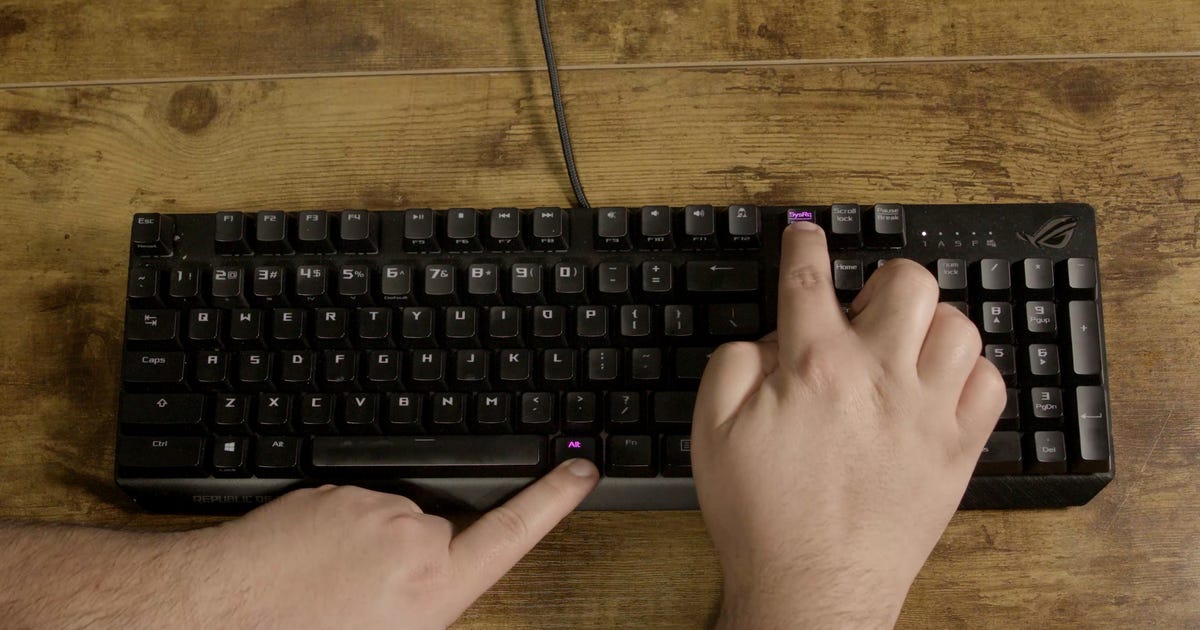
The easiest way to take a screenshot of your entire desktop is with the PrtSc key at the top of your keyboard. After tapping on the PrtSc key, the screenshot will be saved to your clipboard, although you won't receive any indication the screenshot has successfully been taken. To view the full-screen screenshot, use Ctrl-V to paste it into an application like Paint or Microsoft Word, or even into the body of an email.
2. Take a screenshot of the entire screen and save it to your computer
Similar to the first option, hitting the Windows-PrtSc keys will take a screenshot of your entire desktop, but it'll also save the screenshot to a folder on your computer. If you hit the keys correctly, your whole screen will flash, indicating the screenshot has been taken and saved. You can find all of your full-screen screenshots in Pictures > Screenshots.
You can take four types of screenshots: rectangular, freeform, window and full-screen.
CNET
3. Take a screenshot of only part of the screen
Not everyone wants a screenshot of their entire screen, which is why Windows 11 gives you the option to take only a partial screenshot. If you tap on Win + Shift +S, your screen will flash and a small Snipping Tool menu will appear at the top of the screen, allowing you to do the following (from left to right):
Rectangular Snip: Draw a box around what you want to capture
Freeform Snip: Draw any shape around what you want to capture.
Window Snip: Choose a window to capture.
Full-screen Snip: Capture your entire screen (same thing as PrtScr).
Once the screenshot's taken, it'll be saved to your clipboard, as with the PrtScr key option. You can then paste it elsewhere to look at it. However, if you click the Snipping Tool preview that appears at the bottom of the screen, you'll find options to edit the screenshot (crop, rotate and more) and save it to your desktop.
You can delay your screenshot by 3, 5 or 10 seconds.
CNET
4. Use the Snipping Tool to take delayed screenshots
The Snipping Tool comes built into Windows 11, and is the same tool used in the previous section, except with a few tiny additions. To use it, type in Snipping Tool in the Search feature and open the application to take a screenshot.
In Snipping Tool, if you click on New you'll open the mini Snipping Tool menu (like in the section before), where you can then choose between several different snips. However, with this full version of the Snipping Tool, you can choose any of the four snipping options (rectangular, freeform, window and fullscreen) and then choose a delay option. You can choose between a 3-, 5- and 10-second delay. This will give you a bit of time to set up whatever it is you're attempting to screenshot and might make it easier than taking the shot manually.
To take the delayed screenshot, simply hit Win-Shift-S, which will then be copied to your clipboard. You can also click on the screenshot preview that appears to make any edits or save it to your computer as a JPEG, PNG or other.
Need to take a screenshot on windows 11 here s how a charitable need to take a screenshot on windows 11 here s that rainy day lyrics need to take a screenshot on windows 11 laptop need to take a screenshot on chromebook need to take a screenshot on dell need to take a screenshot on a computer we need to take away children i need to take a break do i need to take antibiotics after root canal do i need to take vitamins we need to talk about kevin
Need to Take a Screenshot on Windows 11? Here's How
Need to Take a Screenshot on Windows 11? Here's How
Screenshots are used for a variety of reasons. Maybe you're sending someone a photo of your screen over Slack to diagnose a problem, or you just need to take a quick snippet of an important document to save for later. Regardless of the reason, there are multiple ways to take a screenshot using a Windows 11 computer.
Whether you want to take a full-screen grab, you only want to capture part of the screen or you'd prefer to use a keyboard shortcut or application, the process is simple. Here are all the ways to take a screenshot on Windows 11.
Don't have Windows 11 yet? Check out these two important things you need to do before you can download Windows 11. And if you're unsure about updating, read more about the major differences between Windows 11 and Windows 10.
1. Take a screenshot of the entire screen
The easiest way to take a screenshot of your entire desktop is with the PrtSc key at the top of your keyboard. After tapping on the PrtSc key, the screenshot will be saved to your clipboard, although you won't receive any indication the screenshot has successfully been taken. To view the full-screen screenshot, use Ctrl-V to paste it into an application like Paint or Microsoft Word, or even into the body of an email.
2. Take a screenshot of the entire screen and save it to your computer
Similar to the first option, hitting the Windows-PrtSc keys will take a screenshot of your entire desktop, but it'll also save the screenshot to a folder on your computer. If you hit the keys correctly, your whole screen will flash, indicating the screenshot has been taken and saved. You can find all of your full-screen screenshots in Pictures > Screenshots.
You can take four types of screenshots: rectangular, freeform, window and full-screen.
CNET
3. Take a screenshot of only part of the screen
Not everyone wants a screenshot of their entire screen, which is why Windows 11 gives you the option to take only a partial screenshot. If you tap on Win + Shift +S, your screen will flash and a small Snipping Tool menu will appear at the top of the screen, allowing you to do the following (from left to right):
Rectangular Snip: Draw a box around what you want to capture
Freeform Snip: Draw any shape around what you want to capture.
Window Snip: Choose a window to capture.
Full-screen Snip: Capture your entire screen (same thing as PrtScr).
Once the screenshot's taken, it'll be saved to your clipboard, as with the PrtScr key option. You can then paste it elsewhere to look at it. However, if you click the Snipping Tool preview that appears at the bottom of the screen, you'll find options to edit the screenshot (crop, rotate and more) and save it to your desktop.
You can delay your screenshot by 3, 5 or 10 seconds.
CNET
4. Use the Snipping Tool to take delayed screenshots
The Snipping Tool comes built into Windows 11, and is the same tool used in the previous section, except with a few tiny additions. To use it, type in Snipping Tool in the Search feature and open the application to take a screenshot.
In Snipping Tool, if you click on New you'll open the mini Snipping Tool menu (like in the section before), where you can then choose between several different snips. However, with this full version of the Snipping Tool, you can choose any of the four snipping options (rectangular, freeform, window and fullscreen) and then choose a delay option. You can choose between a 3-, 5- and 10-second delay. This will give you a bit of time to set up whatever it is you're attempting to screenshot and might make it easier than taking the shot manually.
To take the delayed screenshot, simply hit Win-Shift-S, which will then be copied to your clipboard. You can also click on the screenshot preview that appears to make any edits or save it to your computer as a JPEG, PNG or other.
I need to take a screenshot on computer what buttons do you need to take a screenshot what buttons do you need to take a screenshot need to take a nap need to take a picture need to take action synonym need to take a shot meaning need to take into account need to lose weight fast
Need to Take a Screenshot on Windows 11? Here's How
Need to Take a Screenshot on Windows 11? Here's How
Screenshots are used for a variety of reasons. Maybe you're sending someone a photo of your screen over Slack to diagnose a problem, or you just need to take a quick snippet of an important document to save for later. Regardless of the reason, there are multiple ways to take a screenshot using a Windows 11 computer.
Whether you want to take a full-screen grab, you only want to capture part of the screen or you'd prefer to use a keyboard shortcut or application, the process is simple. Here are all the ways to take a screenshot on Windows 11.
Don't have Windows 11 yet? Check out these two important things you need to do before you can download Windows 11. And if you're unsure about updating, read more about the major differences between Windows 11 and Windows 10.
1. Take a screenshot of the entire screen
The easiest way to take a screenshot of your entire desktop is with the PrtSc key at the top of your keyboard. After tapping on the PrtSc key, the screenshot will be saved to your clipboard, although you won't receive any indication the screenshot has successfully been taken. To view the full-screen screenshot, use Ctrl-V to paste it into an application like Paint or Microsoft Word, or even into the body of an email.
2. Take a screenshot of the entire screen and save it to your computer
Similar to the first option, hitting the Windows-PrtSc keys will take a screenshot of your entire desktop, but it'll also save the screenshot to a folder on your computer. If you hit the keys correctly, your whole screen will flash, indicating the screenshot has been taken and saved. You can find all of your full-screen screenshots in Pictures > Screenshots.
You can take four types of screenshots: rectangular, freeform, window and full-screen.
CNET
3. Take a screenshot of only part of the screen
Not everyone wants a screenshot of their entire screen, which is why Windows 11 gives you the option to take only a partial screenshot. If you tap on Win + Shift +S, your screen will flash and a small Snipping Tool menu will appear at the top of the screen, allowing you to do the following (from left to right):
Rectangular Snip: Draw a box around what you want to capture
Freeform Snip: Draw any shape around what you want to capture.
Window Snip: Choose a window to capture.
Full-screen Snip: Capture your entire screen (same thing as PrtScr).
Once the screenshot's taken, it'll be saved to your clipboard, as with the PrtScr key option. You can then paste it elsewhere to look at it. However, if you click the Snipping Tool preview that appears at the bottom of the screen, you'll find options to edit the screenshot (crop, rotate and more) and save it to your desktop.
You can delay your screenshot by 3, 5 or 10 seconds.
CNET
4. Use the Snipping Tool to take delayed screenshots
The Snipping Tool comes built into Windows 11, and is the same tool used in the previous section, except with a few tiny additions. To use it, type in Snipping Tool in the Search feature and open the application to take a screenshot.
In Snipping Tool, if you click on New you'll open the mini Snipping Tool menu (like in the section before), where you can then choose between several different snips. However, with this full version of the Snipping Tool, you can choose any of the four snipping options (rectangular, freeform, window and fullscreen) and then choose a delay option. You can choose between a 3-, 5- and 10-second delay. This will give you a bit of time to set up whatever it is you're attempting to screenshot and might make it easier than taking the shot manually.
To take the delayed screenshot, simply hit Win-Shift-S, which will then be copied to your clipboard. You can also click on the screenshot preview that appears to make any edits or save it to your computer as a JPEG, PNG or other.
How to train yourself to become a back sleeper and pregnancy how to train yourself to become a back sleeper and flat how to train yourself to become a morning person how to train yourself to fight how to train yourself to wake up early how to train a puppy how to train a dog how to take a screenshot
How to Train Yourself to Become a Back Sleeper (and its Benefits)
How to Train Yourself to Become a Back Sleeper (and its Benefits)
Unless you're some kind of Incredibles Elastigirl, there are three primary sleeping positions: side, stomach and back -- although, some can be a combination of these. In 2019, a study that involved over 3,700 volunteers concluded that only 7% of people sleep predominantly on their back, a stark contrast to the 54% of people who favor sleeping on their side.
However, what if back-sleeping had real, tangible evidence that it's better for you? Would you give it a try? It turns out there are many benefits to back-sleeping as it has a long list of benefits, ranging from reducing physical pain to preventing wrinkles and pimples.
Don't worry, it's never too late to train yourself to become a back sleeper, but it will take effort to accomplish. Becoming a back sleeper may not happen overnight, but it's worth a shot if you want to reap its benefits. Find out below how sleeping on your back can improve your health and the steps you can do to make the switch.
See more: Best mattress 2022
The benefits of back sleeping
Back sleeping has been praised as the ultimate sleeper position, and for good reason. It can do wonders for your body, face and overall health.
There are a few exceptions to this. The first is pregnant women (usually after 20 weeks) because back sleeping can cause more pressure to their bellies. The second is people who snore or suffer from sleep apnea, as back sleeping can cause the tongue to obstruct your airway and cause breathing difficulties. Otherwise, training yourself to sleep on your back is worth considering.
Prevent back and neck pain: The key to preventing back pain while you sleep is ensuring your spine, neck and head are all in proper alignment -- one straight line, if you will. Back sleeping on a firm mattress can promote a neutral alignment, relieving pressure on your back and spine. A 2017 study revealed that sleeping on your back with your arms resting on the side or your chest is the best position to relieve pain.
Prevent acid reflux and clear up your sinuses: Sleeping with your head elevated above your heart helps prevent the build up of mucus in your sinuses, and relieves symptoms for those who experience acid reflux by preventing the exposure of acid to the esophagus.
Reduce tension headaches: Headaches that originate from the neck or cervical spine can be confused with migraine headaches, and often happen because of compressed nerves in the neck. Back sleeping helps relieve pressure on your neck, similar to how back sleeping prevents back pain.
Prevent wrinkles and blemishes: Sleeping on your stomach with your face down can have an undesired effect on your appearance. The compression and pinching of your face against your pillow can lead to wrinkles and fine lines, and the same thing goes for your neck. Additionally, your pillowcase is a hub for bacteria and sebum which can lead to breakouts.
Prevent puffiness in your face: When you sleep face-down on your pillow, fluid can collect in the tissues of your face resulting in swelling, puffiness and under-eye bags. Sleeping face-up on your back with your head elevated ensures the fluid is properly drained out.
How to train yourself to sleep on your back
Pillow placement is key
Use pillows to your advantage to help train yourself. You should have a pillow with medium loft (height) to keep your head propped up, a pillow under your knees and a pillow under your lower back. This helps support the natural curvature of your body and relieve pressure.
You can also create a pillow fortress to surround your whole body. It can prevent you from changing into a new position, and make you feel so cozy that you don't even feel the need to roll around.
Properly elevate your head
To elaborate on step one, your pillow should keep your neck in a slight "C" curve to help reduce pressure on your neck and head. If you're staring straight up at the ceiling, your pillow isn't tall enough. If you're fully facing the wall in front of you, your pillow is too tall. The perfect back-sleeping pillow will be somewhere in between.
Make sure your bed is firm enough
Back sleeping on a soft mattress is a recipe for back pain. A soft mattress lacks the support to keep your spine and neck in a neutral alignment, allowing your back to sag into the bed. Instead, try a firm mattress or firm mattress topper to make your bed feel more accommodating.
Try an adjustable bed frame
My Slumber Yard
An adjustable bed frame that allows you to move the head and foot positions up and down can keep you in a comfortable sleeping position, while also discouraging you to switch to your side or stomach.
By raising your head above your heart and slightly raising your feet, you go into a "zero gravity" mode, and it relieves pressure from all parts of your body -- like you're floating in space (hence the name). The positioning also prevents you from moving into an uncomfortable position on your side or stomach.
Consider the starfish position
If you're a single sleeper, your bed is your oyster and you can do as you wish without bothering a co-sleeper. In that case, lay with your legs and arms spread out and stretched each way like a starfish. You're able to evenly disperse your weight to prevent the build-up of pressure, and people who have tried it swear by it.
Mind your late-night meals
As tasty as pizza and hamburgers are, try to refrain from eating heavily fatty foods too close to bedtime. If you eat dinner less than 2 hours before you plan to go to bed, you may feel an uncomfortable pressure on your belly when you try to sleep face-up.
The information contained in this article is for educational and informational purposes only and is not intended as health or medical advice. Always consult a physician or other qualified health provider regarding any questions you may have about a medical condition or health objectives.
How to fight depression and anxiety during therapy how to fight depression and anxiety during the day but not at night how to fight depression and anxiety during third how to fight depression and loneliness without outside help how to fight depression naturally how to fight depression and anxiety rick warren how to fight depression how to fight a speeding ticket how to fight a cold how to screenshot on windows
How to fight depression and anxiety during the coronavirus pandemic
How to fight depression and anxiety during the coronavirus pandemic
For the most up-to-date news and information about the coronavirus pandemic, visit the
WHO
and
CDC
websites.
In a study from the Kaiser Family Foundation published April 21, close to have of the people polled said that their worries and stress about the coronaviruspandemic has negatively impacted their mental health. Even if you didn't already deal with anxiety and/or depression, the stress of living your day-to-day life during a pandemic is likely wearing on you now.
Haley Neidich, a licensed psychotherapist, tells CNET that it's completely normal to experience fear and anxiety right now. It is perfectly okay to feel whatever you are feeling during this time, but there are things you can do to calm your mind and ease stress.
"My biggest concern about the panic is the stress that it causes for each individual," Neidich says, noting that when panic occurs, events are canceled and shelves are cleared out of necessary items which only further increases stress. "Stress and panic begets stress and panic," she continues. "Stress weakens our immune systems, making us more susceptible to illness, which is the exact opposite of what we need right now."
If you're struggling with coronavirus anxiety, fear or feelings of helplessness, the tips below can help keep your spirits up. If you notice that stress is getting in the way of being able to work, take care of your family or do basic daily activities (like cook a meal or take a shower), you should seek professional help.
Read more: The best meditation app to help you destress
1. Limit the amount of information you consume
Limiting your time on social media is one of the best ways to keep coronavirus anxiety from spiraling.
Angela Lang/CNET
Neidich recommends setting a limit of 30 minutes for news and social media combined each day, as well as challenging yourself to take two full days each week with no news or social media.
Even if you don't go on your devices explicitly to check coronavirus news, during this time, you'll be bombarded -- so taking time off is an easy way to soothe anxiety. Setting Screen Time controls on iOS or Focus Mode controls on Android can help you restrict your overall screen time or the way you interact with certain apps.
2. Focus on the things you can control
Truthfully, there's not much you can do about what's happening around you. You can only take care of yourself, so that's what you should focus on, Neidich says. Follow the advice of the major health agencies monitoring and fighting coronavirus in the US -- the CDC and the WHO.
Wash your hands often (and sanitize them when you don't have soap and water)
Stay away from people who are sick
Cover your mouth when you cough and your nose when you sneeze (ideally with a tissue that you can throw away)
Avoid touching your face whenever possible
Leave the face masks for medical professionals, caretakers and people with compromised immune systems
Avoid nonessential travel (locally, domestically and internationally)
Keep your immune system strong by eating a healthy diet, getting enough sleep and managing stress
"There is so much that we don't have control over in life and COVID-19 is no different," she says. "I invite people in this situation to focus on what they are able to control and to make sure they have a loved one or a counselor to confide in about their emotional experience."
3. Stay busy with other things
This is a classic tactic for keeping anxiety under control. While you should definitely honor your feelings (more on that in the next tip), try not to allow your thoughts to spiral out of control. Focus on your daily obligations and add in fun activities to your days to keep anxiety to a minimum, Neidich says. Here are a few examples of simple, distracting activities you can try:
Solve a puzzle or play a board game with your family
Draw, paint, knit or do something else creative
Try to bake a masterpiece dessert with ingredients you already have in your kitchen
Read your favorite novel or watch your favorite movie
Take a nap
Call someone you love and talk about things other than the coronavirus
4. Set aside time to worry
Writing down your thoughts about coronavirus can help you work through them.
Getty Images
Allow yourself time to work through your thoughts about coronavirus. If you ignore them, they'll continue to persist, Neidich says. She recommends journaling by hand on how you feel about COVID-19. Grab a piece of paper and a pen, set a timer and just allow the words to flow onto paper. You don't have to keep the paper when you're done -- throwing it out can be cathartic and make it feel like you're emptying your mind of worries.
Set a timer for 3 minutes for worry journaling, Neidich says. "You will find that you'll run out of worries before the timer is up. Once this is complete, shift your attention to self-care and keep your mind busy."
5. Vent to a friend who won't judge you
If you're more of a talker than a writer, Neidich says it can help to confide in a friend about how you're feeling. Talk to someone who won't judge you for the way you feel, but try to avoid talking to someone who will fuel your anxiety even further. The key, Neidich says, is choosing someone who understands how you feel but won't perpetuate the fear you see online.
You should also first ask whoever you speak to if it's okay to share your fears with them. Many of us are coping with the stress of what is going on and it's only fair to ask someone if they are willing and able to listen before dropping your stress on them.
The information contained in this article is for educational and informational purposes only and is not intended as health or medical advice. Always consult a physician or other qualified health provider regarding any questions you may have about a medical condition or health objectives.
How to get your drone license how to get your drone rust how to get your drone out of a tree how to get your social security card how to get your ex back how to get a passport how to get a new social security card how to take a screenshot
How to get your drone license (and legally make money)
How to get your drone license (and legally make money)
Aerial photography. Real estate tours. Drone burrito delivery.
Imagine the money you could make (and fun you could have!) if you flew for profit.
Sadly, drone businesses aren't legal in the United States unless the government makes an exception for you -- or unless you get your own drone license under the FAA's brand-new rules.
Starting Monday, August 29, you can apply for your very own license by passing a multiple-choice test and paying a small fee. No experience necessary!
What, you mean I can't just sell my drone photos already?
Nope! You could get fined $1,100 (or more) for operating your unmanned aerial system (UAS) for business purposes without FAA approval.
What is a Remote Pilot Certificate?
It's the official name for the drone license I've been talking about. With it, you can legally fly drones with intention of making a profit -- either by selling the footage, delivering goods and everything in between. You still have to follow a lot of restrictions when you fly...but more on those in a bit.
Prosumer camera drones like the popular DJI Phantom start at around $500 -- but the sky's the limit on price.
Joshua Goldman/CNET
What if I'm just flying for fun?
You don't need the certificate...but you do still need to register your drone if it weighs over half a pound (0.55lb to be precise).
Oh, but if you're a drone racer -- weaving through obstacles with a nifty set of first-person-view glasses on your head -- you'll still need that Remote Pilot Certificate. At least that's what the FAA tells Forbes.
OK, I want to make money. What do I need to get my license?
Be at least 16 years old
Have a valid government-issued picture ID with your name, address and signature
Make an appointment to take the knowledge test at a test center near you
Pay $150 to the testing firm
Study
Pass the test
Wait up to 48 hours for your test score to get uploaded
Apply for your Remote Pilot Certificate (using the code from your successful test as proof)
Complete a TSA background check
Print out a temporary Remote Pilot Certificate (while you wait for the real one to be delivered by mail)
Register your drone (maybe do this first?) and start flying!
OK, that does sound like a lot. Let's break it down.
How do I get an appointment for a Remote Pilot Certificate?
You need to call, email or submit an online request form with one of the two companies supervising the test -- not the test center.
CATS (Computer Assisted Testing Service):
1-800-947-4228, then press 3 (Monday to Friday, 5:30 a.m. PT to 5 p.m. PT, Saturday to Sunday 7 a.m. PT to 3:30 p.m. PT)
Online registration and payment (CATS calls you back within 24 hours to schedule)
PSI (formerly LaserGrade):
1-800-211-2753, then press 1 twice (Monday to Friday, 5 a.m. PT to 5 p.m. PT, Saturday 5 a.m. PT to 2 p.m. PT)
examschedule@psionline.com (PSI replies within two business hours)
Online request form (PSI replies within two business hours)
According to testing centers we called, CATS and PSI handle pretty much everything, including assigning you a test center and accepting your $150 payment.
The DJI Phantom 4 taking flight.
CNET
How long is the waiting list?
In the San Francisco Bay Area, it's not too bad as of August 26. One testing center told us they were booked for two weeks, another said they had openings later in the week.
Is there a testing center near me?
Probably! There are 686 of them across the United States. Check for yourself in the FAA's full, official list of test centers (PDF).
You'll need to call CATS or PSI to get your appointment, though. While the FAA's website says you can just walk in, testing centers in the San Francisco Bay Area told us we needed to arrange everything with CATS or PSI first.
How hard is the test?
You get two hours to answer 60 multiple-choice questions, and you only need to answer 70 percent of them correctly to pass! (You can totally miss 18 questions and still succeed.)
But these aren't exactly easy questions. You'll probably need to study.
Oh yeah? How hard can the questions be?
While monitoring the Cooperstown CTAF you hear an aircraft announce that they are midfield left downwind to RWY 13. Where would the aircraft be relative to the runway? (Refer to FAA-CT-8080-2G, Figure 26, area 2.)
A. The aircraft is East.
B. The aircraft is South.
C. The aircraft is West.
That's just one of the FAA's sample questions. Find more here (PDF).
What's the best way to prepare for the test?
The FAA actually offers a free two-hour training course (register here first) to get you up to speed, plus an 87-page study guide (PDF).
But you may need more help than that, because the FAA's course materials don't explain some of the simplest concepts in plain English.
For instance, would you believe you can answer the sample question above without looking at a map? I didn't figure it out until I found this third-party study guide by drone manufacturer 3DR.
I passed the test! Where do I apply for the actual certificate?
Register here first (pick Applicant) and fill out your personal information. (You can ignore the Airman Certificate Number and Date of Issuance fields)
Log into the site using your new username and password
Apply for the certificate here; pick Pilot from the first dropdown menu, then click on the Remote Pilot certification
If you get lost, here's a complete set of instructions.
The Yuneeq Typhoon H drone.
Joshua Goldman/CNET
Now that I've got my certificate, I can fly anywhere, anytime, yes?
Not so much -- as you'll see when you study, there are a lot of rules (PDF) about when and where you can fly your drone.
Unless you get a 107 waiver (and you need to apply for those months in advance), you can't fly:
At night
Over people
Higher than 400 feet (unless you're within 400 feet of a building; skyscraper climbing is OK)
Further away than you can see with your naked eye
At speeds over 100 miles per hour
From a moving vehicle (or inside a covered stationary vehicle)
Within five miles of an airport -- unless you clear it with air traffic control using this tool at the FAA's website.
Also, you need to register your drone (if it weighs between 0.55 and 55 pounds), do pre-flight checks before you fly and report any accidents that hurt people or do $500 worth of damage to property.
What if my drone weighs more than 55 pounds?
You can't do it with a drone license, or even a 107 waiver. Only a 333 exemption (which are hard to get, can take a long time and generally require a real pilot's license to fly) can let you pilot something that heavy.
What if my company already has a Section 333 Exemption?
Lucky you! But in many cases, you can't actually fly a drone for profit under the 333 unless you're a certified pilot. The Remote Pilot Certificate is another option.
What if I've already got a pilot's license?
If you want your Remote Pilot Certificate, you can actually skip the knowledge test and take the online training course instead. You'll still need to fill out a form, make an in-person appointment and have completed a flight review within the last two years, so it's not necessarily any easier.
Here's a step-by-step guide for existing pilots.
Could I really start a drone burrito delivery service?
Yes, the FAA says package delivery is OK -- but it'd be tough! Particularly given the rule about needing to keep the drone within eyesight, and the one about drones needing to weigh 55 pounds or less. It'd probably be easier to just hand someone their food.
How about a journalist covering breaking news stories?
That could be tough, too. You can't fly over people without a waiver, and the FAA says those will take months. But if you're not reporting live, or not directly over people... the FAA says media companies can do it.
What if I have awesome video goggles and a camera on the drone? Do I really need to watch it with my actual eyes?
Someone needs to: either you, or a second person who can act as a visual observer. Them's the rules!
Which drone should I buy?
If you've never flown before, buy a toy drone. Not kidding -- you'll learn the basic motor skills without any risk of hurting people or turning a $1,000+ aerial camera into scrap. Then, pick one of our top-rated prosumer drones that matches your needs and budget.
Is that it?
So far, so good...but there's still a lot to think about. Maybe you'll want to insure your drone against damage, and yourself against liability? You'll definitely want to practice flying and camera skills, and you'll need to figure out how to convince potential clients that you're right for the job.
Lastly, know that your Remote Pilot Certificate is only good for two years. You'll need to pass another knowledge test once that's done.
How to see jupiter tonight how to see jupiter and saturn from earth how to see jupiter from earth best telescope to see jupiter and saturn let me see what spring is like on jupiter how to see jupiter from earth how to see jupiter s moons how to see cpu temp how to see wifi password windows 10 how to see someone s calendar in outlook how to see chunks in minecraft how to see how much ram i have how to take a screenshot how to clear cache how to screenshot on pc how to get free robux how to print screen
How to See Jupiter's Closest Encounter With Earth in Decades
How to See Jupiter's Closest Encounter With Earth in Decades
If you make a habit at all of skywatching after dark, you've probably noticed a bright star in the east in the evenings lately. That's actually not a star, and it's not Venus -- often one of the most visible planets. It's Jupiter, the largest planet in the cosmic neighborhood, brightening itself up as it comes closer to us than it has at any point in the past seven decades.
The huge gas giant is set to reach something called opposition on Sept. 26, which is when the planet will be opposite the sun in the sky. This is why Jupiter is growing increasingly visible not long after sunset in the east, shortly after the sun sets opposite it in the west.
Put another way, we are at the point in orbit when we're about to pass Jupiter, or we're at the closest point to Jupiter in our orbit relative to where it's in its orbit. Now, because orbits aren't perfectly circular things, the distance between our two planets can vary from opposition to opposition (an opposition with Jupiter takes place roughly every 13 months). It just so happens that this will be the closest our worlds will be to each other in at least 70 years.
So this could be the opportunity of a lifetime to get a good view of Jupiter.
As of right now, Jupiter is already the brightest celestial object in the night sky outside of the moon. It's pretty easy to spot. Just head outside a couple hours after sunset, look at the due eastern horizon and then start to scan upward looking for the brightest object that doesn't appear to twinkle like the other stars.
This is probably also a great opportunity to practice with whatever level of telescope or binoculars you might have handy to see if you can get a more detailed view and maybe even make out a few of Jupiter's largest moons.
The official moment of opposition is on Sept. 26, when Jupiter will technically be at its closest and brightest but probably not a noticeable amount, especially with the naked eye. What will happen on that evening, though, is that the planet will rise very close to sunset and then set very close to sunrise.
But you can get out and get the best view of (a few) generations right now. And mark your calendars for the next planetary opposition, when Mars will be bright in the sky in early December.
How to clean your airpods the word how to clean your airpods remove ear wax how to clean your airpods to make them louder how to clean your airpods and case how to clean your pc how to clean a keurig coffee maker how to clean dishwasher how to clean suede shoes how to take a screenshot how to change yahoo to google
How to Clean Your AirPods the Right Way
How to Clean Your AirPods the Right Way
This story is part of Try This, CNET's collection of simple tips to improve your life, fast.
You probably charge your AirPods or other earbuds every day, but do you clean them regularly, too?
Not only can dirt and earwax stick in the crevices of your buds, muffling the sound, but they can harbor bacteria. Repeatedly putting your earbuds in your ears without disinfecting them can transfer the bacteria into your ear canal, which can lead to an infection.
But trying to clean your earbuds the wrong way can damage them, even if they're waterproof.
Don't worry, though -- we'll show you how to do it the right way.
For more tech hacks, learn how to remove stickers and labels in seconds and the right way to use your can opener
The best ways to clean AirPods and other earbuds
Apple has a few suggestions for cleaning your AirPods. One recommended method is using a disinfecting or alcohol wipe to clean the exterior surfaces -- but do not use it on the speaker mesh. If you use any liquids to clean your earbuds, dry them completely before use.
For the microphone and speaker meshes, use a dry cotton swab and a soft-bristled brush to gently wipe away dirt. Don't press too hard, since you don't want to push the wax through the mesh. It would be nearly impossible to get it out from there.
Katie Teague/CNET
CNET contributor Matt Elliott suggests using Fun-Tak to remove stubborn leftover earwax. To do so, rub the Fun-Tak together to warm it up and then press it against the speaker. You can then use a wooden toothpick to scrape off anything stuck to the sides of the speaker hollow.
If you want to stick with only Apple products, the giant tech company released its own Polishing Cloth, which costs $19 and has a compatibility list. While AirPods don't appear to be on the list of products compatible with… a cloth, it could still be useful for hard-core Apple fans wanting to give their earbuds a shine. Otherwise, you might seek out a basic microfiber cloth for external dusting.
How to clean earbuds with removable silicone tips
If you own a set of earbuds with removable silicone tips, like the AirPods Pro or the JBL Reflect Flow Pro, they're a bit easier to keep clean: The silicone tip helps protect the speaker from earwax and other debris, and they pop off easily.
To clean the tips, remove them from the earphones and soak them in warm, soapy water for 30 minutes. If they're really dirty, you can agitate the container to loosen up the gunk. Next, use a clean cloth or cotton swab to remove any remaining earwax or dirt and let the silicone tips completely dry.
If you have earbuds that don't come with silicone tips, you can often buy them separately on Amazon. These $10 ear tips can slip over regular AirPods, for example.
Clean your charging case, too.
It's important to clean the case your wireless earbuds call home, too.
First, use a soft, dry and lint-free cloth to wipe away any dirt. You can slightly dampen the cloth with water or alcohol, but avoid getting any liquid inside the charging ports.
Read more: The 21 Best Wireless Earbuds for 2022
Keep your charging case clean, too.
Rick Broida/CNET
How not to clean your earbuds
While some earbuds are advertised as waterproof (or water-resistant), we don't recommend submerging them in water to get them clean-- only the removable silicone tips. Stay on the safe side and dampen a microfiber cloth or a cotton swab and gently wipe away the dirt.
We also don't recommend using a sharp object, such as a safety pin, to clean the speaker or microphone mesh, as it could puncture the speaker. Instead, use a soft-bristled toothbrush or wooden toothpick to gently remove any gunk.