Step into a world where the focus is keenly set on what is roll over means. Within the confines of this article, a tapestry of references to what is roll over means awaits your exploration. If your pursuit involves unraveling the depths of what is roll over means, you've arrived at the perfect destination.
Our narrative unfolds with a wealth of insights surrounding what is roll over means. This is not just a standard article; it's a curated journey into the facets and intricacies of what is roll over means. Whether you're thirsting for comprehensive knowledge or just a glimpse into the universe of what is roll over means, this promises to be an enriching experience.
The spotlight is firmly on what is roll over means, and as you navigate through the text on these digital pages, you'll discover an extensive array of information centered around what is roll over means. This is more than mere information; it's an invitation to immerse yourself in the enthralling world of what is roll over means.
So, if you're eager to satisfy your curiosity about what is roll over means, your journey commences here. Let's embark together on a captivating odyssey through the myriad dimensions of what is roll over means.
Elden Ring Boss Guide: How To beat Margit, Godrick, Radahn, and more
Elden Ring Boss Guide: How To beat Margit, Godrick, Radahn, and more
Elden Ring is out and like every other Souls-like game there are times when you confront a major foe who will put your survival skills to the test.
Elden Ring has the largest roster of bosses and secret encounters of any Souls-style game to date, and people are quickly figuring out how unforgiving these bad guys can be. So with that, we're offering a quick rundown of general tips to know when facing these bosses. Along with that, a guide on defeating some of the first major bosses of the game.
Check back with us in the coming days as we'll be adding more guides and tips on overcoming the big bads of The Lands Between.
General Boss tips
Learn Their Patterns
While every boss can be daunting, they each have a pattern that they follow rigorously. The most important thing you can learn when fighting enemies is how they move and what behaviors they follow. This knowledge can be a bit tough to learn, especially when you have swords and magic spells being hurled at your face. But once you do, you'll get a sense of how a boss' attacks work and what you can do to overcome them.
Don't Rely on Rolling Too Much
Rolling in Elden Ring is vital to every battle, but it's easy to abuse it. The move gives players a small window of invincibility on any attack, so it appears that spamming it would be the right answer to whatever scenario. Do not do this. FromSoftware purposely makes enemies' attacks reach a certain distance for when you roll. Bosses also have multiple quick and delayed attacks to throw off the timing of your rolls. Keep that in mind even in the heat of the battle.
If you need to roll, especially for boss battles, try rolling toward the boss. It sounds counterintuitive but the way FromSoftware designs boss attacks, going toward the boss helps you evade, as the expectation is for you to roll away. If there's one attack constantly hitting you when you roll away, that's when you need to roll forward.
Being Greedy is Dangerous
We know the feeling you can get when a particular foe gets caught in a vulnerable spot, and you want to keep attacking them. However, it's important not to be greedy in those moments. Before you know it, a boss can quickly recover and send you flying with a powerful counterattack. Always be mindful of the time it takes to attack. It's often better to go in for a couple of quick hits and back away to safety, even if there's time for another set of blows.
Make Sure to Use Your Summons
As players progress through the game, they'll receive more summons. These spirits can be somewhat weak and do minimal damage, but they distract the boss. These assists provide a small respite from the battle, allowing you to heal or set up a powerful charge or jumping attack. Calling on a summon should be the first thing players should do in a boss battle.
For the boss fights of legacy dungeons, there is usually a summon right next to the golden fog gate. Keep an eye out for an orange symbol on the ground as these fighters are powerful and can help you tremendously in these hard battles. You might need to find these NPCs within the dungeon before they will help.
Finish The Fight, Later
FromSoftware always finds ways to catch you off guard. An example is the Tree Sentinel, a big brute of a boss, in the game's first area. It's a powerful foe that can kill you in two hits. This encounter may give you the impression that you have to beat him at this moment, but trust us when we say that is not the case. You'll inevitably come across some foes that will knock you out in a quick fashion. While you can certainly try and figure a way to beat them, you're often better off just taking the hint and doing something better with your time. You can always come back later once you're stronger and get some revenge -- and those moments are always satisfying.
Now let's take a look at some specific bosses...
Margit, The Fell Omen
Margit, the Fell Omen can be a daunting foe to face in your first hours with the game.
From Software / Namco Bandai Games
This encounter is likely the first major boss you'll face in Elden Ring and they will certainly put you through your paces. The battle against Margit is, above all, a test of your dodging, attack skills and patience during a fight. Despite its size, Margit is highly mobile and can easily close the distance to land some hits on you if you aren't careful. The boss primarily uses their staff as a close-range weapon, striking with three-hit combo attacks and a harder two-handed blow that can drop your stamina fast if you try to block it. Margit will throw magic daggers at a distance at a range, and it's best to avoid them by dodging.
The best way to strike Margit is to hit them once they've finished performing their attacks. By looking at their attack patterns, you can have a window of opportunity to hit them with quick strikes. It's always better to stick and move rather than lay into them with a series of long combos. Go for brief 2-3 hits and then move away to avoid their follow-up attacks. And unless you have decent strength and endurance for your character, it's always better to roll out of the way of its attacks. Though if you have a shield with parry sub-ability -- and you're willing to take a risk -- you can stun Margit with a well-timed parry. However, if you miss the timing, you leave yourself open to a devastating attack.
Once you clear half its health, Margit enters a second phase where they'll pull out a massive hammer. While their patterns are still similar, Margit's extra aggression makes for a more tense fight. The best thing to do is stay composed and look at their patterns to find an opening. And always stick with dodging as opposed to blocking. If you try to block their hammer, you will lose your stamina and open yourself up for attack. Remember to stick and move, and keep your attacks brief when fighting Margit, and you will eventually defeat them.
If you're still struggling, another option to make the fight slightly easier: Visit the Murkerwater Cave dungeon, north of the Dragon Burnt Ruins. Inside the case, you'll encounter a boss named Patches, a recurring character from previous FromSoftware games. If you spare his life after he yields in combat, he will open up his inventory for purchase. One item he sells is Margit's Shackle, which will stun the boss during its first phase only, allowing you to go in for a series of strikes. This is a great way to overcome Margit if you need extra help with the fight
Godrick The Grafted
The battle against Godrick will be a real test of patience and resolve. It'd be best to bring in some back up for him.
FromSoftware / Namco Bandai Games
If you make it through Stormveil Castle, then you've already picked up skills and tactics when it comes to overcoming foes. However, the battle with Godrick is, by far, the biggest hurdle you'll need to overcome. As the first demi-god you'll fight, this fallen ruler of Stormveil Castle will pull out all the stops to take you out. Much like Margit, Godrick is speedy despite his size. But unlike Margit, Godrick has a larger arsenal of weapons and skills to use.
Before this fight, one thing you can do to make it easier is to summon an AI character. Nepheli, a traveling warrior, is someone you'll first meet in the Roundtable Hold, and you can find her again in Stormveil Castle near Godrick's location. If you speak with her, she will help you during the battle. Just outside the door to Godrick, you can see her summon sign. It's recommended you call in an assist in this fight, as having a backup will be a big help.
Like the previous fight, you'll need to watch Godrick's patterns to avoid their strikes. One attack to watch out for is a 360-degree wind attack that will encompass the immediate area of Godrick, damaging you and other allies if you stay close. It's important to watch for his tells and avoid his attacks once he gets them ready. It would be best to try to be more aggressive in this battle. Godrick has a lot of health, so playing it safe too long can exhaust you and resources, leading to a sudden defeat. Still, don't be greedy with your attacks.
During his 2nd phase, he'll take a more desperate tactic and graft the head of a dragon onto his arm and use it to attack you. This upgrade for him not only adds a new melee attack to his arsenal, but he can also use his new arm for breathing fire on you, which does considerable damage if you get hit. During this phase, the best thing to do is to keep a medium distance away from him, avoid his area of effect attacks, and then run to his blind spots when he pulls out the dragon head to breathe fire. The flames will only go in front of him, so running up to his side or behind him will protect you while also leaving him vulnerable for extended periods.
One of the important lessons this fight will impact is the importance of placement and position in a fight. Along with being a narrow bridge, the area also has a set of stairs on both sides. The elevation change can prove to be an advantage, as some of Godrick's attacks can miss you entirely if you get the high ground above him or below him. If you can be mindful of his attacks while also keeping your positional advantage, then you will be able to overcome Godrick with patience and a steady rhythm of attacks.
Red Wolf of Radagon
The battle with Red Wolf of Radagon will test if you can handle a foe adept at magic and close ranged combat.
FromSoftware / Namco Bandai Games
The battle with Red Wolf can be tough, due to how aggressive it is with close-range attacks and its set of long-range magic attacks. Like other major bosses, the Red Wolf is highly mobile, and uses that to its advantage with its attacks. Its deadliest attacks, by far, are the magic missiles, which are homing attacks that will tear right through your defenses and health. The Red Wolf also has a regular habit of priming up its magic spells and then using melee attacks to close the distance, adding further pressure on you. It can be tough to manage, and you'll likely face a quick death during your first attempts.
Thankfully, the Red Wolf doesn't have a second phase, so you'll see most of its patterns and tricks during the first couple minutes of the fight. The important thing to figure out is that the Red Wolf is very aggressive. Yet, that aggression can be used against it. Once it finishes attacking, it will leave itself vulnerable to counterattacks. Given the frequency of its attacks, you'll have plenty of opportunities to go in for quick hits -- provided you dodge its attacks without fail. Don't bother chasing after it; keep your distance and let it come to you. Once it has finished its attacks, strike it and back away. Keep this up for the remainder of the battle, and you will eventually come out on top.
Rennala, Queen of the Full Moon
Rennala is an incredibly powerful magic user, and can easily vaporize your character with her spells.
FromSoftware / Namco Bandai Games
The two-phased fight against magic-wielding Rennala is a bizarre one, but it's still a challenging fight. Unlike other bosses, Rennala likes to keep her distance, use spells, and summon monsters to tear through you. She'll start off with having her academy students fight for her, but once the battle continues, she'll take matters into her own hands -- and that's where things can quickly go south.
The first phase taking place in the library is a strange one. As you can see in the center of the room, Rennala is suspended in the air and it's impossible to reach her. The only way to bring her down is to find three different glowing gold students. They're hidden in the library, so you'll have to run through the area to search for them. Once you destroy three students, Rennala will fall to the ground in the center of the room, opening her up for attack. She won't stay down for long, though. Once enough damage has been done, she'll come back up, forcing you to repeat the previous steps. The biggest dangers in this phase of the fight is the magic that sends furniture hurling towards you, along with some devastating spells that will turn Renalla's students into missiles. The best thing to do is dodge through these attacks while searching for glowing students. After you deal enough damage, Renalla will then get serious.
This second phase is where the fight gets more dangerous. Rennala is an adept mage, and she'll keep her distance away from you while she sends out devastating magic attacks. Many of her spells are homing, which means you'll need to be extra careful when dodging and running towards to close the distance. Also, she'll call in help from her plethora of summoned monsters, many of which are common foes you've fought through the game thus far. These additional enemies are ultimately a distraction. If you focus too much on them, Renalla will snipe at you with her spells, spelling a quick defeat. If you die during this phase, you'll have to repeat the first one again.
The best way to defeat Renalla is to take note from previous bosses and be aggressive. While Renalla has some spells that push you away, she is very weak at close range and easily staggered with attacks. If you are a spellcaster, the best thing to do is to dodge her spells and then cast your own in quick succession. The key to winning this fight is to not hesitate and land your attacks when you see a window of opportunity. If you can keep it up, then you'll defeat Renalla in no time.
Godfrey, First Elden Lord
Roll forwards, not backwards!
From Software
Godfrey is the first required boss in Leyndell. He's a big golden brute with a giant axe. Luckily, his attacks, while powerful, are somewhat typical for a boss.
A good way to start off the fight is with a summon. If you haven't yet, visit the Fringefolk Hero's Grave, which is at the very start of the game behind a fog wall. Complete the dungeon and you'll receive Banished Knight Oleg who is a more powerful summon that can take quite a few hits from bosses.
As for strategy, the key to his Godfrey fight is to roll forwards, not backwards. Godfrey makes use of his giant axe to reach you as you roll back. If you see him winding up, it's like he's getting ready for a long-reaching attack which is when you want to roll forward. He'll also use this attack when you're backpedaling while trying to heal.
If there's an attack you want to be aware of it's his stomp. It comes out quickly and will stun just enough to combo into an axe swing if you don't move. If you see a stomp coming, try to use a shield to block the attack instead of rolling away since it can still catch you.
You'll want to attack when you roll forward into those long axe attacks and when you roll away from his jumping pound attack. In both cases, he takes an extra couple of seconds to reset himself leaving him open to attacks.
Morgott, The Omen King
If Margit gave you nightmares, Morgott is going to haunt you while you're awake. The Omen King is going to be the toughest challenge you've faced so far unless you have gained a substantial number of levels. Even then, this is far from an easy fight.
The good news is that you have an orange summon available right outside the golden fog: Melina. If you don't see her symbol, use a Furlcalling Finger Remedy to reveal it. She's going to be vital for the fight as she can heal you while also dealing and taking damage. You'll also be able to use one of your own ash summons, but it's best to save that for the second phase.
What's important in this battle is speed. Do not attempt long combos against Morgott. Their attacks are so quick, can do multiple hits and will be delayed in order to throw your timing off. What you want is to get in, do a quick jumping attack and run away. This is where having Melina helps because as soon as she becomes targeted, you can get a few more hits in as well as a jumping attack.
In this fight, rolling back is more ideal as Morgott doesn't have long reaching attacks. If you're far away, they can throw some daggers or a lance that can be easily blocked or dodge. If you see swords floating above, that's a big area-of-effect attack and you want to roll back and avoid any areas where they land.
Phase 2 starts when Morgott's health gets about halfway. They'll lean over and start coughing. This is your sign to run away because a big blast is about to happen. If you're clear, it's time to for an ash summon in order to get another target for Morgott.
In the second phase, Morgott does the same attacks, but whenever an attack is missed, a puddle of liquid will be left that will erupt a few seconds after so make sure to avoid them. Aside from that, keep the same strategy of jumping in for quick attacks and then getting out of range. Keep this up and Morgott will go down.
Starscourge Radahn
The battle with Radahn is one of Elden Ring's most bizarre and epic boss fights. Come in prepared.
FromSoftware / Bandai Namco Games
While not required to complete the main story, this battle against Starscoruge Radahn is one of Elden Ring's most epic boss encounters, and it's one you'll likely find yourself walking into unintentionally. Located just off from Redmane Castle in the Caelid region, the battle with Radahn will see you face off against a towering foe who wields a ludicrous amount of power. Along with that, you'll call in many support characters to help you in battle. It's truly a one-of-a-kind fight, but it's also quite unforgiving. One wrong move against Radahn can result in a quick and brutal defeat.
What makes this battle so difficult is that is Radahn's attack power and range are so high that he can easily kill you within seconds of the fight beginning. He wields a magic-infused bow and twin great swords that can tear through your defenses. Right at the beginning, you'll need to close the distance on Radahn while also taking the time to summon allies to the fight. During this part of the fight, he'll try to pick you off with his arrows, and they deal considerable damage. You'll need to stick with cover, using the piles of old weapons as a shield, and close the distance to Radahn. You'll need to jump on Torrent and begin your attack from here.
This battle has two phases, and you'll need to pick your moments to attack Radahn and make a quick exit to avoid his strikes. For more of a detailed breakdown of the battle against Radahn, check out deeper guide that details the fight and the best strategies you'll need to beat him.
The best strollers of 2022 cost convenience and snowball the best strollers of 2022 cost convenience and neighborhood the best strollers of 2022 cost convenience and voluntary the best strollers of 2022 cost convenience and comfort the best strollers of 2022 black the best strollers of 2022 movies the best strollers of 2022 nfl the best strollers on the market the best strollers for toddlers the best strollers for infants what are the best strollers what are the best starting words for wordle
The Best Strollers of 2022: Cost, Convenience and Best Features
The Best Strollers of 2022: Cost, Convenience and Best Features
A stroller can be one of the most expensive purchases you make as a new parent. We say "can" because the stroller market is so vast and varied that your choices range from sub-$100 umbrella strollers to premium models that ask $1,000 and up. With so many different options for wheeling around your bundle of joy, it's easy to become overwhelmed.
In many ways, shopping for a stroller is like shopping for a car. Just as you'd do for that similarly daunting process, you must first identify your needs. Do you want a small stroller you can take anywhere and deploy and break down quickly, or do you want a large stroller that's more comfortable and can carry more stuff? How many seats do you need? Do you want to be able to swap in a car seat? And how much are you willing to spend? Once you have a better idea of what you want, you can narrow down your options.
To help you in your search, we tested nine strollers across several different categories. Keep reading to find out which ones deserve your attention.
Read more: How To Choose the Right Baby Stroller for You
Screenshot by Nasha Addarich Martínez/CNET
It's a great idea to buy a convertible stroller for your first baby if you're considering having a second. It gives you the flexibility to add another seat and convert it into a double later on down the line. But while a convertible stroller will work well enough, a dedicated double stroller might better suit your needs. The Baby Jogger City Mini GT2 Double is an all-terrain side-by-side double stroller with several advantages over a convertible double stroller. For one, its maneuverability doesn't change with the number and size of the kids it's carrying. A convertible double stroller has its seats arranged in a tandem configuration. If you have an older toddler in the front seat, the added weight over the front wheels will affect your steering effort. A side-by-side doesn't have that problem if you don't exceed the stroller's weight limits.
Another benefit of the side-by-side layout is the ease of getting your child into the seat. Since there's nothing in front, lifting them into the seat is a breeze. My 3-year-old liked to climb into his seat himself, though this was a double-edged sword as he could just as easily climb out if he wasn't buckled in. Buckling him in was easy when I just used the waist belt, but the shoulder straps' interlocking harness system was tricky. The harness parts all go together a certain way, and getting them to stay that way while your child is squirming can be challenging. Another shortcoming is the small under-seat storage basket. It's a relatively small space for such a large stroller, though it will fit a backpack-style diaper bag, provided you can squeeze it past the crossbar right over the basket. There are also no cup holders, so if you want a place to dock your latte, you'll need to buy one separately from Baby Jogger.
Being an all-terrain stroller, the GT2 Double has larger wheels and a fantastic suspension that provide a smooth ride on pavement and more off-road capability for outdoor excursions. To set the brake, simply pull the lever on the right rail.
One drawback of side-by-side double strollers is that they're wide. The GT2 Double will fit through standard-size doorways, though sometimes just barely. You need to be aware of the placement of the back wheels when pushing through a door to avoid snagging them. The stroller's extra width makes it less ideal for cruising narrow store aisles. It's best suited for wide-open spaces, so the GT2 Double has become my go-to theme park stroller. As I already mentioned, it's supremely maneuverable and very easy to get my kids in and out of. Thanks to the individually reclining seatbacks and flip-up footrests, it's also great for taking naps. If one child falls asleep, you can lean them back and pull down the sunshade, which provides generous coverage.
Folding the GT2 Double is as easy as pulling the straps on the seats. The stroller collapses neatly in half, though you need to be ready for the top to swing down to avoid smacking your shins. Carrying the GT2 Double by those straps is easy enough, but at 36.5 pounds, it's far from being a lightweight stroller. Getting it in and out of your car requires some muscle, especially if you lift it over and into a conventional trunk. Additionally, its substantial width makes it bulky even when folded, so you'll need to clear a good amount of space to make room for it.
Price: At around $700, the GT2 Double isn't cheap. But it makes life with two young kids a little bit easier, and for that, I say it's worth every penny.
Screenshot by Nasha Addarich Martínez/CNET
Unless you're a stroller enthusiast, you probably won't notice when another parent rolls up next to you with a fancy set of wheels. But everyone will notice the Wonderfold W4 Luxe. This imposing four-seat stroller wagon stands at 4.5 feet tall with the canopy fully extended and is just over 4 feet long. On walks, it will take up most of the sidewalk. Despite its size, the largest Wonderfold model is relatively easy to maneuver, though don't expect it to navigate tight corridors and aisles. You will feel the weight of the wagon (plus your kids) when pushing uphill or for long periods, but the large 12-inch wheels in the rear make that task less laborious.
The Wonderfold W4 Luxe is kind of like a Pack 'n Play on wheels and, as such, it's spacious. The wagon comes with two bench seats, which accommodate two children each. The shoulder room will be tight with two toddlers on one bench, but it's manageable. We usually install the front-facing bench for our two kids, leaving space for blankets, toys and whatever else they need in the front of the wagon. I like that the walls are tall enough that my 3-year-old can't just jump out whenever he wants, and he likes the secret zipper door in the front that allows him to crawl in and out when opened. The canopy is simple and effective, providing plenty of shade no matter the sun's position. When not needed, the canopy rods slide out and stow neatly in the back of the wagon. Also in the back is a large external cargo basket that can hold your diaper bag and more.
The W4 Luxe's best feature is also its biggest downside: it's massive. The wagon weighs 58 pounds in total, and while folding it does shrink it down substantially, it's still bulky. This isn't a stroller you can fit easily in an average-sized trunk. You need to be able to fold some seats down or have a truck bed to toss it into -- and even then, lifting it in and out won't be easy. With all that said, the Wonderfold W4 Luxe isn't well suited for everyday stroller duties.
Price: This wagon will set you back by $900. But if you have two or more kids and go on regular family adventures, the W4 Luxe is a fantastic option that you'll get years of use out of.
Screenshot by Nasha Addarich Martínez/CNET
After more than 60 years in the baby products game, Chicco has earned a reputation among parents for being a trusted brand. In the competitive stroller market, Chicco's offerings fall right in the middle of the price spectrum, and even though its strollers aren't super high-end, they offer a lot of bang for your buck. The Chicco Corso is a perfect example.
The Corso is a full-size, single-seat travel system stroller, which means it was designed from the outset to be compatible with a car seat (in this case, the Chicco KeyFit range). Though the Corso's seat is suitable for newborn babies (it reclines fully and comes with an infant insert), it's easier to keep your little one in their car seat, remove it from its base, pop it into your stroller and go. Doing this avoids transferring your baby, which is a game-changer if they're sound asleep and want them to stay asleep.
The Corso is a midrange stroller, so it feels plain compared to high-end offerings in the same class. Some of its materials are somewhat rough to the touch, and overall the seat lacks the plushness you might expect based on its upscale, modern design. I tested the Corso LE model, which does add a few more premium features, such as a faux leather wrap for the handlebar and bumper bar and a larger cargo basket with cup-holder pouches. It also upgrades the wheels from plastic to a treaded rubber design. These enhancements help raise the Corso's luxury quotient, but if you're expecting Uppababy or Nuna levels of quality, you'll be sorely disappointed.
What the Corso lacks in luxury, it makes up for with practicality and value. The Corso is handy with a supple ride that's easy on your hands and your baby. The seat has three recline positions and will lay flat. Meanwhile, the canopy provides good coverage thanks to a zip-out extension. I love the one-handed folding mechanism, similar to the Chicco Bravo and it comes in handy when you've got a baby occupying your other hand. Once folded, the stroller stands on its own -- a highly underrated feature.
The Corso is often paired with a KeyFit infant car seat (the standard Corso gets the KeyFit 30 while the Corso LE gets the KeyFit 35). That makes sense since a travel system stroller works best when you have the car seat it's designed to work with. You can, however, buy the Corso separately.
Price: At around $500, the Chicco Corso is a versatile stroller that looks chic and performs well and is a comparable option from Uppababy or Nuna.
Screenshot by Nasha Addarich Martínez/CNET
It's rare for a stroller to live up to its marketing hype, but the Veer Cruiser does just that with a rugged design that offers capability and utility in spades. The Veer is a versatile stroller wagon that seats two children. The wagon can be pulled or pushed, though pushing requires some getting used to as it steers from the back in this configuration. In keeping with its extreme outdoorsy image, the wagon is designed to be hosed down when it gets dirty. This is a great feature, especially if your kids spill food from the center snack tray.
The Veer Cruiser's 12-inch rear wheels help it crawl over uneven terrain, while the front wheels with integrated suspension help smooth out the ride. The sides of the wagon are at a good height for a toddler to rest their arms on and they can easily climb in and out. Though the sides, seat backs and handle bar collapse flat, the Veer Cruiser is still bulky when folded due to its large wheels. It's also on the heavy side at 32.5 pounds.
The Veer Cruiser has many useful features out of the box, but some conveniences that come standard on other strollers are only available as optional accessories. For example, if you want shade for your children, you'll have to fork over an additional $60 each for the retractable canopies. If you want more cargo space, the rear cargo basket will set you back at around $80. The advantage of offering everything à la carte is you can customize your Veer Cruiser to your heart's content with unique colors and prints. The Veer Cruiser is undoubtedly a pricey option (especially after accessories), but you'll appreciate this wagon's versatility and robustness if you find yourself outdoors often.
Price: At $699, the Veer cruiser is pricier than other strollers on this list. But if you enjoy having the option to fully customize your stroller to your ever-changing baby needs, it may be well worth the price.
Screenshot by Nasha Addarich Martínez/CNET
Full disclosure: I've owned an original Minu since 2018, so I've had a lot of time to consider what it does well and where it falls short. With that said, I can say the changes UppaBaby made to the Minu V2 go a long way towards addressing the issues I had with the original. The UppaBaby Minu is the brand's lightweight, compact stroller. Its significantly smaller dimensions make it well-suited for traveling on a plane, but the Minu also works as an everyday stroller.
The Minu V2 builds on the original with small but meaningful improvements. The latch that keeps the stroller together when folded is now hinged and spring-loaded, making it easier to release and unfold. The canopy has been redesigned with a zip-out extension, replacing the previous pull-down shade that got loose and floppy over time. There's also an adjustable leg rest, a welcome addition for naps in the stroller.
These enhancements only make a great stroller even better. The Minu V2 still boasts exceptional maneuverability and a smooth, comfortable ride for a small stroller. Storage space is limited, but there's enough room in the cargo basket to stow a backpack-style diaper bag. Another reason you'll love it is it fits just about anywhere. There's no need to worry about clearance issues when you're rolling through a densely packed store -- and no matter what other junk you have in your trunk, odds are the Minu V2 will fit. Unfortunately, one feature that hasn't been updated is the two-pedal brake system. Normally, you step on the red pedal to set the brakes on both wheels and step on the green to release them, but in some cases, the pedals stick and fail to lock or unlock both wheels. This is an annoyance but won't affect functionality too much as you can still set the brake manually on each wheel.
Price: The Minu V2 is priced at around $450, which is high for a compact stroller. But its ease of use and overall build quality will ensure that you get plenty of mileage out of it.
Screenshot by Nasha Addarich Martínez/CNET
If you like the idea of the Veer Cruiser but can't bring yourself to spend that kind of money on a wagon, the Evenflo Pivot Xplore is a compelling alternative that's substantially easier on your wallet. Like the Veer, the Pivot Xplore is an all-terrain stroller wagon with a reversible handlebar that allows you to pull it like a wagon or push it like a stroller. It seats two kids facing each other and comes with a detachable snack tray that snaps in the middle. It also comes with two canopies and an external cargo basket, features that are available only as optional accessories on the Veer.
The Pivot Xplore's large wheels with foam-filled rubber tires perform well on uneven terrain, though not as big as the Veer's. In addition to being competent off-road, the Pivot Xplore rides smoothly on pavement and requires little effort to push or steer when in stroller mode. The seats are spacious, offering plenty of room for your kids to grow thanks to a deep, expandable footwell and wide seat cushions. Drop the wagon's front rim to get in or out, and your kids can come and go as they please. The three-point waist belt is easy to use and holds them securely in place if you need them to stay put.
Storage is another thing this stroller wagon does well. Each seat has an interior side pocket for storing snacks, sippy cups, toys or whatever your kids pick up on the trails. There are also two exterior pockets that are a good size for storing water bottles. The basket hangs off the back of the wagon and provides a decent amount of space for jackets or a small diaper bag. Do keep in mind that it can get in the way of your legs when pushing in stroller mode.
It's tough to avoid bulkiness with a wagon, especially an all-terrain wagon with large wheels. The Pivot Xplore weighs 34.7 pounds, but it doesn't feel that heavy loading it into your car when folded. The folding process is straightforward, but it does require some muscle to get the two ends of the stroller to scissor in half and click together in the middle.
Price: At just under $400, the Pivot Xplore offers a tremendous amount of value for the money. For nearly half the price of the Veer, you get almost as much utility.
Screenshot by Nasha Addarich Martínez/CNET
If you're a parent that's constantly on the go, you need a stroller that can keep up with your busy lifestyle. The Ergobaby Metro Plus is a compact stroller that offers a lot of convenience and takes up hardly any space at all when folded.
Thanks to its compact dimensions, the Metro Plus can fit just about anywhere, whether you're making your way through a crowded store or rolling down the narrow aisle of an airplane. It also folds up small enough that it's approved for stowage in the overhead bins of most airlines, which is great because a stroller comes in handy when boarding or deplaning with a toddler. At just under 17 pounds, the Metro Plus is exceptionally light. Moving it from one car to another is effortless, especially since you don't have to rearrange your trunk to get it to fit.
The Metro Plus is reasonably spacious for a compact stroller with a well-padded seat. The seatback reclines flat for nap time and has an adjustable leg rest. The canopy is mounted high on the stroller, limiting coverage, and there's no visor extension. Meanwhile, the cargo basket is decent for a small stroller and has a good clearance between the bottom crossbar and the basket. I also appreciate the adjustable handlebar, a feature I wish the Minu had. The Metro Plus rides well on smooth surfaces, but it can get bumpy going over chunky asphalt. The stroller is supposed to fold with only one hand, but I found the folding mechanics awkward and almost always had to use two hands to origami it into the correct position. It could just take some getting used to, however.
I wouldn't recommend the Metro Plus as your only stroller, but it works great as a lightweight second stroller that you can quickly grab and go.
Price: At right around $300, it's a fair bit cheaper than the Minu.
Other strollers we've tested
Screenshot by Nasha Addarich Martínez/CNET
Because the stroller market is so competitive, manufacturers need to keep innovating new features to make their products stand out. One such innovation is the self-folding mechanism, a design that allows a stroller to fold itself automatically without operator assistance. If you frequently have your hands full by the time you get to your car, this is huge, as you have one less thing to worry about when you're trying to get your baby back in the car. The Evenflo Gold Otto is a new addition to the niche self-folding stroller segment, and though it's not perfect, there's a lot to like about it.
For starters, it's true to its name. Just press the button on the handlebar and the Evenflo Otto automatically collapses down. To unfold it again, hit the same button and pull the handlebar up to watch the stroller snap into position. When folded, it's not quite as compact as the other travel strollers I tested, but it's still easy to squeeze into your trunk or the back seat. It could use some improvement in the ride and handling department. The Otto uses small foam wheels and doesn't have much in the way of suspension. As a result, the ride can be bumpy at times. The wheels on my tester squeaked more than I liked.
Price: The Otto only costs around $200. If you can live with the above issues, the Otto would make a great second stroller for running quick errands.
Screenshot by Nasha Addarich Martínez/CNET
The Chicco Cortina Together is a dedicated double stroller with seats arranged in tandem or in-line configuration. It has some handy features, but like other strollers in this category, it also has some major downsides. But first, let's go over what it does well. The Cortina Together can accommodate two larger toddlers thanks to spacious seats with high backs. Additionally, the stroller can accept two Chicco infant car seats (KeyFit 30/35 or Fit2) without adaptors. There's also a nifty parent tray with two built-in cup holders and a small storage compartment beneath the handlebar. The storage basket is large, though not as large as it appears since about one-third of it serves as the footwell for the rear seat.
Now on to the stroller's drawbacks. The Cortina Together is difficult to push and steer when loaded up with two kids. Its small plastic wheels don't roll well on anything but smooth surfaces, and the suspension doesn't do much to dampen the ride over rough pavement. When folded, the Cortina Together is long and unwieldy, and though it might fit in a large, mostly empty trunk, you'll need to clear a good amount of space for it in most cars. It's also fairly heavy at 36.6 pounds.
Price: At around $320, the Cortina Together isn't too expensive, but there are better double stroller solutions out there.
How we tested
I began researching the most popular strollers online, looking for models with stand-out individual reviews and high aggregate review scores. After acquiring a sampling of strollers from various categories and price ranges, I tested them over several months. On the many walks around the neighborhood, visits to the park, shopping trips and all-day excursions during that time, I evaluated each stroller based on the following criteria:
Convenience: How easy is it for the parent to use, break down and transport? Comfort: How do my children like riding in it? Do they get sweaty from the seat material? Are the straps comfortable to wear? Ride and handling: How smooth is the ride? How easy is it to push and steer? Value: Do you get your money's worth for the price you pay?
Stroller FAQs
What are the different types of strollers?
It seems like the stroller market invents new niche categories every year, but here are the basic types of strollers available:
Full-sized: This is the standard stroller size. Full-sized strollers typically feature more robust construction than compacts and have wider seats. Some full-sized strollers, like the Uppababy Vista, are convertible strollers, meaning they can accommodate a second seat if you want to convert it to a double.
Double: A double stroller has two seats arranged in either an in-line or side-by-side configuration.
Travel system: This type of stroller lets you swap the seat out for a compatible infant car seat or bassinet. Because it's modular, you can add pieces as you need them. Another handy travel system feature allows you to flip the seat around, so your baby's facing you.
Compact: Made for parents who are always on the go, compact strollers offer many of the same benefits as their full-sized counterparts but in a smaller package. They're sometimes called travel or lightweight strollers.
Umbrella: Even smaller and lighter than a compact, umbrella strollers are great for traveling as they're portable when folded. They also tend to be pretty basic, so don't expect to get many features. But because they're so simple, umbrella strollers are affordable choices.
Jogging: Parents who can't live without their morning run might consider a jogging stroller. These purpose-built buggies have large wheels and beefed-up suspensions to handle rough terrain. They usually also include air-filled tires and a hand-operated brake to help you slow down.
Stroller wagon: As the name implies, stroller wagons are one part wagon and one part stroller. They're great for when your kids are a little older as they offer more space. They also give you more cargo options than a typical stroller.
Car seat carriers: Like a travel system stroller, a car seat carrier will snap into an infant car seat. But that's all they're designed to do. They're sometimes called stroller frames, which is apt because that's exactly what they are. Since there's no seat or anything in the way of creature comforts, these tend to be relatively inexpensive.
Can you use a stroller for a newborn?
According to the American Academy of Pediatrics, a baby should be able to hold their head up between their first four and six months. Before that, they lack the muscle strength in their neck to keep their head upright. That means most stroller seats aren't suitable for newborn babies. One exception is if your stroller can recline completely flat. Some companies also make newborn inserts for their stroller seats, which give your baby a little more support in a seat that's frankly too big for them.
But even though you can put your baby in some stroller seats, it's probably best to keep them in a car seat or bassinet. Travel system strollers are great options, as they give you flexibility from birth to toddlerhood. If you don't have a true travel system stroller, you might still be able to get an adapter for it that will allow you to use your car seat.
Do you need more than one stroller?
No, you don't need more than one stroller. But having a second one significantly opens up your options for taking the baby out. That's because you can have two strollers that each specialize in doing one thing rather than having to choose one stroller that's a jack of all trades but master of none. For example, you could pick a full-sized stroller for long outings where you want storage space and ride comfort and pair it with a compact for running quick errands.
If you think you're a one-stroller family, make sure you get something versatile that can meet all your needs. Full-size travel system strollers work well in this role, and if it's going to be your only stroller, you can spend a little more money on one. You might consider upgrading to a premium brand like Uppababy or Nuna.
The information contained in this article is for educational and informational purposes only and is not intended as health or medical advice. Always consult a physician or other qualified health provider regarding any questions you may have about a medical condition or health objectives.
Gopro hd hero 2 camera gopro hero hd review gopro hd hero 2 gopro hd hero 2 software update gopro hd hero camera review gopro hd hero 2 camcorders gopro hero 3 review gopro hd hero 2 gopro hd camera
GoPro HD Hero2 review: GoPro HD Hero2
GoPro HD Hero2 review: GoPro HD Hero2
I've had a bit of a love-hate relationship with the GoPro HD Hero that we've used during the recording of the Car Tech Live podcast for the last year or so. On the one hand, the Hero takes phenomenal wide-angle video, is ridiculously durable thanks to its polycarbonate shell, and (when you get the settings right) relatively easy to use. However, that last bit is also my biggest point of contention with the first few generations of the GoPro Hero cameras; I'm a self-proclaimed techie who's recorded hours of footage using the HD Hero and I still have to break out the poorly written instruction sheet to change any of the settings. More often than not, I just leave the settings where I left them and just point and shoot.
So, when the new generation GoPro HD Hero2 landed on my desk boasting an improved interface, I decided to challenge myself to full-test the device without cracking the spine on its (also improved) 90-page user manual.
Old design with a twist Looking at the GoPro HD Hero2 side by side with the original HD Hero (hereafter referred to as the HD Hero1), reveals remarkably little change in the unit's form factor. Both units are dimensionally identical and feature the same lens, power button, shutter button, and LCD screen placement. This means that any waterproof cases or lens covers purchased for the HD Hero1 will still work with the HD Hero2, which is a good thing for GoPro devotees. Likewise, both units feature the same rear hook and connection port for GoPro's line of removable BacPacs, which we'll discuss later.
Closer inspection reveals that there's more than the addition of the number 2 to distinguish the new model from the old. For starters, the Hero2 features a new glass lens that should be sharper and more durable than the old lens. Where the Hero1 featured only one red recording indicator LED, the Hero2 features four (one enlarged indicator on the front of the unit and smaller lights on its top, back, and bottom edges). On the right edge (when viewed from the front) are the connections for the proprietary video output, the Mini-USB port for charging, and a 2.5mm microphone input. Thankfully, these three connections are actually labeled this go-round. On the left edge are the full-size SD card slot and a new HDMI video output. Onboard microphones are now located on the top and bottom edges of the unit. Finally, the rear panel is where you'll find the battery door that covers the user-replaceable 1,100mAh lithium ion battery.
I mentioned that the HD Hero2 ships with the same waterproof housing as the Hero1. For those unfamiliar with this housing, it's a clear, polycarbonate shell that holds the Hero camera to whatever mounting option you chose to use. Spring-loaded waterproof buttons give users access to the selection and shutter buttons and a clear lens bubble protects the HD Hero2's lens from scratches. In the event that this bubble is damaged, a replacement can be ordered and affixed with a small screwdriver. At the back of the shell is door that locks shut with a plastic latching clamp. (The plastic latch on our HD Hero1 busted after only a few weeks of use, so this bit worries me. Fortunately, it's a relatively simple fix.) Users are given the choice between two easily swappable doors that ship with the HD Hero2. The first is a sealed waterproof door that keeps the camera dry, even when submerged to a depth of 197 feet. The second door is a "skeleton door" with openings that sacrifice waterproofing f or increased sound quality.
The mounting options included in the box will depend on which HD Hero2 kit you pick up. The Motorsports Edition, for example, ships with a suction cup mount on an articulated arm and five adhesive mounts. The Surf Edition packs a pair of surfboard mounts and a special "Floaty" back door that will keep your camera from sinking to the bottom of the ocean in the event of a detachment. Finally, the Outdoor Edition includes a helmet strap, a head strap, and a selection of adhesive mounts. Additionally, additional mounts for handlebars, roll bars, chest straps, etc. are available from the manufacturer for additional cost.
Same screen, new interface Of all of the changes to the HD Hero, the most drastic is the overhauled interface present on the tiny monochromatic LCD. For starters the HD Hero2 uses larger, bolder icons for identifying the current recording mode. So tapping the selection button on the front of the unit fills the screen momentarily with a large icon for the newly selected mode that is easier to read with goggles on or at an arm's length. When the moment is passed, the screen returns to its default state with a smaller icon indicating the mode and a new text-based setting identifier. So rather than memorizing that "R7" is 1080p video at 30 fps, the unit simply displays "1080-30," which is much easier to decode. Likewise, photo modes are clearly identified with, for example, "5 MP 0.5 sec" which can easily be identified as "take a 5 megapixel shot every half second."
Likewise, the menu system has also been made clearer, with more easily identified icons for each setting that leads to a drop-down menu where the different options can be viewed clearly. Navigating the GoPro's many options with just the select and shutter buttons is still an exercise in patience. For example, setting the date to 11:11am on 11/11/11 can take as many as 60 or more button presses. (Fortunately, the date is something you should only really have to set once.) That's an extreme example, but even simpler tasks (such as changing the video or still-photo resolution) can take as many as 10 button presses.
On the bright side, the fact that the GoPro HD Hero2 even offers granular access to all of its settings right on the camera is an advantage that it holds over simpler camera systems, such as Contour's.
There are still a few icons that don't make much sense. (I doubt many can tell me what this icon means without first checking the manual.) However, the important bits--changing the resolution of photos and video, setting time-lapse intervals--and the options that you're likely to find yourself wanting to fiddle with before bombing down that double-black-diamond slope are extremely easy to understand.
I started the review with the intention of never cracking open the GoPro HD Hero2's instruction manual and I'm pleased to state that I didn't need to use it. (Although, I did flip through the manual and found that it is both more thoroughly written and better organized than the old sheet. So if you do find yourself needing help, it's a great resource.)
Recording modes So, we've discussed the chassis and we've explained that it's easy to use, but what sort of video and photos can you expect to get out of this camera?
Like the Hero1, the HD Hero2 features a wide range of video and photo modes to chose from. Where moving images are concerned, the HD Hero2's highest recording resolution is 1,920x1,080 pixels (1080p for short) Full HD video at 30 frames per second (fps) with a wide-screen 16:9 aspect ratio. Users can also select a 1,280x720-pixel (720p) wide-screen mode with options to capture at 30 or 60 fps. There's also 1,280x960-pixel Tall HD mode that records at a 4:3 aspect ratio with options to capture at either 30 or 48 fps. Finally, there are the 800×480-pixel (480p or WVGA) modes that capture relatively low-resolution video but at high 60 or 120 fps speeds, which can be slowed down using software to create slow-motion video.
Most video modes capture at the lens' full 170-degree wide-angle field of view (FOV), but users can choose to step down to medium 128-degree or narrow 90-degree FOVs. To my eye, 1080p video captured at these narrower FOVs appears to be grainier with visible pixelation, which leads me to believe that GoPro is using some sort of digital zoom technology to compensate for the lens' fixed focal length. This likely won't bother many, particularly at the medium FOV, but I couldn't unsee the image degradations once I'd noticed them and stuck with the full wide FOV for most videos captured after the official testing had concluded.
Still photos are captured at a maximum of 11MP with space-saving 8MP and 5 MP modes also available. Like the video mode, still photos take advantage of the full 170-degree FOV, but can be set to capture at a medium 128-degree FOV. (The narrow FOV is unavailable for still photos, presumably because the digital zoom artifacts would be too visible in a still shot, but that's just speculation.) Photos taken outdoors at the full resolution with full FOV are sharp and pleasing. The wide angle makes framing shots easy, but without the aid of the optional LCD BacPac, shot composition is a bit of a guess-and-check affair.
When shooting still photos, there are a few trigger modes to choose from. The first is a single shot. Press the button, capture a photo. It's the simplest of the available modes. Next is a self-time mode that captures a single shot after a 10-second delay. The next mode is one of my favorites: Time-lapse mode continuously captures a still photo at timed 60s, 30s, 10s, 5s, 2s, 1s, and 0.5s intervals. (Note: The fastest interval of 0.5s requires a high-speed Class 10 SD card to keep up.) Users can then stitch those photos together into a cool time-lapse video that compresses hours of actions into minutes of video.
Finally, the HD Hero2 gains a new trick made possible by its new faster digital image processor called Photo Burst Mode. In this mode, the camera can capture 10 full-resolution 11MP photos within the span of a single second. Personally, I found timing the Burst to be tricky, particularly because there's a few seconds of lag after a burst is captured while the HD Hero2 writes the contents of its buffer to the SD card. However, with practice this could be another cool tool in your GoPro toolbox.
In sum About the only think that I didn't like about the previous-generation GoPro HD Hero was that maddeningly difficult interface. And while in my opinion GoPro still hasn't perfected its menu structure and usability, it's gotten pretty damn close within its self-imposed constraints (two-button interface, maintaining compatibility with older hardware). GoPro also states that its low-light image quality has been improved between the two generations, which you can see yourself by comparing the indoor photos below. There's no question in my mind that this is the best GoPro camera yet.
But is it the best HD sports camera? To figure that out, we have to compare it to its most fierce competitors from Contour's lineup, particularly the ContourGPS. (Contour's top tier Contour+ is significantly more expensive, so we're leaving it out of the running for now, but many of the same points I'm about to make will still apply.)
Ease of use is a tie. Both camera systems excel here in different ways. The Contour camera's supersimple slide-and-record interface and laser-pointer aiming makes it easier for first-time users to pick up and shoot with. However, the GoPro HD Hero2 excels where on-device flexibility is concerned. If you're, for example, trackside with the Hero2 and you want to switch capture modes, every still and video setting is available right there on the device itself. The ContourGPS features two user presets that can be selected with the flip of a switch, but if neither of those is what you need at the moment, then you'll need to fire up the Contour smartphone app or bust out your laptop to pick a new preset. Additionally, the Contour cameras give no visual indication of what mode they're in, where the GoPro always displays its capture mode on a display. Trust me, there's nothing worse than getting back from a full day of recording with an SD card full of photos when you wanted videos. To the p oint, users who enjoy constantly fiddling with settings on the fly will prefer the GoPro, but if you're the kind of person who sets up the camera once and never changes modes, perhaps the Contour cameras are a better fit.
One place where Contour has the GoPro system beaten is where applications are concerned. Contour's included desktop editing and uploading software makes it easy to cut the good part out of a long video. Conversely, GoPro's experience is a B.Y.O.-software affair. Contour's top-tier models also capture GPS position, speed, and elevation data that can then be displayed alongside an uploaded video. GoPro does not, but if you don't mind spending a few extra bucks, the GoPro system can be upgraded with longer battery life, an LCD display, or the ability to capture 3D video thanks to its BacPac system.
The GoPro has the Contour cameras flatly beat on ruggedness. The Contour+ and ContourGPS require an additional purchase of a waterproof housing to match the GoPro in the wet. The entry-level ContourRoam is waterproof out of the box, but not nearly to the same depth as the GoPro. And if the HD Hero2 and the ContourGPS fell off of the same car at speed, the GoPro camera would definitely fare better. When you're talking about action cameras, durability is a top-tier attribute.
Deciding which camera system is best is truly a tough decision, and depending on your particular needs, you may disagree with me. At $299, the GoPro HD Hero2 is a slightly better buy than the ContourGPS, which is the same price--provided that the collection of GPS metadata isn't one of your top priorities. The learning curve is slightly steeper (and only just barely thanks to the upgraded interface), but once you're over it, the GoPro HD Hero2 is a much more flexible and durable device.
Great tech gifts under 100 top 20 tech gifts best cheap tech gifts gifts for tech people great gifts for techies best tech gifts for 2018 best tech gift ideas great gifts for tech guys 25 greatest tech inventions in the world 25 greatest songs of all time 25 greatest movies of all time
25 Great Tech Gifts for $100 or Less
25 Great Tech Gifts for $100 or Less
This story is part of Gift Guide, our year-round collection of the best gift ideas.
Whether you're celebrating a birthday, anniversary or a promotions, you could need a gift for a variety of occasions. If you're looking for a perfect present that'll cost less than $100, and branches out from the typical scarf, coffee mug or gift card, you'll find tons of ideas below. There are gifts under $100 for every type of personality, including picks for music lovers, tech-heads and even some items that can help soothe aching muscles.
Each product has been either comprehensively reviewed or personally tested to bring you the best tech gifts for $100 or less. And if you need more gift ideas before you check out the contents of your online cart, here are some more gifts for under $100 that we love, as well as great gift ideas for $50 or less if you're looking to spread some joy on a budget.
Chris Monroe/CNET
Amazon's Smart Thermostat sets a new standard for the category. It has a clean, modern touchscreen design, and it's easy to use, whether you're adjusting the temperature at the thermostat, through the Alexa app or with Alexa voice commands with a compatible Alexa-enabled speaker or display. It is an affordable gift that earned a CNET Editors' Choice Award for best value smart thermostat.
Read our Amazon Smart Thermostat review.
Earfun
The Earfun Air Pro 2 earbuds not only feature solid active noise cancellation but their sound is also impressive for their relatively modest price, with overall well-balanced sound, decent clarity and solid bass performance. Some of Earfun's buds have had a bit too much treble push -- sometimes referred to as "presence boost" -- but these mostly manage to avoid that. This affordable gift does sound better than the original Air Pro.
The earbuds have some extra features, like an ear-detection sensor (your music pauses when you take the buds out of your ears) and a case that has USB-C and wireless charging, that you don't often find at this price. Equipped with Bluetooth 5.2, they're splash-proof with an IPX5 rating and offer up to seven hours of battery life on a single charge at moderate volume levels, though you'll probably get closer to six hours with noise canceling on.
There's also a transparency mode that lets ambient sound in. It actually sounds pretty natural and is closer than I thought it would be to the AirPods Pro's excellent transparency mode. Alas, there's no companion app that allows you to tweak the sound or upgrade the firmware.
Earfun talks up the Air Pro 2's voice calling capabilities -- the buds have three microphones in each earbud -- and I thought call performance was good but these didn't reduce background noise as much the new Soundpeats T3, which are also good for the money ($36). However, while the Soundpeats T3 are better for calls, the Earfun Air Pro 2's noise-canceling and transparency modes are superior and the Soundpeats don't have the ear-detection sensor. Also, the Earfun Air Pro 2 buds sound better, with richer, more dynamic sound.
Lumos
If you're looking to maximize your giftee's visibility while riding a bike or scooter, the Lumos Ultra is a great gift idea. It makes sure they're noticed with both front and back LEDs that you can customize via an app -- the helmet is Bluetooth-enabled.
The helmet includes a small remote that allows you to activate a turn signal (on the back display), letting those behind you know what your next move is. It comes in a variety of colors and also is available in a step-up MIPS version that offers added protection.
This helmet is only available at full price right now, which is a little over $100, but it often goes on sale for $20 off or more.
David Carnoy/CNET
For its first three generations, JBL's Clip micro Bluetooth speaker had a circular design. But for the fourth-gen Clip 4, JBL has moved to a more oval shape, bulked up the speaker slightly and added USB-C charging. It does seem more durable, with a sturdier integrated carabiner "clip." Also, it sounds a little better, with more volume, clearer sound and more bass. With an IP67 water-resistance rating, it's not quite fully waterproof (the Clip 3 is), but it's now dust-proof.
One of the best wireless Bluetooth speakers for its tiny size, the Clip 4 used to cost a little less, but thanks to supply chain issues, this great gift is now down to $60. This JBL Clip 4 comes in five different colors and the older Clip 3 is frequently discounted.
Read our JBL Clip 4 review.
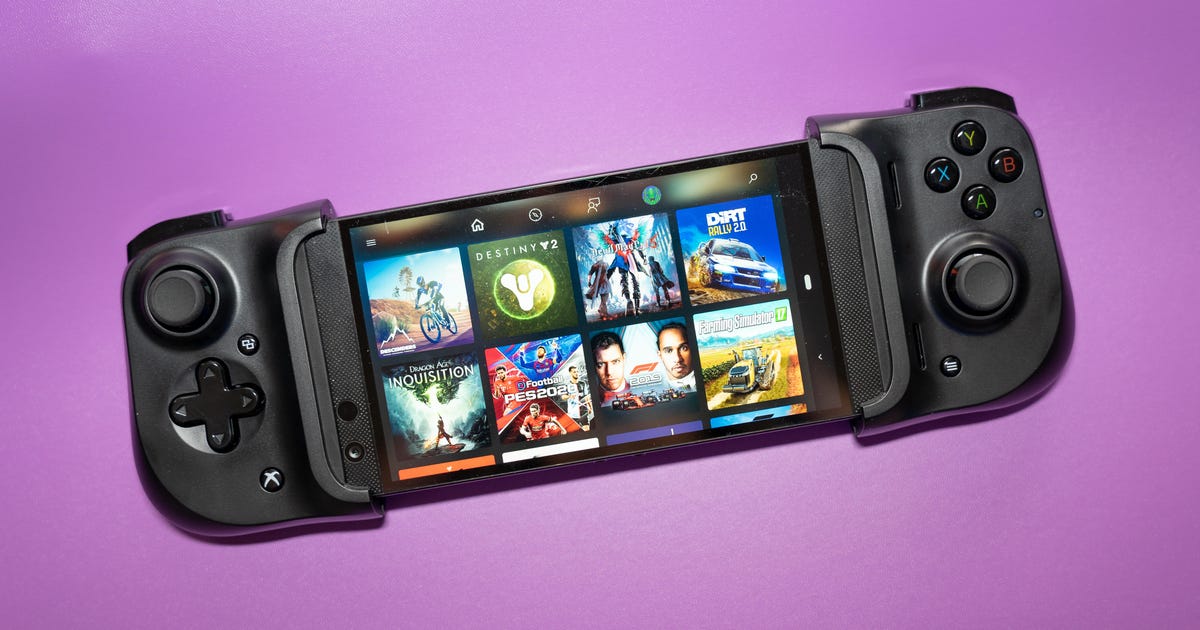
Razer
Buying for someone who's gaming on their phone? Whether they're iPhone users subscribed to Apple Arcade or Android owners using Xbox Cloud gaming or Google Stadia, the Razer Kishi is a great option. Similar to the $60 iPhone-compatible model (the iPhone version is MFi-certified and will work with the iPhone 6 Plus and any newer model), the Android version allows Android phone owners to play Xbox Cloud gaming with a Game Pass Ultimate subscription. It connects via USB-C and has pass-through charging but no built-in battery to supply extra juice. There's an Xbox-optimized one for Android owners, too, for a few bucks more.
The controller allows you to game in style with mobile games that have game-controller support (and benefit from it), and anybody who plays a lot of games on their phone would appreciate it as a great gift. Just make sure you're matching the right model to their phone. We do prefer the Backbone controller for iOS users (see below). Alas, no Android version of that controller exists yet.
Read our Razer Kishi review.
Lori Grunin/CNET
It's amazing how good this Lightning-connected controller from startup Backbone is compared to the alternatives. It turns any iPhone 6S or later into a Nintendo Switch-style gaming experience, with added smarts for social and chatty gamers. Like the Razer Kishi, it connects via Lightning with pass-through charging but has no built-in battery. The big advantage this beauty has over the Kishi is that it's just a more ergonomically sound controller and feels better in your hands.
David Carnoy/CNET
I like Hyperice's Hypersphere Mini ($99) massage ball, but Theragun's new Wave Solo massage ball is arguably a tad better and almost $20 cheaper at $80. It's also about the size of a softball (3.4 inches, or 8.7 cm, in diameter), charges with a USB-C cable (a full charge offers up to 200 minutes of battery life) and has three vibration speed options.
It's a great option for pinpointing problem areas as hip flexors that you might roll out with a lacrosse ball. There's also a Wave Duo version for $99 that's good for rolling on either side of the spine or placing at the top of your shoulder behind your neck while lying down.
Amazon
Whoever you're getting this for may be a little embarrassed but he'll most likely appreciate it. Panasonic says its new ER-GK80-S has a unique V-shaped head that's "built to go everywhere" -- and with precision. It comes with two attachments, has almost two hours of battery life and can be used wet or dry. A travel case is included. It's an excellent manscaping device.
David Carnoy/CNET
I never tried the original Fiil CC earbuds, but the next-generation CC2 improves on the performance of the originals, with better battery life (they're rated at five hours on a single charge) and no audio latency issues when watching videos.
These did stay in my ears better than the standard AirPods. They pair quickly -- they're equipped with Bluetooth 5.2 -- there's a Fiil companion app for tweaking settings and they sound quite decent for open-style buds, with just enough bass to keep you from feeling they're bass shy. They're also decent for making calls and have touch controls.
One of their distinguishing features is their open case, which makes it easy to access the buds and put them back in their case. Thanks to some integrated magnets, they stay in the case securely -- you can turn it upside down and the buds won't come out. Unlike the AirPods, these have square rather than rounded stems, which seems a little weird at first, and they do fit in your ears slightly differently to AirPods as a result.
Lenovo
We liked the original Google-Assistant Lenovo Smart Clock and this Version 2 model is also pretty nifty and includes a wireless charging pad. The touch screen is only 4 inches, so it's pretty small, but it's easy to set up and the inclusion of wireless charging is convenient. The feature set is somewhat limited compared to Google's Nest Hub (2nd gen) -- there's no YouTube streaming available -- but if you're looking for a smart alarm clock with weather forecasts built-in and decent enough sound for its small size, this is an attractive option. It's available in three colors.
Read our Lenovo Smart Clock 2 review.
For a lot of people, Apple's original HomePod was too pricey at $350. That speaker has been discontinued, but the HomePod Mini is still around. It's a very compact Wi-Fi speaker that costs a lot less ($99) and plays bigger than you'd expect for its small size. Yes, it's more appealing to those invested in Apple's ecosystem and comfortable with Apple's voice-assistant Siri, which drives the speaker, but the price is right and you can pair two HomePod Minis to create stereo sound or combine several to create a multiroom audio system (you can link them to the original HomePod, of course).
While music playback is tied into Apple Music, you can use AirPlay 2 to stream audio from other music services, including Spotify, from your iPhone and other Apple devices (read this for AirPlay requirements).
Read our Apple HomePod Mini review.
Jabra
The Jabra Elite 3 headphones are Jabra's most affordable true-wireless earbuds to date and have a fairly basic feature set, though they offer strong sound and call quality for the money. They have 6mm drivers, four-microphone call technology and Jabra's HearThrough transparency mode. Qualcomm aptX HD audio is supported for aptX-enabled devices.
Battery life is rated at up to seven hours on a single charge at moderate volume levels, with the case storing an extra three full charges (28 hours total). They have an IP55 water-resistance rating, which means they can take a sustained spray of water and are also dust-resistant. As with the other new buds, you can use either bud independently in a mono mode.
While they don't have such extras as active noise canceling, the Elite 3 earbuds offer solid performance and a comfortable fit for a reasonable price.
David Carnoy/CNET
The Luxe is SanDisk's latest iXpand Flash Drive that allows you to move photo and video files from a Lightning-enabled iOS device to a USB-C-enabled computer or Android phone. It also has an automatic back-feature for iOS devices (you'll need to download the iXpand Drive companion app).
The 128GB version I tried costs $60 (though it's on sale now for $48), while the 256GB version costs $75.
David Carnoy/CNET
Ember temperature-controlled smart mugs, which keep your hot beverage of choice hot while you sip it over a longer drinking session. While it won't keep coffee or tea warm for hours, the idea is that you can select your ideal temp via the companion Ember app for iOS or Android and keep your beverage at a high temp during the 30 minutes or so it takes to casually drink it.
I personally prefer the larger version, but it does cost more. A good insulated mug with a top on it will also keep your beverage hot (and they are cheaper), but this Ember mug allows you to drink a cup of Joe like you normally would and not sip it through a small hole in the top.
It's only available at full price at the moment, but it occasionally goes on sale for $100 or less.
Read our Ember Ceramic Mug preview.
David Carnoy/CNET
There's nothing like a little blending on the go for your loved ones' protein shakes. That's where the BlendJet 2 comes in. Equipped with a rechargeable battery, it's more powerful than you think and is able to whip up smoothies without having to plug in anywhere. It charges via USB-C (you get about 15 blends per charge) and is fully waterproof. Drink right from the blender!
David Carnoy/CNET
This insulated water bottle has built-in UV technology in the lid that, with a press of a button, kills off bacteria in three minutes and purifies your water. (There's an integrated rechargeable battery that uses a proprietary USB charger.)
The UV light breaks the DNA of the bacteria," Glo says, "eliminating the bacteria that cause bad smell and taste." So not only does the bottle clean water, but it cleans itself. The bottle also keeps your water cold or hot for up to 12 hours.
Biolite
BioLite has several portable lighting options and the Alpenglow 500 is one of its more recent additions to its line. It's a portable "lantern" that has multiple modes and color options. As its name implies, it delivers 500 lumens of light, and it is indeed pretty bright.
The step-down Alpenglow 250 offers 250 lumens for $15 less. Both are rated for 5 hours of battery life on the high setting and up to 200 hours on the low setting.
Tyler Lizenby/CNET
The 2021 version of Amazon's smallest smart display adds a higher resolution camera than its predecessor for a list price of $85. Right now, it's on sale for $55. If you're looking for a video-enabled Echo device for a nightstand or home office, this is the most affordable option. The new Echo Show 8 lists for $100 and sometimes goes on sale for less.
Sarah Tew/CNET
Logitech's MX Keys is one of our favorite everyday Bluetooth keyboards and now it comes in two smaller versions that leave off the number pad and some other keys: MX Keys Mini and MX Keys Mini for Mac. Both cost $100, the same price as the standard MX Keys. Colors include rose, pale gray and graphite.
While you're getting less keyboard for the same amount of money, the MX Keys Mini does have three new keys, giving you shortcuts to dictation (available in select countries for Windows and MacOS users), emojis and the all-important muting and unmuting of your microphone for video-conference calls. Also, Logitech says that its "minimalist form factor aligns your shoulders and allows you to place your mouse closer to your keyboard for less hand reaching, resulting in better posture and improved ergonomics." From my tests, I agree with that assessment.
The keyboard is similar in size to Logitech's popular and less expensive K380 keyboard ($30). But MX Keys Mini, equipped with Perfect Stroke, Logitech's "best nonmechanical typing technology," has a more premium look and feel. And, like the standard MX Keys, it has backlit keys that light up as your hands approach and automatically adjust to the lighting conditions, dimming or even turning off to conserve energy.
Note that the link below goes to the standard MX Keys Mini. The MX Keys Mini for Mac can be found here.
Read our Logitech MX Keys first take.
David Carnoy/CNET
A couple of years ago, Logitech unveiled the MX Master 3 ($100), the third generation of its premium home/office mouse. Then last year we got the $80 MX Anywhere 3, the third iteration of the company's premium "mobile" mouse, and it may just be my favorite Logitech mouse yet.
The MX Anywhere 3 comes in a couple of versions. There's the standard "universal" version that works with Windows, MacOS, iPadOS (13.4 or higher), ChromeOS and Linux computers via Bluetooth or Logitech's Unifying USB dongle, which is included. MX Anywhere 3 for Mac works only via Bluetooth and is optimized for Macs and iPads. Both mice are available in pale gray and the MX Anywhere 3 (with the dongle) is also offered in rose and graphite.
Read our Logitech MX Master 3 first take.
David Carnoy/CNET
Anker's Soundcore Wakey may be the best clock radio you can buy for the money. Not only does it sound better and play louder than your typical clock radio, but it has an integrated wireless charging dock for Qi-enabled smartphones, which includes all the iPhones and Samsung smartphones from the last few years. What's also appealing about this holiday gift idea is that there's a companion app (yes, it's also a Bluetooth speaker) that allows you to program in your preset FM radio station favorites and dim the LED clock to your liking.
The Wakey comes in white and black; sometimes the black model goes on sale.
Best ev charger for 2022 jeep best ev charger for nissan leaf best ev charger for chevy bolt best ev charger for tesla best ev charger for bolt best ev charger for mach e best ev charger consumer reports best ev charger for nissan leaf best ev charger for tesla model 3 best ev cars 2022 best ev vehicles
Best EV Charger for 2022
Best EV Charger for 2022
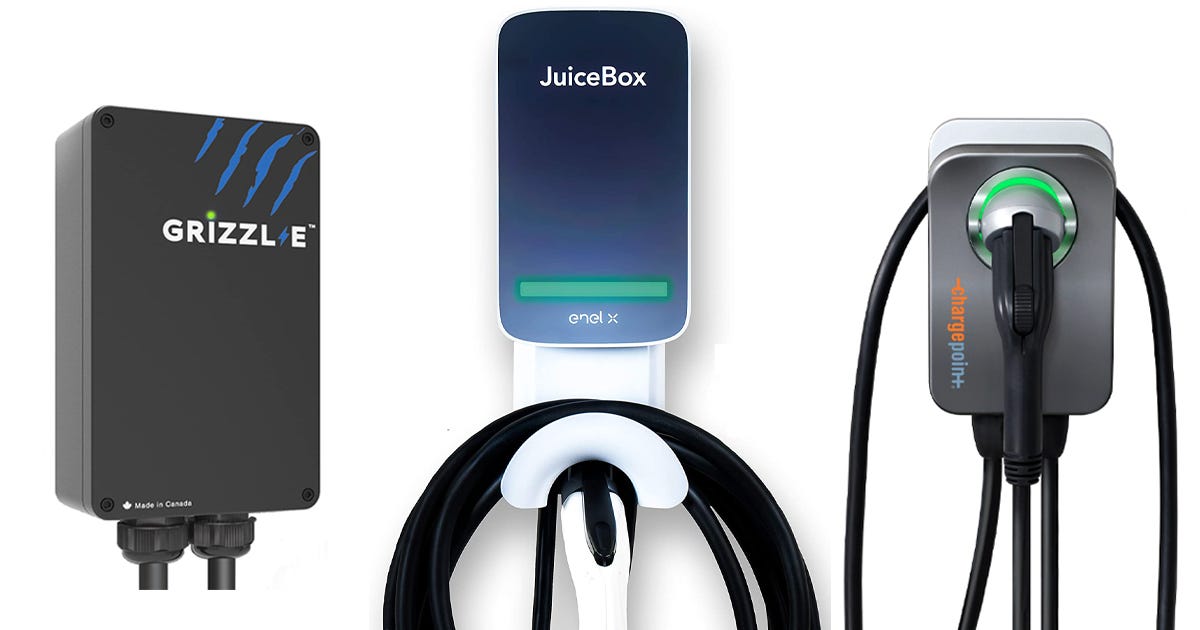
If you're taking the plunge and buying your first electric car, pickup or SUV, you'll also want to buy and install a Level 2 home charger.
There are things to think about when you pick a Level 2 EV charger, but the value in one is straightforward. For the vast majority of drivers, Level 2 will limit and probably eliminate reliance on a public charging station, and it will remove the anxiety that goes with finding an unoccupied public charger when you need it. Just about any Level 2 charger should fully charge your electric vehicle's battery overnight, even if the battery is nearly depleted.
A Level 2, 240-volt home charger will charge your electric car much much faster than the Level 1 charger that comes with the vehicle. There are more Level 2 chargers to choose from each month, and they might be less expensive than you'd guess. Set up and installation don't have to be complicated or expensive, either, depending on your circumstances. Many Level 2 EV chargers can be plugged into an outlet just like the Level 1, which comes with your car. Others can be hard-wired into household electrical if that's the better option for your purposes. Many have their own phone apps to manage charging and minimize cost.
This list aims to give you some foundation for choosing a home EV charger. I've studied a broad range of chargers across the price spectrum and based my recommendations on expert interviews, user feedback, personal experience and the work of testing labs such as Consumer Reports and Underwriters Laboratories. Browse the full list before you click through, then follow on for a primer on just about everything you need to know when choosing an electric vehicle charger.
Enel X
The JuiceBox 40 delivers everything you need and most of what you'll want in a Level 2 home charge station, at a reasonable price. It's UL listed, built to exceed NEMA 4 standards and great for outdoor use. It can be hardwired or plugged in. It will charge any electric car, pick-up or SUV available in North America, including Tesla with the brand's standard J1772 adaptor, and it comes with the industry standard three-year warranty. Perhaps most important, it hits the magic charge-rate threshold of 40 amps, which means it will replenish any substantially drained EV (current or forthcoming) in an 8- to 10-hour time frame for years to come.
Beyond its foundational features, the JuiceBox 40 is finished with some polished and useful details. It's easy to install, and it's 25-foot connector cable allows maximum flexibility in use. Even its plug-in cord is longer than most, and that adds flexibility when mounting the box in relation to the necessary 240-volt plug. JuiceBox 40 has a built-in cable rack and security lock and, according to experts, one of the best control apps going. It can be started with voice commands through Amazon Alexa or Google Home, and you can use the app to set reminders, program charge hours and monitor energy consumption (and cost) precisely.
ChargePoint
ChargePoint started in the EV business building public charge stations. The Home Flex represents its expansion into residential, Level 2 chargers.
Home Flex has nearly everything you'll find in our Best Overall JuiceBox 40, with even a bit more to like. Its box is compact and stylish, and its connector locks into its holster or a charge port with a smooth, authoritative click. The holster is ringed with a softly glowing halo of an LED. More significantly, Home Flex can raise the peak charging rate to 50 amps if it's hardwired. While that's almost overkill in a Level 2 charger, given that 40 amps should still charge any EV overnight for years to come, Home Flex will charge a few more current EVs (a couple Teslas and the Ford Mustang Mach E) at their fastest possible rate on residential Alternating Current.
Wired for 50 amps, Home Flex is likely to add some installation cost. Its connector cable is a couple feet shorter than JuiceBox 40's, and its box-to-outlet cord is shorter, too. Those things can matter, but they're not what relegate Home Flex to runner-up status, in our estimation. It's just simple, rational arithmetic. ChargePoint's Home Flex costs at least $100 more than JuiceBox 40, and that cash would make a significant contribution to whatever installation costs there might be.
United Chargers
The Grizzl-E Classic car charging station is designed and built in Canada, and that could be one of the reasons we like it. The Classic ships as a plug-in, to minimize potential installation costs, but it's also suitable for hardwiring. It's manually adjustable from 16 to 40 amps, and that can save on installation, too, in the short run (as in you might not need a higher-rated, more expensive circuit breaker until you have a car that needs the higher charge rate).
Throw in a 24-foot connector cord, and that's about it. There's no Bluetooth connection or phone app here. Yet calling the Grizzl-E Classic a no-frills, charge-your-EV-fast Level 2 undervalues one of its other strengths. This thing is built like a tank, and packaged in a dustproof, fire-resistant aluminum case that's built to NEMA 6 standards, which protect against full water immersion to one meter for 30 minutes. Most other home stations are "upgraded" at NEMA 4.
This is a great charger for folks who like it simple. The Classic is well built, well warrantied (three years) and often cited for good customer service. You'll look a long time trying to find another home station with 40 amps of charging and this kind of quality at this price.
United Chargers
The Grizzl-E Duo is a carbon copy of our Best Value Grizzl-E Classic. Or maybe that's a double copy, because the Duo adds a second 24-foot cable and connector to charge two cars simultaneously.
Beyond that, it's basically that same no-frills, rugged, high-output charge station, though there is another feature unique to the Duo. It adds an intelligent power-sharing circuit to maximize available current between the two charging cars according to each car's need, up to 40 amps total. That in turn maximizes charge speed for each vehicle, without risk of blowing a circuit.
Wallbox
The Pulsar Plus is an extra-compact Level 2 residential charge station. It's suitable for outdoor use, with 40 amps of charging power and most of the preferred features, including a 25-foot connector cable and a mobile app. And if the app loses its connection with the charger, or you don't feel like messing with it, you can just plug in your EV and charge.
Yet what separates Pulsar Plus from nearly all other home charge stations is its Power Sharing feature. This allows more than one unit to be connected to the same electrical circuit to safely charge multiple EVs at once without exceeding the circuit's capacity. Built-in smart power management automatically balances charging to ensure the most efficient energy distribution among the various chargers on the circuit, no need for extra hardware. Further, Wallbox says it's developing the capability to meter each Pulsar Plus charger separately and directly bill individuals. This might be your future if home is a multi-unit dwelling shared with other occupants.
ClipperCreek
ClipperCreek began building home and commercial chargers at its factory in Auburn, California, in 2009, and its HCS-40 Level 2 home station is one of the best-selling chargers to date. In 2022, the box that houses the hardware is larger than most competitors, and the HCS-40's charge rate maxes out at 32 amps. That will still charge most electric vehicles on the road today at their highest rate possible on household current, but it's about 20% less than experts recommend for the long view.
Beyond that, the HCS-40's features still hold up well. Its case is rated NEMA 4 for extreme weather, and its connector cord measures 25 feet. It comes with a remote connector holster that you can hang where you want it -- as in right next to your EV's charge port, wherever that may be. It has a keyed lock that can secure the connector in your charge port or the holster, and there's even an optional cord retractor. It's warranted for three years, and ClipperCreek's customer service is praised in EV circles.
Siemens
Siemens has been making industrial electrical equipment, automotive components and imaging devices for 170 years, and it was an early adaptor to home EV chargers, too. When it was introduced in 2016, the US2 VersiCharge was consistently rated one of the best Level 2 home charge stations available.
Today, the VersiCharge console or case is bigger than just about any out there, and its connector cord is hardly the longest (20 feet). With a peak charge rate of 30 amps, it will still max charge most EVs on the market, but it doesn't leave much growth for the future.
Still it's prized by many EV owners. That's partly for its charm and partly for its build quality. US2 VersiCharge meets NEMA 4 standards for rough weather, with a rugged metal case that looks like the adornment on a big Art Deco building. It even offers its own bespoke outdoor post. It has a couple of buttons that let you delay the start of charging when you plug it in up to 8 hours, and it's known for reliability. It's also warranted for three years, which remains the industry max.
Dcbel Energy
Designed and built by Montreal-based Dcbel Energy, the R16 is much more than a Level 2 home charge station. Think of it as the electrical command center for the home of the future, with its own operating system.
The R16 allows solar-collected Direct Current to charge your EV or home batteries, and DC is by far the fastest way to charge your car. It will turn solar DC into Alternating Current to power your home, and it can turn your EV into a household power bank in the event of utility failure. The R16 can integrate and replace up to five pieces of hardware early solar and low-carbon adopters now use in their homes.
It will work like a conventional Level 2 home charge station on AC, in case you're still in the process of building your solar array. It has two connector cables to charge two electric cars, pickups or SUVs at once. Foremost, the R16 represents the next big thing in EV charging. It's one of the first chargers to market that allows bi-directional charging, which can turn your electric vehicle--or at least some electric vehicles, like the new Ford F-150 Lightning -- into backup power for you home when it's sitting in the driveway. Depending on the size of your car's battery, that could power your home at full bore for at least a day or two, or on emergency rations for 10 days or more. For more on bi-directional charging, read on to EVSE 101.
MeGear
The MeGear Level 1+2 Charger looks a lot like the manufacturer-issued Level 1 charge cord that comes with the typical electric vehicle. It's 25 feet long and has an adapter that allows you to plug it into a typical, three-prong, 120-volt household outlet. If you do that, the MeGear Level 1+2 will charge your EV at essentially the same rate as the cable that came with the car. But if you happen to have access to a 240-volt outlet with a NEMA 6-20 plug (a lot of electric clothes dryers use these), MeGear Level 1+2 will raise your charge rate to 240-volt Level 2. A device like this one is the cheapest path to Level 2 charging.
Now, we've seen this charger marketed under a few different brand names. While the other chargers on our Best list all come with a three-year warranty, the MeGear Level 1+2 is warranted for only a year. It's also the only one that won't restart itself after a power interruption, even if that interruption is only momentary. You'll have to restart it yourself, so hopefully the interruption doesn't occur just after you turn in for the night.
Like we said: this is the cheapest path to Level 2 charging. Quite a bit cheaper, even, than buying a replacement Level 1 cord from your EV dealer. The MeGear Level 1+2 charges on 240 at the lowest Level 2 rate of 16 amps -- much lower than the optimal, future-protecting 40 or 50 amps. Yet at 16 amps, Level 2 should charge your EV about three times faster than the Level 1 cord that came with it. With this charger you can continue to save your pennies for a more powerful Level 2 home station. In the meantime, you'll be able to take advantage of Level 2 when you can and worry less about making it to work the next morning if you can't find a public charger on the way home.
Comparison of the best EV chargers for 2022
Charger
Level 1 or 2
Max charge rate
Connector cable length
Hardwired or plug-in
Phone app
Features
Best EV charger overall
Enel X JuiceBox 40 Smart Electric Vehicle Charging Station
2
40 amps
25 feet
Both
Yes
Everything you need for fast, easy home charging, and most of what you'll want. The right features at a good price.
Best EV charger overall runner-up
ChargePoint Home Flex Electric Vehicle Charger
2
50 amps (hardwired)
23 feet
Both
Yes
A bit slicker than best overall, and it can raise max charge rate to 50 amps (assuming your car could take that charge rate). But it also costs more, and fitted for 50 amps, could cost more to install.
Best EV charger value, especially if it's going outdoors
United Chargers Grizzl-E Classic EV Charging Station
2
40 amps
24 feet
Both
No
A simple, rugged home station that charges EVs fast. Comes with the highest weather protection standard.
Best EV charger for charging two cars
United Chargers Grizzl-E Duo Plug In EV Charger
2
40 amps
24 feet
Both
No
Two connectors, and internal controls that automatically balance power for maximum efficiency and charge speed.
Best EV charger if you need two or more ganged
Wallbox Pulsar Plus Electric Vehicle Smart Charger
2
40 amps
25 feet
Both
Yes
Safely allows multiple chargers on a single electrical circuit. According to the manufacturer, it'll soon add separate metering (and billing) for each one.
Best EV charger from the start of the new EV age
ClipperCreek HCS-40/HCS-40P Charging Station
2
32 amps
25 feet
Both
No
An all-time top seller, from an early adapter known for customer service.
Best EV charger from an old-school brand
Siemens US2 VersiCharge Universal EV Charger
2
30 amps
20 feet
Both
No
Built like a tank, looks like Art Deco, from one of the world's oldest electrical suppliers. Still charges most electric cars at the maximum possible rate on household current.
Best home EV charger if money is no object
Dcbel R16 Home Energy Station
2+
DC charging capable (with solar)
Up to 20 feet
Hardwired
Yes
More like a home electricity substation, managing solar, batteries, charging and household supply with its own OS. As a Level 2 EV charger, it's one of the first to enable bi-directional charging, which can turn your EV battery into a power bank for your home.
Best EV charger for cheapskates, bi-voltage edition
MeGear Level 1+2 Home Electric Vehicle Charging Station
1 or 2
16 amps at 240 volts
25 feet
Plug-in
No
About the least expensive path to Level 2 charging, and it will work as a Level 1 until you have access to 240-volt AC. Much slower than more powerful level 2s, but still about three times faster than the Level 1 that comes with your car.
Wallbox
EVSE 101
The thing you use to plug in an electric car, pickup or SUV is not, technically, a charger. The charging hardware and control system are actually inside the vehicle's powertrain. The plug-in thing is Electric Vehicle Supply Equipment, and it allows the transfer of energy between an electric utility and the EV. This equipment includes charge cords, charge stands (residential or public), attachment plugs, vehicle connectors and bits of electrical hardware that ensure safe operation for user and vehicle. But don't worry. You can call your EVSE a charger.
Every electric car should come with a charger -- invariably a heavy cord with a large, block-shaped device between the vehicle connector and the wall plug. If you bought your electric vehicle used and it didn't come with its charge cord, I hope you accounted for that in the transaction price.
These cords are called Level 1 chargers, and they plug into a standard 120-volt electric outlet on your house or in your garage. They're fine for plug-in hybrid vehicles, which typically have fairly small batteries and a gasoline engine to power the car, and a Level 1 cord will charge a full electric, no-engine car. It won't charge a pure EV anything close to quickly. If your daily electric-car rounds amount to 20 or 25 miles, you can probably live with Level 1. But if you happen to pull your electric car into the driveway with its battery nearly depleted, it can take literally days with a Level 1 charger to replenish to full capacity.
Dcbel Energy
I wouldn't recommend buying another Level 1 charger, unless you need to replace the one that came with your EV or want a second for an alternate location. No Level 1 charger -- from the vehicle manufacturer or an aftermarket supplier -- will charge your EV substantially faster than the cord that came with it. The money you'd spend on a Level 1 charger will get you a long way toward something called a Level 2 charge station, and you can still take the Level 1 cord that came with your car wherever you go. If you want maximum convenience and don't want to rely on public, high-speed charging stations, you probably want Level 2. If your daily rounds regularly use 100 miles of range or more, you absolutely want Level 2. I'll elaborate shortly.
First, I'll answer a question many EV shoppers are likely to have. Every electric car, truck and SUV sold in North America comes with the same connector in its charge port. Every car that's not a Tesla, that is. This standard connection is called SAE J1772, and it means that you don't need to worry about buying the wrong EVSE. Every charge cord and station, home or public, will plug into every electric car, truck or SUV on the road -- including Teslas. That's because every Tesla vehicle comes with an adaptor that allows a J1772 plug to fit in its proprietary charge port. And as Tesla ponders rolling out its private, national Supercharger charging network to non-Tesla owners, it's developed an adaptor that allows its proprietary connection to fit into the J1772 port on other manufacturers' electric vehicles.
Take it up a level
Level 2 EV chargers are a major upgrade from the Level 1 device that comes with an electric car. While it won't charge as quickly as a public DC charger, Level 2 is the best most of us will get for home charging -- or at least those of us who aren't certified millionaires or better. There are 480-volt fast chargers that can theoretically be installed for residential use, but they're expensive to begin with and have specific power requirements, including a dedicated power line. In short, the cost of a 480-volt charge station is prohibitive for the typical homeowner.
ChargePoint
How big is the Level 2 upgrade? A Level 1 charger delivers about 12 amps, give or take a couple, and adds three to five miles of range to a typical electric car in an hour. A Level 2 charger delivers a minimum 16 amps and as many as 80, with a rate of 12 to 60 miles of range per hour of charge, depending on the car and the specific charger. Bottom line, a Level 2 charger can charge an EV three to 10 times faster than a Level 1 charger can, and you can buy good, higher-amperage Level 2 charging stations for $500 all day.
Level 2 chargers require 240-volt electrical supply. If you're not up to speed on electrical current, you shouldn't let that requirement put you off. While there may be some preparation or installation costs, drawing 240 volts from typical residential electrical is not a major or particularly expensive proposition. Many homes already have 240. Yours may, too, if you have an electric water heater or clothes dryer, and if you do there's a good chance it's already in the garage, where you'll need it for a Level 2 charge station.
If you live near a major population center and don't drive a lot, you may not need a Level 2 EV charger. If you live in a rural area with less developed infrastructure, you probably do need one. Wherever you live, the more and further you drive your electric car, pickup or SUV, the more valuable a Level 2 charger will be. Level 2 can substantially reduce the small hassles and anxiety of owning an electric car. For upwards of 90% of the driving public, it can eliminate reliance on public charging stations, unless or until you take your electric car on a long-distance driving vacation.
ChargePoint/Dcbel/United Chargers/Wallbox
Getting ready
There are a handful of things to think about before installing a Level 2 charger, but the first comes down to where you live and who controls your electrical supply.
If you own a home, that's probably all you need to know. You're the boss, and you can proceed with a Level 2 charging station. If you own a condominium, you'll likely need permission from the owner's association. That could be as simple as filling out a form, or it could require jumping through a few more hoops, but you should start by reaching out to the association or property management company. If you rent a home or live in an apartment with reserved parking or a garage, hope is not lost. You'll still have to get the landlord's permission, then determine how much power is available in the parking area and how it's metered.
If you don't have 240-volt current, that's not a huge challenge. The first thing you need is an electrician to tell you whether your existing electrical panel has sufficient capacity for a 240-volt line. There's a reasonable chance it does, but if it doesn't, you'll have to upgrade. And even if you have existing 240-volt service, it's best to consult an electrician as you prepare for a Level 2 charging station.
Let's say, for example, that you already have an electric dryer, and it's in the garage not far from where you want your Level 2 charger. There's a good chance you can find a Level 2 charger that will plug into the same outlet as the dryer (most plug-in Level 2s offer one or two of three common 240 plugs -- NEMA 6-20, 6-50 or 14-50, with NEMA standing for the National Electrical Manufacturers Association). This path means you'll never be able to charge your car and run the dryer at the same time, however, so a good electrician seems like a good place to start. Different surveys by different organizations put the average cost of installing a Level 2 charge station between $650 and $800. That's on top of the charger, of course.
Wallbox
While you're waiting for the electrician, think about where you want the charge station to go. That's typically on a wall inside or outside the garage, or on a post near where you park. Outside is no problem, but you should know it's going outside before you pick your charger, and you should also know where the charge port is located on your electric car, truck or SUV. No two electric vehicle makes put their charge ports in exactly the same place, and the cords on Level 2 charge stations typically range from 12 to 25 feet.
Lastly, check what's available in your locale when it comes to rebates, tax credits and other incentives for installing an EV charge station. The IRS offers a tax credit equal to 30% of the cost, up to $1,000. Your state and local government may offer incentives as well, and don't forget to check your electrical utility.
Big things to think about
Home chargers for electric cars are proliferating, and there are more to choose from all the time. Nearly every vehicle manufacture offers its own, branded charge station through its sales points, typically with third-party installation. If convenience is more important than cash outlay, or if you're a committed brand geek, you can certainly go with the manufacturer's product. On the other hand, you'll do at least as well on quality and performance for less money if you choose your own Level 2 charger. Often substantially less money.
Question 2 when choosing a Level 2 home charger for your electric car, pickup or SUV: Do you want one that's hardwired or one that plugs into an outlet, like the Level 1 charger that comes with the car? Hardwiring means the station is semi-permanently connected to your home's electrical grid, and you won't be able to move it without opening a junction box and detaching the wiring. A plug-in station simply plugs into a 240-volt electrical outlet. Think of it like a permanently installed light fixture versus a plug-in lamp. Other things being equal, a plug-in charge station will work as well as one that's hardwired. The primary advantage of the plug-in is that you can more easily remove it and bring it with you -- if you relocate, for example.
Dcbel Energy
Other things are rarely equal, though, and there are a few more subtle things to consider when choosing between hardwired and plug-in. Most local electrical code will require a charge station installed outdoors to be hardwired. Plug-in charge stations are limited to 40-amp output, and while 40 amps of charging power is more than adequate for the foreseeable future (I'll get to that next), the ultimate future-proof charging station might have a higher charge rate. A plug-in charger won't eliminate additional installation cost, either, unless you happen to have an appropriate 240-volt plug in your garage, in close proximity to where you want the charge station. If that's the case, we'd definitely recommend a plug-in Level 2.
Most Level II chargers are packaged in a case designed to be mounted to a wall or post. Removal and relocation require that they be detached, which can be as simple as removing a couple of fasteners. Yet there are an increasing number of more portable Level 2 chargers, as well as bi-voltage chargers that work at Level 1 or Level 2 depending on the receptacle they're plugged into. These look similar to the Level 1 charger that comes with the car -- usually a long, heavy cord with a plastic brick somewhere between the outlet plug and the vehicle connector. Portables can be useful for travel or commuting because they'll work at Level 2 in the event you have access to a 240-volt plug at work or a vacation residence. The drawback is simple, however. Portable bi-voltage chargers often max out at 16 amps output, or occasionally 20 amps, and while that's better than anything Level 1 can deliver, it won't bring the potential charge speed of higher-amperage Level 2 home stations .
With Level 2 charge stations, output amperage is king. Sort of. Level 2 delivers at least 16 amps and as many as 80, and the chargers tend to get more expensive as output amperage increases. Accounting for one important limitation, the charger with the highest output amperage will charge your electric car fastest. Yet that limitation is big, and it's the reason you need to know the maximum charge rate your electric car, pickup or SUV will accept.
Siemens
You'll find your electric vehicle's maximum charge rate in its owner's manual, on the spec sheet or in the worst case from the manufacturer. It may be listed in kilowatts, or kW, and if that's the case you should Google a kilowatts-to-amperes conversion calculator and convert the kW at 240 volts. This isn't a safety issue: A charger with a higher charge rate won't somehow melt your electric car. But your car's maximum charge rate matters when you decide how much to spend on a Level 2 charger, and which one to choose. If its max charge rate is 16 amps, it's never going to charge faster than 16 amps on household current, no matter how many amps your Level 2 charger can deliver. Find one of those expensive 80-amp chargers, which will very likely require some serious infrastructure improvements to your household electrical, and your car is still not going to accept a charge rate greater than 16 amps.
Does that mean you should never buy a charger that delivers more amps than your electric car, pickup or SUV can accept? It definitely does not mean that, unless you consider the charger a short-term investment to ditch when you get your next car. A short history of the current crop of electric cars explains why choosing a Level 2 charger based strictly on your current car's max charge rate might not be the best idea.
When it was introduced in 2011, the Nissan Leaf could accept a maximum charge of about 14 amps on household current, adding five or six miles of range per hour of charging. With updates for model year 2016, the Leaf could charge at 28 amps. Around 2018, the Chevy Bolt, Jaguar I-Pace and Kia Niro EVs debuted with a max charge rate of about 30 amps, good for 23 to 24 miles of range per hour. Ford's recently introduced Mustang Mach E, and some Tesla models, can charge at 48 amps on AC, adding 35 miles of range per hour of charge. And charge rates for electric cars are likely to increase further over the next several years as new models roll out.
If the point isn't clear, we'll put it another way. Your first electric car may charge at a max of 16 amps, but it's very likely that your next one, brand new or used, will take a charge at a faster rate. Given the outlay for a Level 2 charge station, you probably want to protect your investment. You might save a few bucks now with a low power Level 2, but there's a good chance you're going to want a more powerful one when you get your next electric car.
Megear
If you're now wondering by exactly how much you should future-proof your Level 2 charge station, we have a simple rule of thumb. Experts generally agree that a home charger output of 40 amps -- or 50 amps at the extreme -- will be sufficient for the typical electric car owner for years to come.
"Forty amps seems to be the sweet spot," says Barry Woods, the director of vehicle innovation at ReVision Energy in Maine, and a board member for the trade group Plug In America. "A 40-amp charger is sized correctly for most residential locations, and 40 amps is going to be relevant for a while. That's based on driving habits more than technology. Given the batteries we have now, and what we anticipate, 40 amps should adequately meet the needs of the vast majority of users."
A 40-amp Level 2 charger should cover the daily range requirements of more than 95% of drivers in the United States, including those in rural areas, based on reams of data collected over decades. Your next electric car could charge at a rate faster than 40 amps, but 40 amps will still replenish its deeply depleted batteries in an 8-to-10-hour time frame. Ten hours at 40 amps will add roughly 300 miles of range, depending on the vehicle.
You could consider a 50-amp charger, to take advantage of the higher household charge rate in a few current electric vehicles, but the charger will cost more than a 40-amp max charger. The 50-amp demands heavier-gauge wiring, a higher-rated circuit breaker and a higher-capacity electric panel, so there's a good chance it will cost more to install, and its advantage for household use is minimal -- maybe just bragging rights. A Level 2 charger rated at more than 40 amps will have to be hardwired, so it eliminates the option of a plug-in charge station that you can take with you when you move.
ClipperCreek
In 2022, a 40-amp Level 2 charge station almost certainly delivers the best cost/benefit breakdown for your electric car, pickup or SUV, and it should deliver sufficient charge speed for years to come. And remember. Even if your current electric vehicle charges at a maximum rate less than 40 amps (most do), there's nothing to worry about. The electric car controls how much electricity its battery absorbs when it's charged, so you can't damage the vehicle with a charger capable of a higher rate.
More things to look for
If the charge amperage thing gets confusing, think of 40 amps as the target and work up or down from there, based on cost, features and preferences. The next thing to think about when choosing a Level 2 charger is the weather -- or specifically, whether your electric car, pickup or SUV is going to sit out in the weather. If you can't or won't park your electric car in a covered garage, the charge station probably needs to go outdoors, too. In that case, to be in code, it will need to be hardwired and not plugged in. It will also need to be rated for outdoor use.
Most Level 2 chargers, including those on our Best list, are rated at least NEMA 3, and NEMA 3 is acceptable for outdoor use. Some chargers are built to NEMA 4 standards, which add another layer of protection and shield the box against direct pressure from a garden hose. If there's lots of rain where you live, and it's often driven by stiff winds, NEMA 4 is a good choice. Whether your Level 2 charger is going in the garage or out, it's always smart to choose one listed by Underwriters Laboratories or Edison Testing Labs. The UL or ETL listing designates compliance with safety standards established by these nationally recognized testing labs.
Next are the physical features of the charger itself, starting with the connector cord. Level 2 charge cords typically range from 12 to 25 feet, and longer is almost always better. A 12-foot cord can cut it close in the best of circumstances, and might require that you park your car in the same direction or orientation every time you plug it in. The 25-foot one should allow you to park in at least two different spots if your garage has two bays or more. It should cover things if you the charge port on your next electric car is in an entirely different spot than your current car's.
ChargePoint
Many chargers come with a horn to hold the looped cable. Others expect you to wrap the cable around the box, or a long nail of your choosing, or to simply leave the cable coiled on the ground or floor. Pay attention to these details if you're not fond of clutter, trip hazards or excessive dust accumulation. Look for a charger that has a holster for its connector, or at least a cap to cover the connector when it's not in use. Finally, consider the dimensions of the charger box itself. A really wide one might not fit the space between two single garage doors. A thick one that sticks out relatively far might make it more difficult to squeeze between the car and a wall in a tight, single-car garage.
Some early electric car chargers would not restart themselves if the power temporarily failed and then came back. You had to unplug the connector, then plug it back in to restart. Most current Level 2 chargers, including those on our Best list, will restart automatically, but make sure that's the case when you choose. It's better than waking up to find your electric car is not sufficiently charged.
Beyond that automatic restart feature, some chargers have just a few LEDs to tell you what they're doing. Others have a few hard buttons to set features or manually delay starting the charge once the vehicle is plugged in. Still others come with a phone or tablet app that connects to the charger via Wi-Fi or Bluetooth and shares a range of data and control options.
With the apps, you can typically monitor your car's charge progress, keep statistics on energy use and know fairly precisely what it's costing to operate your electric vehicle. Some allow voice interface with the charger ("Alexa, charge my car!") and communication with local utilities, so you can participate in demand response programs and charge your car when the electricity is the cheapest or cleanest available. Some Level 2 charger apps let you load-share two chargers on the same circuit without tripping the breaker.
Enel X
These programs can definitely be useful, but if you're not fond of fiddling with phone apps, or you just want to plug in your car and charge it, there's no reason to pay up for charger with a control app. If you do want some of those app features, or you're basically a data geek, you still might not have to pay up for a charger with an app. Electric vehicle manufacturers have their own apps that communicate with their vehicles, and there's almost certainly one that goes with your electric car, pickup or SUV. Learn what the vehicle app can do before you buy the charger. There's no reason to pay extra for charger features that are redundant.
The next big thing
When Ford Motor Co. unveiled its 2022 F-150 Lightning in May 2021, one of the truck's second-level features grabbed almost as much attention as Ford's first electric, full-size pickup did on its own.
With the right Level 2 home charging station, the F-150 Lightning can essentially turn itself into a giant power bank on wheels. During a household power failure, the truck can automatically direct the electrical energy stored in its expansive battery pack back into the household wiring grid. If a Lightning with the upgrade, 155 kWh extended-range battery were fully charged when the power failed, based on the average household electrical consumption of about 30 kWh per day, this pickup should be able to power most households full speed for three or four days. With more carefully metered household usage, running essentials like the refrigerator and freezer, modest lighting and communication, the F-150 might provide power for 10 days or a bit longer.
Sounds like a nice capability to have, but if you want in with the Lightning and you're not already in line, don't hold your breath. Ford has promised the first Lightning deliveries by March 2022, with a base price starting just north of $40,000, but it also claims the first three years of Lightning production are sold out -- even with its decision to double its initial assembly capacity a few months after the Lightning was revealed.
Dcbel Energy
You don't have to wait for a Lightning, and you definitely don't have to use Ford's Level 2 home charger. The power-bank concept represented by Ford's electric pickup is sometimes called vehicle-to-grid or V2G -- or, more frequently, bi-directional charging. In its basic form, bi-directional charging uses a Level 2 home charge station as a two-way bridge between an electrical utility grid and an electric vehicle's battery. It's more than a potential source of back-up power because many experts see bi-directional charging as a means to even out electrical demand and make utilities more efficient as electric cars proliferate. The thinking is that cars can be charged during off-peak demand, as the world sleeps, and then supplement utility power when they sit during the day during high-demand, potential brown-out periods.
It's nascent technology, yes, but bi-directional charging can already be achieved. The Nissan Leaf is the only current EV that allows it, and its biggest battery has only about a third of the capacity of the F-150 Lightning's (several other current EVs do allow bi-directional flow from the vehicle, but only for appliances plugged into the vehicle itself, rather than the house grid). Going forward, many and maybe most new electric cars, pick-ups and SUVs will offer bi-directional charging. Hyundai, Kia, Lucid and Rivian all have promised the capability, though Tesla seems less likely to offer it, given its commitment to its Powerwall home battery. Further, bi-directional charging is not limited by the hardware in most current EVs. It's mostly a function of the binary bits in the control software, and some vehicle manufacturers are considering software updates to allow their existing vehicles to charge bi-directionally.
The first handful of bi-directional Level 2 home charge stations have hit the market, including our Best If Money Is No Object Dcbel R16. Yet the least expensive bi-directional we've found is about six times more expensive than our Best Overall Juicebox 40, and in the typical household it will require higher installation costs.
Wallbox
If you're committed, and you have the resources, you might want to think about bi-directional charging for your Level 2 home station. Or you might want to limit your investment now, with the most basic Level 2 charger you trust, and wait for bi-directional to play out.
"It's not exactly here yet, but bi-directional is coming soon," says Plug In America board member Barry Woods. "In most respects it's fairly simple technology, and the barrier is acceptance more than technical.
"It's one more consideration choosing a Level 2 charger. The first step has three filters. Do you want basic charging, smart (app-based) charging or bi-directional? Once that's clear, it's basic consumer requirements like reliability, warranty and customer service."
Written by J.P. Vettraino for Roadshow
EV charger FAQs
Is a Level 2 charger worth it?
The short answer: A Level 2 charger is always better at charging than a Level 1 charger, which typically comes with every electric vehicle. Whether a Level 2 is worth the additional cost depends on your living circumstances, your driving habits and your access to public charging stations. That cost runs from maybe $200 on the low end to $2,000 on the high end, installed, contingent on the charger and required electrical upgrades.
If your daily electric-car rounds amount to 20 or 30 miles, you can probably live with Level 1. But if you happen to pull your electric car into the driveway with its battery nearly depleted, it can take literally days with a Level 1 charger to replenish to full capacity. Or you can find an open public charging station in convenient proximity to your home.
If you want maximum convenience and don't want to have to rely on public, high-speed stations, you probably want Level 2. If your daily rounds regularly use 100 miles of range or more, you absolutely want Level 2. If you live in a rural area with less developed infrastructure, you probably need Level 2. Wherever you live, the further you drive your electric car, pickup or SUV, the more valuable a Level 2 charger will be. Level 2 can substantially reduce the small hassles and anxiety of owning an electric car. The right Level 2 home charger will charge any electric vehicle from nearly depleted to nearly full in the typical overnight time frame, or say 8 to 10 hours. For upwards of 95% of the driving public, Level 2 can eliminate reliance on public charging stations, unless or until you take your electric car on a long-distance driving vacation.
Are all EV home chargers the same?
Definitely not. There are Level 1 chargers (3 to 5 miles of range per hour of charging in the typical electric car) and Level 2 chargers (12 to 60 miles of range per hour, depending on the car and the specific charger). Level 2s can be portable, plug-in or hardwired, with different max charge rates and different operating features.
That said, you don't need to worry about buying the wrong charger, because certain hardpoints are the same. Any Level 1 or Level 2 charger will safely charge any electric car, truck and SUV sold in North America. You can't charge your vehicle too quickly, or over-charge it, because its own on-board electronics will protect it. Every electric vehicle comes with the same connector in its charge port -- or at least every electric vehicle that's not a Tesla. This standard connection is called SAE J1772, and every charge cord and station, home or public, will plug into every electric car -- including Tesla. That's because every Tesla vehicle comes with an adaptor that allows a J1772 plug to fit in its proprietary charge port.
Which is the best charger for electric cars?
The best EV charger for you depends on a host of circumstances: how and where you plan to use it, how soon or frequently you expect to move, whether you want to use an app to manage it and even the electric vehicle you plan to charge. Read the full report above for more thorough guidance
If you're looking for a fairly guideline on what to buy, this can help: Choose a plug-in Level 2 charger with a peak charge rate of 40 amps. In 2022, a 40-amp Level 2 charge station almost certainly delivers the best cost-benefit breakdown for your electric car, pickup or SUV, and it should deliver sufficient charge speed for years to come. A plug-in is easy to move. Even if your current electric vehicle charges at a maximum rate less than 40 amps (most do), there's nothing to worry about. The electric car controls how much electricity its battery absorbs when it's charged, so you can't damage the vehicle with a charger capable of a higher rate.
Can you buy a Level 3 charger for home?
Level 2 is the best most of us will get for home charging -- or at least those of us who aren't certified millionaires or better. There are 480-volt fast chargers that can theoretically be installed for residential use, but they're very expensive to begin with and have very specific power requirements, including a dedicated power line. In short, the cost of a 480-volt charge station is prohibitive for the typical homeowner, and rarely necessary to begin with.
Really high-voltage chargers will typically convert residential and commercial alternating current, or AC, to direct current, DC. Fast-charge public stations use DC, because DC is by far the fastest way to charge your electric car. If you happen to have reasonably expansive solar array, you can take advantage of DC at home without a full Level 3 charger. There are a couple of expensive home charge stations (and probably more coming) that can take the DC collected by solar panels and dump it straight into your electric car. When the sun shines full bore, they can charge faster than the typical Level 2. When there's cloud cover, or it's dark, these chargers will revert to operating on household AC and charge at Level 2.